
NHTSA ID Number: 10162118
Manufacturer Communication Number: PIP5112S
Summary
This Preliminary Information communication advises the technician that the drive motor battery and internal parts for the 2014-2015 Spark EV are being placed on restriction. Technician is to call General Motors Technical Assistance Center with scan tool data and information from the Rechargeable Energy Storage system label.
3 Affected Products
Vehicle
SEOCONTENT-START
Bulletin No.: PIP5112S
Published date: 06/10/2019
Preliminary Information
PIP5112S Spark EV (BEV) High Voltage Battery Exchange Process
Models
| Brand: |
Model: |
Model Years: |
VIN: | |||
| from | to | |||||
| Chevrolet | Spark EV | 2014 – 2016 | All | All | ENO | MME |
Supersession Statement
This PI was superseded to update ordering process. Please discard PIP5112R.
Condition / Concern
As part of our ongoing quality improvement process effective as of 08/06/2014, the Drive Motor Battery for the 2014 – 2016 Spark EV and several internal components are being placed on restriction through the General Motors Technical Assistance Center (TAC). The dealership must call TAC to establish a TAC case number and authorization to order the Rechargeable Energy Storage System (RESS). TAC or Engineering will then provide guidance if internal components should be replaced or if the RESS should be replaced. If it is to be replaced, TAC will advise dealer to call the Battery Service Center (BSC) to order the Drive Motor Battery.
NOTE: This Part Number should not be entered on the Warranty Claim. The Chevrolet Spark EV Drive Motor Battery may also be referred to as the Rechargeable Energy Storage System (RESS).
Please review all of the information provided below prior to contacting the General Motors Technical Assistance Center (TAC) @ 877-446-8227 (U.S.) or in Canada 1-800-263-7740 (English) or 1-800-263-7960 (French) to review case details.
IMPORTANT: Prior to calling TAC, please make sure to collect the required information and complete the diagnosis provided in the recommendations portion of this PI. Completing the diagnostics and obtaining all required information will minimize downtime, multiple calls to TAC, misdiagnosis, or unnecessary component replacement.
The following items should be reviewed and followed by the dealership technician.
- Do not remove the Drive Motor Battery assembly covers unless instructed to do so by TAC or
- A GDS2 Session Log with Freeze Frame Data, Vehicle Wide DTC Check with Module ID Information, any Battery Energy Control Module (BECM) or HPCM2 data menus, will normally be requested by TAC or
- Guidelines for honoring this exchange program are being strictly To obtain a replacement Drive Motor Battery, the servicing Spark EV technician must provide customer complaint and conditions as mentioned in this document.
- If the failure is due to one of the non-serviceable components, the battery will be
- Whenever performing battery repairs it is imperative that fasteners are torqued to specification and that S.I. procedures are followed.
- The dealership must also use banding straps to secure the battery to the container base when shipping the Drive Motor
NOTE: Please notify BSC if banding equipment is not available at your dealership when requesting a Drive Motor Battery. There is a limited number of Banding Kits available when the Drive Motor Battery order is being placed through the Battery Service Center (BSC). It may be necessary to obtain a Banding Kit through existing dealership resources.
DANGER: Always perform the High Voltage Disabling procedure prior to servicing any High Voltage component or connection. Personal Protection Equipment (PPE) and proper procedures must be followed. The High Voltage Disabling procedure will perform the following tasks:
- Identify how to disable high
- Identify how to test for the presence of high
- Identify condition under which high voltage is always present and personal protection equipment (PPE) and proper procedures must be
CAUTION: Before working on any high voltage system, be sure to wear the following Personal Protection Equipment:
- Safety glasses with appropriate side shields when within 50 feet of the vehicle, either indoors or
- Certified and up-to-date Class “0” Insulation gloves rated at 1000V with leather protective
- Visually and functionally inspect the gloves before
- Wear the Insulation gloves at all times when working with the Drive Motor Battery assembly, whether the system is energized or Failure to follow the procedures exactly as written may result in serious injury or death.
Recommendations / Instructions
IMPORTANT: Only have a certified Spark EV technician follow the diagnostic procedures below prior to contacting TAC. It will be necessary to connect GDS2 to record the Battery Capacity Code prior to disabling the 12V or High Voltage systems.
- Do not clear codes prior to capturing data. GDS2 Session Log Freeze Frame & Failure Records should be reviewed prior to clearing any DTCs or performing any Regardless if DTCs are current, history or G.S.I. repair procedure gives direction to remove any internal components or perform programming,
- It may be necessary to road test the vehicle through several drive cycles with GDS2 installed in an attempt to capture relevant data in the GDS2 Session Log while attempting to duplicate the
- The GDS2 Session Log should include a Vehicle Wide DTC Check with Module ID Information, any relevant failure records, module data from the Hybrid Powertrain Control Module 2 (HPCM 2), Battery Energy Control Module (BECM) while attempting to duplicate the customer’s concern in certain conditions or driving TAC or Engineering may request that you e-mail the GDS2 Session Logs to them for immediate review.
- This information, along with the Battery Identification Number (BIN) and the 4 digit battery capacity number, will be needed for the TAC Consultant prior to ordering the The battery pack 4 digit capacity code is located in the HPCM 2 under the voltage data list. You may need the latest version of GDS 2 to see this 4 digit code.
- If the battery is not out of the vehicle yet, you can find the BIN by installing the MDI and using Access the BECM Module Information and look under the identification information section and the sixteen digit number will be listed under the GDS2 parameter:
Hybrid/EV Battery Identification Number (BIN). You will need to record the BIN and supply it to TAC when ordering a battery. The battery also has a 16 digit Battery Identification Tag (B.I.N.) that is located on the right side of the battery. You can locate the tag and record the B.I.N. upon removal. As of date, the BIN is the number on the bottom label (See Photo Below).
- Call GM TAC to establish a TAC The latest version of PIP4902 can be used to email the GDS2 Session Log that may need further review by TAC or Engineering. If a component has been identified as one of the allowable internal battery repairs, instructions will be provided to the dealer. It is imperative that the technician has completed all available Spark EV training including hands-on training as well as have all the required dealer equipment, and all Personal Protection Equipment (PPE) is up to date.
- After the data is reviewed, TAC will use a case reference number and order an exchange Drive Motor Battery through the Battery Service Center (BSC) in order to have it shipped to your
Dealers are now asked to order packs and sections directly from the GM Battery Service Center by calling 1- 833-33 GM BSC (1-833-334-6272).
This is the information that the dealer will need to Provide Speirs when calling to order a Battery.
Dealer Name:
Dealer Code:
Shipping Address:
Contact At Dealership (include phone#):
Dealerships Preferred Dealer Delivery Time/Date for Dealer Forklift Operator (Must be within 24 hours of the order time) Hours of operation:
RO #:
Part #: Battery Type: VIN #
TAC Case # BIN
Customer Complaint:
Odometer Reading:
Standard of Service is 2 Day Freight– Is customer requesting next day delivery?:
Banding Kit Needed? No Yes
- After verifying that the high voltage systems are disabled, remove battery assembly per SI
IMPORTANT: The Battery pack has two ground straps that are attached to the battery. ONLY remove the ground straps that are attached to the battery. The new battery will NOT come with the 2 ground straps already attached. IMPORTANT: The exchange unit will be shipped without coolant. As part of the battery removal process, all coolant should be drained from the drive motor battery.
Follow G.S.I. procedure for proper coolant type, fill and coolant bleed procedures. After the Battery has been removed from the vehicle (see G.S.I. procedure), and before placement into the shipping container, prepare the battery for return by performing the following:
- Install Coolant plugs (2) in coolant Coolant plugs can be removed from the new service battery assembly and installed in the returned battery. Additional coolant plugs (GM P/N 22770854) can be ordered if they are needed.
- Install the Manual Service Disconnect (MSD) Cover. The MSD cover can be removed from the new service battery assembly and installed in the returned Additional MSD covers (GM P/N 22989605) can be ordered if they are needed. The MSD lever should remain with the vehicle and not be returned with the battery assembly.
- Install the High and Low Voltage Connector The covers can be removed from the service battery and installed on the returned battery. In order to properly prepare the used battery for shipping and to insure safe shipment, all of the above steps must be followed.
CAUTION: With the Drive Motor Battery on the EN 48244 Support Table, slowly raise the support table to the vehicle. Use a punch or alignment tool to get the Drive Motor Battery into position. Avoid making contact with the front of the drive motor battery with the body so damage does not occur to the studs that are used to attach the aero panels upon final installation.
DANGER: The High Voltage Drive Motor Battery must be protected when outside of the vehicle. This is why the battery must be immediately placed in the original shipping container.
- Follow current SI Procedure to complete installation of the Drive Motor
IMPORTANT: Programming steps: (Please carefully review steps 1-5).
- Perform K16 Drive Motor Generator Battery Energy Control Module (BECM) programming when replacing the Drive Motor This will also program the Module Balance Boards (MBBs) and Current Sense Module (CSM) which may take approximately four minutes.
- Turn the ignition off, disconnect all devices, close the door and allow the vehicle to enter a sleep cycle (fully power down) for at least two
- After SPS programming the BECM, follow current SI Using GDS2, select Control Functions, perform the Hybrid / EV Pack Capacity Reset and then Battery Capacity Relearn in Hybrid Powertrain Control Module 2.
- When SI procedures are complete, you will have to drive the vehicle in Sport Mode with the vehicle in Low Gear for approximately 5 miles (8 km). This will pack the most energy in the battery during charging and regeneration and exercises the coolant valves and pumps. When performing the 5 mile (8 km) drive cycle, drive vehicle in slalom (side to side motion) to purge any air from the battery pack cooling After the drive cycle, check for codes and top off the coolant system.
IMPORTANT: Low coolant or the incorrect coolant could result in internal battery or coolant heater damage
- Follow current SI Procedure to complete installation of the Drive Motor Battery and fully charge Drive Motor Battery before delivering the vehicle to the
DANGER: The High Voltage Drive Motor Battery must be protected when outside of the vehicle. This is why the battery must be immediately placed in the original shipping container.
STORAGE GUIDELINES:
- Store the Drive Motor Battery
- Store the Drive Motor Battery in an environmentally protected
- Maintain the Drive Motor Battery at room
- Protect the Drive Motor Battery from exposure to
- Protect the Drive Motor Battery from physical
- Store the Drive Motor Battery in a limited-access
DANGER: Failure to follow these guidelines may result in serious injury or death.
PARTS RETENTION AND RETURNS – UNITED STATES DEALERS
Parts Return Request (WPC) – A Special Parts Return Request will be faxed to you with proper shipping instructions. Do NOT wait for the warranty claim to be paid before returning the failed used battery. Please follow WPC guidelines below:
- Do NOT send a battery back without a Special Parts Return
- Do NOT send the battery back to the Battery Service Center (BSC).
- Do NOT send battery back to the
- Do NOT return battery in any other container than the container (crate) that the new battery was delivered The removed unit must be returned complete in the original exchange shipping container.
- The Special Parts Request will provide a request This request number must be placed in the outside shipping envelope along with the TAC Case number. Dealers need to place a new envelope inside the battery crate with completed Spark EV Battery Exchange information including the TAC Case number along with a copy of the Job Card (RO), including the technician’s comments, DTCs, and diagnostics. It is recommended that this be taped to the battery inside the container. Failure to place this information both outside and inside the battery shipping container may delay the processing of your return. Do not ship a battery back without an offcial WPC Request.
IMPORTANT: Failure to return the battery by the due date will result in the dealership being debited the entire warranty claim (parts and labor).
IMPORTANT: If you do not receive the WPC Special Part Request, call 248-371-9939 to obtain the proper paper work in order to return the failed Drive Motor Battery.
SHIPPING PREPARATION:
- Disable the high voltage at the drive motor generator Refer to High Voltage Disabling.
- Remove the Drive Motor Battery from the vehicle as outlined in Drive Motor Generator Battery Replacement in SI.
- Tighten any fasteners that were loosened or removed to the original torque specification during Drive Motor Battery
- Remove any plastic shipping plugs or covers from the new unit and install them on the Drive Motor Battery to be
- Write the TAC case reference number on the drive motor battery assembly in a visible
- Write the TAC case reference number on the repair
- Inspect Shipping Crate for any damage prior to inserting the Drive Motor Battery, if any damage is found contact TAC
- Place the Drive Motor Battery into the shipping container and attach the completed return shipping tag to the Drive Motor
- Take a digital picture of the shipping container depicting condition of container as the shipping company picks it up and retain it for the shop
- It is important to package the Drive Motor Battery upon return exactly as the new Drive Motor Battery was received. Zinc-Plated Steel Lag Screws for Wood, 5/16″ Diameter, 2-1/2″ Length are used to secure the battery pack to the crate The dealership must also use banding straps to secure the battery to the container base. The container top or “bonnet” must also be banded to the container base as pictured below.
IMPORTANT: During your call to TAC, inform them if banding equipment is not available at the dealership. Banding Kits may obtained if requested when placing the battery order through TAC.
- Banding Straps
- Access Door
- Banding Straps
- Access Door
- Banding Straps
SHIPPING INSTRUCTIONS:
- Place a copy of the Special Parts Return Request, repair order with technician comments, along with the completed “Spark EV Battery Product Feedback Form” (available in Global Connect) and place into the plastic envelope. The bill of lading and customs papers (for cross border shipments) should also be inserted into the plastic Remove the original shipping label and attach the plastic envelope with the return shipping label on it to the container.
- Label the outside of the shipping container with the Part Return request number and the TAC case reference number. Refer to Corporate Bulletin Number 99-00-89-019 for detailed shipping
- Follow the shipping instructions received in the Special Parts
- Have the driver sign the bill of Retain a copy of the signed bill of lading and attach your copy to the original repair order. This will be your proof of returning the Drive Motor Battery.
- Ship the Spark EV battery with appropriate paperwork to:
Battery Refurbishment
Dock 16
Brownstown Battery Assembly Plant
20001 Brownstown Center Drive
Brownstown, MI 48134
Attention: Brett Powell
+1 248 866 9010
PARTS INFORMATION:
No Part Number should be entered for exchange components. Applicable miscellaneous items such as coolant should be added to the part allowance amount and claimed in the Parts Cost column and not included in the Net Amount (DMN) column of the warranty claim.
CANADIAN SERVICE AGENTS ONLY:
All Spark EV batteries must be returned with completed documentation including battery return worksheets with TAC Case Number and VIN.
NOTE: Failure to return the battery will result in the dealership being debited the entire warranty claim (parts and labor.) For dealers in Canada, the return of failed batteries will be handled as outlined in Parts Bulletin GMP2013- 081.
SHIPPING PREPARATION:
- Disable the high voltage at the drive motor generator Refer to High Voltage Disabling.
- Remove the Drive Motor Battery from the vehicle as outlined in Drive Motor Generator Battery Replacement in G.S.I.
- Tighten any fasteners that were loosened or removed during Drive Motor Battery removal to the original torque
- Remove any plastic shipping plugs or covers from the new unit and install them on the Drive Motor Battery to be
- Write the TAC case reference number on the drive motor battery assembly in a visible
- Write the TAC case reference number on the repair
- Inspect Shipping Crate for any damage prior to inserting the Drive Motor Battery, if any damage is found contact TAC
- Place the Drive Motor Battery on the cradle into the shipping
- Place the completed “Spark EV Battery Product Feedback Form” (available in Global Connect) inside the crate with the failed Dealers need to place a new envelope inside the battery crate with completed Spark EV Battery Exchange information including the TAC Case #, along with a copy of the Job Card (RO) including the technician’s comments, DTCs, and diagnostics. It is recommended that this be taped to the battery inside the crate.
- It is important to package the Drive Motor Battery upon return exactly as the new Drive Motor Battery was received. Zinc-Plated Steel Lag Screws for Wood, 5/16″ Diameter, 2-1/2″ Length are used to secure the battery pack to the crate The dealership must also use banding straps to secure the battery to the container base. The container top or “bonnet” must also be banded to the container base as pictured below. Notify Technical Assistance if banding equipment is not available at the dealership.
- Take a digital picture of the shipping container depicting condition of container as the shipping company picks it up and retain it for the shop
CANADIAN SHIPPING INSTRUCTIONS:
Canadian Dealers should follow the steps below to return a failed battery:
- Contact Rob Carlyle – CCA (905-644-5385 ) or Kris Muller – CCA (905-644-5159) to arrange battery/section pick-up.
- Complete the required return hazardous goods shipping paperwork (302C form) 3.The DDS assigned carrier will pick up this
- Canadian Dealers DO NOT return batteries to the Battery Service Center (BSC) or to the WPC.
Please Refer to as needed
- NA-142 Retrofit of 2015 Vehicles to Model Year 2016 High Voltage Battery Pack
- NA-003 Information on Retrofitting 2014 Vehicles to Model Year 2016 High Voltage Battery Pack
Parts Information
| COMPONENT CODE | MODEL YEAR | PART NAME | PART NUMBER | QTY |
| A4 | 2014 | HV Drive Motor Battery (use 17-NA-003 for all parts needed to install) | 24287480 | 1 |
| A4 | 2015 | HV Drive Motor Battery | 24287479 | 1 |
| A4 | 2016 | HV Drive Motor Battery (Can Back service 2014 and 2015) | 24287480 | 1 |
Warranty Information
For vehicles repaired under the EV coverage, use the following labor operation. Reference the Applicable Warranties section of Investigate Vehicle History (IVH) for coverage information.
| Labor Operation | Description | Labor Time | Net Admin Allowance |
| 5031030 | Drive Motor Battery Replacement | Use Published Labor Operation Time | $400.00 |
| Add | Administrative Allowance | N/A | $20 |
Please follow this diagnostic or repair process thoroughly and complete each step. If the condition exhibited is resolved without completing every step, the remaining steps do not need to be performed.
SEOCONTENT-END
Bulletin No.: PIP5112S
Published date: 06/10/2019
To View or Download this Document Click Here
SEOCONTENT-END
Bulletin No.: PIP5112R
Published date: 09/19/2018
To View or Download this Document Click Here
SEOCONTENT-END
Bulletin No.: PIP5112Q
Published date: 05/8/2018
To View or Download this Document Click Here
SEOCONTENT-END
Bulletin No.: PIP5112P
Published date: 04/9/2018
To View or Download this Document Click Here
SEOCONTENT-END
Bulletin No.: PIP5112N
Published date: 09/25/2017
To View or Download this Document Click Here
SEOCONTENT-END
Bulletin No.: PIP5112M
Published date: 02/20/2017
To View or Download this Document Click Here
SEOCONTENT-END
Bulletin No.: PIP5112L
Date: Oct-2016
To View or Download this Document Click Here
SEOCONTENT-END
Bulletin No.: PIP5112K
Date: Aug-2016
To View or Download this Document Click Here
SEOCONTENT-END
Bulletin No.: PIP5112G
Date: Feb-2016
To View or Download this Document Click Here
SEOCONTENT-END
Bulletin No.: PIP5112F
Date: Dec-2015
To View or Download this Document Click Here
SEOCONTENT-END
Bulletin No.: PIP5112E
Date: Jun-2015
To View or Download this Document Click Here
SEOCONTENT-END
Bulletin No.: PIP5112D
Date: May-2015
To View or Download this Document Click Here
SEOCONTENT-END
Bulletin No.: PIP5112C
Date: Apr-2015
To View or Download this Document Click Here
SEOCONTENT-END
Bulletin No.: PIP5112C
Date: May, 2015
To View or Download this Document Click Here
SEOCONTENT-END
Bulletin No.: PIP5112B
Date: Aug-2014
To View or Download this Document Click Here
SEOCONTENT-END
Bulletin No.: PIP5112A
Date: Jun-2014
To View or Download this Document Click Here
SEOCONTENT-END
Bulletin No.: PIP5112
Date: Jun-2013
To View or Download this Document Click Here
SEOCONTENT-END
Bulletin No.: PIP5112
Date: June, 2013
To View or Download this Document Click Here
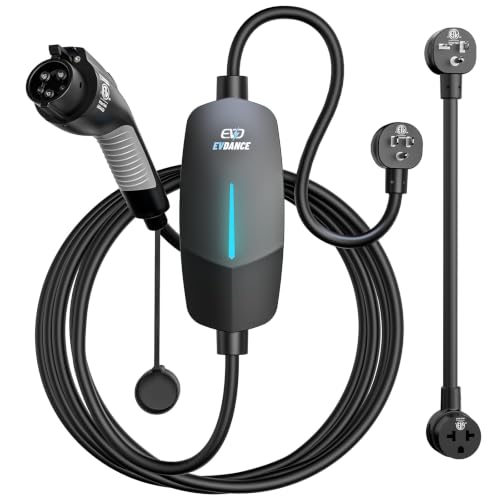
- Flex Level 1 EV Charger - The EVDANCE Level 1 electric car charger is compatible with J1772 electric vehicles and plug-in hybrid vehicles (North American Standard). *Tesla requires a SAE J1772 adapter.
- Convenient to Use - This charger has both NEMA 6-20 plug for 16A 240V charging (3.68kW, 10-12 mi/h) and a NEMA 6-20 to 5-15 plug adapter for 12A 120V charging (1.44kW, 2-5 mi/h). The included bag makes it easier to carry on the go. It also has a 25ft cable length, you can use it flexibly from anywhere in the garage or driveway.
- Check Your Outlet Type -This charger works with standard 120V NEMA 5-15/5-20 outlets (2-5 mph charging speed) and 240V NEMA 6-20 outlets (10-12 mph) . It's not compatible with NEMA 6-15/10-30/14-30/14-50/6-50 outlets – you'll need a NEMA 14-50/14-30/10-30/6-50 to 6-20 adapter (sold separately) to connect.
- Compatible EV Models -This EV charger works with most major electric vehicles, including Ford, Chevrolet, Hyundai, Audi, Nissan Ariya, Rivian R1S, Kia, and others. However, it's not compatible with Mini Cooper Electric Hardtop,Toyota Prus Prime/Z4X/RAV4Prime, Porsche Taycan Base/4S/Turbo/Turbo S or Tesla models (Tesla requires a J1772 to Tesla Adapter, sold separately). For a full list of compatible models, check out the Full Compatibility List on our product page.
- Indication Displays - LED display that can tell you the status as well as indicate errors while charging your electric vehicle.

- WORKS WITH EVERY NON-TESLA EV: Standard J1772 connector plugs straight into Ford, Chevrolet, Hyundai, Kia, Nissan, BMW, Volkswagen, Audi, Rivian, Lucid and every other EV or plug-in hybrid sold with a J1772 port - no adapter needed. Tesla drivers can charge too, using the J1772 adapter that comes with the car.
- PLUG IN, NO HARDWIRING: Level 2 charger delivers up to 40A to fully charge most EVs overnight. Plugs into a 240V, 4-prong NEMA 14-50 outlet (the RV/range type - NOT a dryer outlet) on a dedicated 50A circuit. The extra-long 25 ft cable easily reaches across a garage or driveway. Before ordering, check your car's port type and that you have the right outlet.
- CONTROL & SAVE FROM YOUR PHONE: A stronger built-in antenna keeps the charger online even in a garage or basement. Use the free app to start/stop charging, set speed (6-40A), get reminders, and track energy use and cost. Schedule off-peak overnight charging to cut your electric bill. Requires 2.4 GHz WiFi.
- SAFETY-CERTIFIED & WEATHERPROOF: Independently tested and certified (UL, ETL, FCC, Energy Star). A fully sealed IP66 / NEMA 4 housing stands up to rain, snow, heat and dust indoors or out, and internal steel shielding protects the electronics for years of reliable use.
- GLOW-IN-THE-DARK HOLSTER: The included high-visibility holster glows in the dark so you can find and dock the plug easily at night. Holds the connector securely when not in use.

- Charge with Confidence: ChargePoint builds reliable, flexible EV charging stations for home, business, and fleets. Get 24/7 support and access to hundreds of thousands of North American charging locations.
- Charge Smart: With the user-friendly ChargePoint Mobile App, you can control your electric car charger, manage reminders, connect to smart home devices, find stations, get data and charging info, and access the latest features. Note: WiFi is needed for certain functionalities and troubleshooting steps if connectivity issues arise.
- Vast Network: Wherever you go, ChargePoint’s network includes 274k+ stations across North America and Europe and 565k+ roaming partner stations.
- Safe & Durable: Rely on this UL-certified EV charger for safe home charging. It can be installed indoors or outdoors by an electrician and includes a cold-resistant cable.
- Fast & Powerful: This EV charger charges 9× faster than a 120V outlet, delivering up to 45 mi/hr., dependent upon your vehicle. It features a J1772 connector for all non-Tesla EVs and requires a 20A or 80A circuit. For Tesla EVs, this will require an adapter.

- [2026 INTELLIGENT CHARGING UPGRADE — PRECISION CONTROL MEETS SMART SCHEDULING] After surveying 100K+ U.S. EV owners, the Raylix R&D team found that nearly all drivers recognized the necessity of adjustable current and scheduled charging. Our upgraded J1772 charger features 4-level adjustable current (8A/10A/12A/16A) and a 1–12 hour smart delay timer. Whether you're charging overnight or during off-peak hours, enjoy smarter energy use, lower costs, and total convenience—on your schedule.
- [ONE CHARGER, ALL J1772 EVs/PHEVs READY!] Compatible with all SAE J1772 electric vehicles and plug-in hybrids—whether it’s Ford, GM, Nissan, Audi, BMW, Kia, Hyundai, Honda, Chevy, or more. Perfect for home or on-the-road charging, our 16A Level 1 & 2 charger ensures your EV is always powered and ready for any journey.
- [CHARGE 4× FASTER — NO MORE WAITING] In a rush? Our 16A Level 1 & 2 charger delivers charging speeds up to 4× faster than standard 8A Charger Level 1. Whether it's an early commute, a spontaneous trip, or last-minute errands, your EV will be ready when you are.
- [LEVEL 1 & 2 PORTABLE CHARGER — CHARGE ANYWHERE, ANYTIME] Designed for maximum flexibility, Raylix Level 1 & 2 EV charger features both 5-15 and 6-20 plug compatibility. Whether you're charging in your garage, at a friend's house, or at a roadside motel. NEMA 6-20 plug for Level 2 ev charging (240V, 16A, 3.68kW, 9-12 miles/hr) and a NEMA 5-15 adapter for Level 1 ev charging (120V, 12A, 1.44kW, 3-5 miles/hr) NOTE: In compliance with North American electrical safety standards, the charger automatically limits current to 12A when using a 5-15 outlet—protecting both your vehicle and your home’s electrical system.
- [AT-A-GLANCE CHARGING COMMAND: TOTAL CONTROL, INSTANTLY] While most ev chargers solutions confine vital data to in-car screens, the Raylix tesla charger breaks free with its enhanced TFT color display. This Raylix-exclusive feature delivers crystal-clear, real-time updates—voltage, current, power load, AND critical charging temperature—directly on the unit. Just one glance gives you complete charging insight. It’s not just information; it's the empowering peace of mind and satisfying control that transforms every charge into a masterfully managed experience.
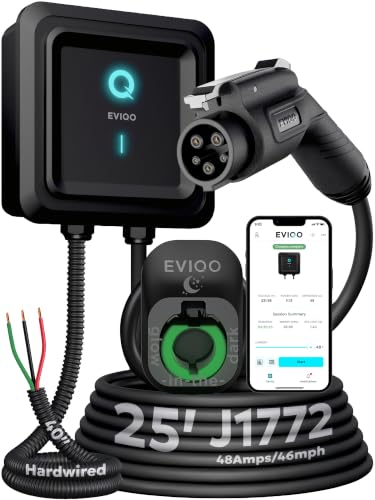
- WORKS WITH EVERY NON-TESLA EV: Standard J1772 connector plugs straight into Ford, Chevrolet, Hyundai, Kia, Nissan, BMW, Volkswagen, Audi, Rivian, Lucid and every other EV or plug-in hybrid sold with a J1772 port - no adapter needed. Tesla drivers can charge too, using the J1772 adapter that comes with the car. The extra-long 25 ft cable easily reaches across a garage or driveway.
- HARDWIRED - PROFESSIONAL INSTALL: This Level 2 charger is hardwired (not plug-in), so a licensed electrician installs it per National Electrical Code. It delivers up to 48A on a dedicated 60A, 240V circuit - enough to charge most EVs fully overnight. Want more speed? You can set DIP switches 4 and 5 to unlock 50A on a dedicated 70A circuit. Before ordering, check your car's port type and that your electrical panel can support the circuit.
- CONTROL FROM YOUR PHONE: A stronger built-in antenna keeps the charger online even in a garage or basement. Use the free app to start and stop charging, set the charging speed (6-48A), get reminders, and track how much energy and money each charge uses. Requires a 2.4 GHz home WiFi network.
- SAFETY-CERTIFIED & WEATHERPROOF: Independently tested and certified (UL, ETL, FCC, Energy Star). A fully sealed IP66 / NEMA 4 housing stands up to rain, snow, heat and dust indoors or out, and internal steel shielding protects the electronics for years of reliable use.
- GLOW-IN-THE-DARK HOLSTER: The included high-visibility holster glows in the dark so you can find and dock the plug easily at night. Holds the connector securely when not in use.
This product presentation was made with AAWP plugin.
This seems like a good procedure BUT the local dealers like mine in Chandler AZ aren’t familiar with it. They didn’t know how to pull the data and to contact TAC. They gave me a nice 2 page report on the battery but had no idea what it means. After 2 months I used a TORQUE APP with an OBDII bluetooth to see my battery capacity of 13.6 kWh.
They still can’t tell me how much you have to lose before qualifying for a new battery. Mine is a 2015 with about 38K miles on it.
Try a different dealer.