NHTSA ID Number: 10035764
Manufacturer Communication Number: SB-02-06-04-0371
Summary
CHEVROLET /GMC: CHECK ENGINE LIGHT ON, FUEL TANK HARD TO FILL, DTCS P0442, P0446, P0455 OR P0449 SET (REPLACE EVAPORATIVE EMISSION (EVAP) VENT VALVE SOLENOID ASSEMBLY AND ADD/RELOCATE FILETER BOX USING SERVICE KIT). *PE
Condition
Check engine light illuminated.
Difficult to fill with fuel or when filling, the pump continuously shuts off before the tank is full.
When checking the vehicle for DTCs, the ECM may report one or more of the following DTCs set as current or in history: P0442, P0446, P0449 or P0455.
Cause
The EVAP canister vent solenoid (CVS) valve draws fresh air into the system through a vent.
Under certain operating conditions, dirt and dust intrusion into the EVAP CVS fresh air intake/venting system, may result in restricted air flow.
Under certain operating conditions, water, if ingested into the EVAP CVS fresh air intake/venting system, may reach the CVS valve causing corrosion in the CVS valve, and may cause restrictions in the fresh air intake path, when the valve is in the closed position.
Parts
| Description | Qty | Part Number |
| (1999-2003 Model Year) Solenoid Kit, EVAP Emission Canister Vent Valve | 1 | 19207762
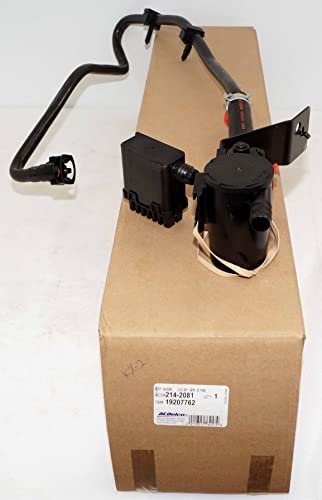
Genuine GM 19207762 Evaporator Emission Canister Vent Solenoid Valve Kit
|
| (2004-2010 Model Year) Solenoid Kit, EVAP Emission Canister Vent Valve | 1 | 19207763

GM Genuine 19207763 Evaporator Emission Canister Vent Solenoid Valve Kit
|
| Hose (5/8” X 25′ roll) | Cut to Length | 9438383

Genuine GM Parts - (S Hose (9438383)
|
| Tie-Strap | 5 | 12337820
GM Strap - 12337820
|
| Clamp | 2 (1999-2003)
or 4 (2004-2008) | 11609970
No products found. |
20 Affected Products
Vehicles
| MAKE | MODEL | YEAR |
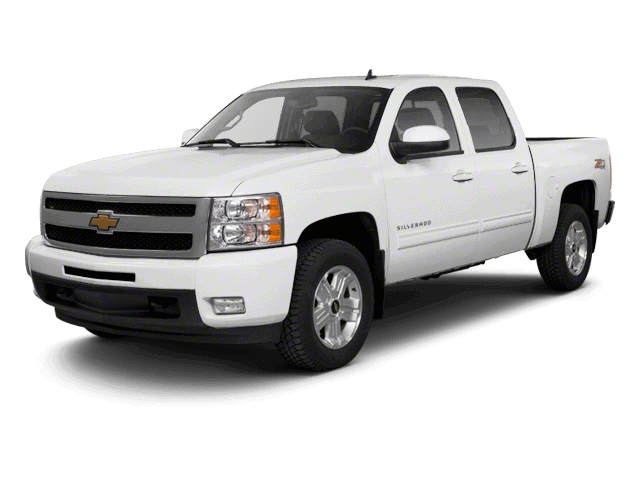
| CHEVROLET | SILVERADO | 2007-2010 |
| CHEVROLET | SILVERADO CLASSIC | 2003-2007 |
| CHEVROLET | SILVERADO HYBRID | 2009 |
| GMC | SIERRA | 2007-2010 |
| GMC | SIERRA CLASSIC | 2003-2007 |
| GMC | SIERRA HYBRID | 2009 |
NHTSA ID Number: 634786
Manufacturer Communication Number: 02-06-04-037
NHTSA ID Number: 10035764
Manufacturer Communication Number: SB-02-06-04-0371

- CEL Doctor: The ANCEL AD310 is one of the best-selling OBD II scanners on the market and is recommended by Scotty Kilmer, a YouTuber and auto mechanic. It can easily determine the cause of the check engine light coming on. After repairing the vehicle's problems, it can quickly read and clear diagnostic trouble codes of emission system, read live data & hard memory data, view freeze frame, I/M monitor readiness and collect vehicle information.
- Sturdy and Compact: Equipped with a 2.5 foot cable made of very thick, flexible insulation. It is important to have a sturdy scanner as it can easily fall to the ground when working in a car. The AD310 OBD2 scanner is a well-constructed mechanic tool with a sleek design. It weighs 12 ounces and measures 8.9 x 6.9 x 1.4 inches. Thanks to its compact design and light weight, transporting the device is not a problem. The buttons are clearly labelled and the screen is large and displays results clearly.
- Accurate Fast and Easy to Use: The AD310 scanner can help you or your mechanic understand if your car is in good condition, provides exceptionally accurate and fast results, reads and clears engine trouble emission codes in seconds after you fixed the problem. This device will let you know immediately and fix the problem right away without any car knowledge. No need for batteries or a charger, get power directly from the OBDII Data Link Connector in your vehicle.
- OBDII Protocols and Car Compatibility: Many cheap scan tools do not really support all OBD2 protocols. AD310 scanner as it can support all OBDII protocols such as KWP2000, J1850 VPW, ISO9141, J1850 PWM and CAN. This device also has extensive vehicle compatibility with 1996 US-based, 2000 EU-based and Asian cars, light trucks, SUVs, as well as newer OBD2 and CAN vehicles both domestic and foreign. Pls confirm with our customer service whether it is compatible with your vehicle before purchasing.
- Home Necessity and Worthy to Own: This is an excellent code reader to travel or home with as it weighs less and it is compact in design. You can easily slide it in your backpack as you head to the garage, or put it on the dashboard, this will be a great fit for you. The AD310 is not only portable, but also accurate and fast in performance. Moreover, it covers various car brands and is suitable for people who just need a code reader to check their car.

- Multi-Functions - Practical Multi-Functions OBD2 code reader features built-in OBD2 DTC lookup library, which help you to determine the cause of the engine light, read code, erase code, view freeze frame, I/M ready, vehicle information, data flow, real-time curve, get vehicle speed information, calculate load value, engine coolant temperature, get engine speed.
- Wide Capability - Supports 9 protocols compatible with most 1996 US-Based, 2000 EU-Based and Asian cars, and newer OBD II & CAN domestic or import vehicles. Supports 6 languages - English,German, Dutch, Spanish, French, Italian.
- 2.8" LCD Display - Designed with a clear display 2.8" Large LCD screen - white backlight and contrast adjustment. No need any battery or charger, OBD reader gets the power directly from your vehicle through the OBDII Data Link Connector.
- Compact Design - Car diagnostic scanner is equipped with a 2.5 feet long cable and made of a very thick flexible insulator.There are 6 buttons on OBD2 Scanner:scroll up/down,enter/exit and buttons that quick query VIN vehicle number& the DTC fault code.
- ABS / Airbag codes NOT Supported - It is able to read and clear check engine information which is part of OBDII system, but it cannot work with non-OBDII systems, including ABS / Airbag / Oil Service Light, etc.

- 【Diagnose Check Engine Light in Seconds – No Mechanic Needed】The FOXWELL NT301 OBD2 scanner instantly reads & clears engine fault codes (DTCs) with one click. Simply plug into the 16-pin DLC port, turn ignition on, and get accurate results within seconds—No prior car knowledge required. Save hundreds on dealership fees by knowing exactly what’s wrong before you visit a shop. The #1 choice car scanner for DIYers and car owners who want to take control of their vehicle’s health
- 【Clear & Reset CEL with Confidence】Unlike cheap code readers that just erase codes temporarily, NT301 works like all professional vehicle code readers: It clears the check engine light only after you’ve fixed the underlying issue. If the problem isn’t fully repaired, the fault code will reappear. So you’ll never get a false pass. Use the foxwell scanner to verify your repair work and drive with peace of mind
- 【Sm-og Check Helper – Know Your Pass/Fail Status Before the Test】With dedicated one-click I/M readiness hotkeys and a simple Red-Yellow-Green LED indicator, you’ll instantly know if your vehicle is ready for annual testing. Built-in speaker provides clear audio feedback. No guesswork—just confidence before you head to the test center. One less thing to worry about when inspection day comes
- 【Advanced OBDII Modes – O- 2 Sensor & EVAP Testing】NT301 go beyond basic code reading with enhanced OBD2 modes. Run an EVAP system check to assess fuel tank condition, and use the O- 2 sensor test to optimize air-fuel ratio, boosting fuel economy, cutting em- issions, and saving you money at the pump. The code reader for cars and trucks is like having a mini em-issions lab in your glove box
- 【Live Data Graphing – Spot Engine Issues in Real Time】View and log live sensor data in easy-to-read graphs with this OBD2 scanner diagnostic tool. Monitor ox- ygen sensors, fuel trims, coolant temperature, RPM, and more to spot suspicious values instantly. This obd scanner gives you professional-grade insight without the pro price tag—a feature you won’t find on basic $20 car code readers
- UNDERSTAND YOUR CHECK ENGINE LIGHT – The ANCEL AD410 OBD2 scanner helps everyday drivers quickly read and clear engine-related fault codes, view code definitions, and understand why the check engine light is on before visiting a repair shop. With 42,000+ built-in DTC lookups, this car code reader helps reduce guesswork and makes basic vehicle diagnostics easier for beginners and DIY users
- FULL OBD2 DIAGNOSTICS MADE SIMPLE – More than a basic engine code reader, this OBD2 scanner diagnostic tool supports key OBDII functions including reading/clearing codes, live data, freeze frame, I/M readiness, O2 sensor test, EVAP test, vehicle information, and MIL status. It helps you check your car’s condition, verify repairs after the issue is fixed, and communicate with mechanics more confidently
- LIVE DATA & REAL-TIME VEHICLE INSIGHTS – View real-time engine data such as RPM, coolant temperature, fuel trim, oxygen sensor readings, and other available OBD2 parameters directly on the screen. These live data readings help you better understand how your vehicle is running, spot abnormal patterns, and make more informed repair decisions instead of relying only on a warning light
- SMOG CHECK READINESS AT A GLANCE – Use the I/M readiness function before a smog check or emissions inspection to see whether your vehicle’s monitors are ready. This OBD2 code scanner helps you confirm if recent repairs have brought the system back to a ready state, reducing the chance of failed inspections, retests, wasted trips, and unnecessary inspection fees
- WORKS WITH MOST OBD2 VEHICLES – Compatible with most 1996 and newer U.S.-based OBD2 cars, SUVs, and light trucks, as well as many 2000 and newer EU/Asian OBD2 vehicles. Supports major OBDII protocols including CAN, ISO9141, KWP2000, J1850 VPW, and J1850 PWM. This automotive diagnostic scanner is designed for wide vehicle coverage; please check compatibility with your vehicle before purchase

- 【TURN OFF CEL】 This AL319 car scanner diagnostic tool supports Reading and Clearing DTCs, DTC Look Up, displaying Live Data, Freeze Frame & I/M Readiness, view vehicle information, etc., to figure out the root cause of the Check Engine Light (CEL) and turn it off, helping you catch any potential issues early and avoid excessive costs from unnecessary repairs.
- 【EXTENSIVE APPLICATION】 Autel AL319 Compatible with 7 languages (English, French, Spanish, etc.) and various post-1996 OBD II protocol vehicles (Toyota, Nissan, Honda, Ford, etc.), this OBD II scanner provides accurate and fast diagnosis for worldwide car owners.
- 【FOR END USER & DIYERS】 This error code reader AL319 is “plug and play” and comes with an easy interface. Even if you’re not familiar with vehicle repair, you can quickly take control of this obd2 scanner, and get the information you want.
- 【USER-FRIENDLY DESIGN】 This OBD2 scanner and check engine code reader features a patented One-Click I/M Readiness, TFT color display, built-in speaker, LED Indicator etc. The cable is long enough without being too long and getting in the way. No batteries are needed.
- 【HIGH-QUALITY SERVICES】 12 months war.ranty from the date of purchase and lifetime free update are offered by this Automobile OBDII scan tool. Welcome to contact us via Q&A, email, or hotline, and our after-sale-service team for technical support.
SEOCONTENT-START
#02-06-04-037J: CHECK ENGINE LIGHT ON, FUEL TANK HARD TO FILL, DTCS P0442, P0446, P0455 OR P0449 SET (REPLACE EVAPORATIVE EMISSION (EVAP) VENT VALVE SLOENOID ASSEMBLY AND ADD/RELOCATE FILTER BOX USING SERVICE KIT) (MAR 20, 2012)
| Subject: | Check Engine Light On, Fuel Tank Hard to Fill, DTCs P0442, P0446, P0455 or P0449 Set (Replace Evaporative Emission (EVAP) Vent Valve Solenoid Assembly and Add/Relocate Filter Box Using Service Kit) |
| Models: | 1999-2007 Chevrolet Silverado (Classic) Models |
| 1999-2007 GMC Sierra (Classic) Models | |
| 2007-2010 Chevrolet Silverado Models (Including Hybrid) |
|
| 2007-2010 GMC Sierra Models (Including Hybrid) |
This bulletin is being revised to update the Parts Information. Please discard Corporate Bulletin Number 02-06-04-037I (Section 06 – Engine/Propulsion System).
Condition
Some customers may comment about the check engine light being illuminated.
They may also comment that their vehicle is difficult to fill with fuel or when filling, the pump continuously shuts off before the tank is full.
When checking the vehicle for DTCs, the ECM may report one or more of the following DTCs set as current or in history: P0442, P0446, P0449 or P0455.
Cause
The EVAP canister vent solenoid (CVS) valve draws fresh air into the system through a vent.
Under certain operating conditions, dirt and dust intrusion into the EVAP CVS fresh air intake/venting system, may result in restricted air flow.
Under certain operating conditions, water, if ingested into the EVAP CVS fresh air intake/venting system, may reach the CVS valve causing corrosion in the CVS valve, and may cause restrictions in the fresh air intake path, when the valve is in the closed position.
Correction (1999-2007 Classic/Old Style Models)
After following the published SI diagnostics and determining that the EVAP canister vent valve is the cause of the MIL light, replace the existing EVAP canister vent valve assembly with a new assembly. This new assembly is a sealed unit that is designed to be vented through a remote filter box. To ensure correct installation, follow the procedures below.
Important: DO NOT replace the EVAP canister assembly for this concern unless it fails the leak test.
1999-2003 Model Year (Use Service Kit P/N 19207762)
- Raise the vehicle. Suitably support the vehicle.
- Disconnect the EVAP canister vent valve electrical connector, if equipped.
- Disengage the two vent valve pipe clips securing the pipe to the underbody. Remove the clips from the underbody and discard.
- Disconnect the vent valve pipe at the EVAP canister.
- Remove and retain the EVAP canister vent valve bracket mounting bolt.
- Remove the complete EVAP canister vent valve assembly with bracket attached and discard.
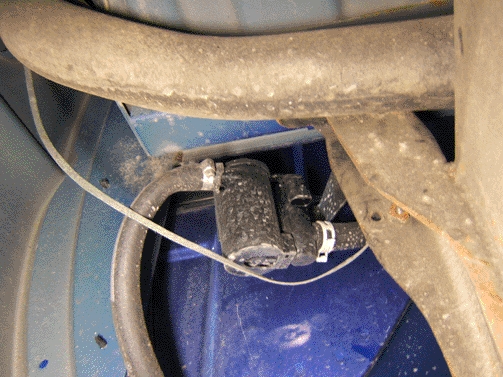
Important: The new canister vent valve will be installed in a new location, outside of the frame.
- Position and secure the new valve assembly to the frame bracket on the outside of the frame using the existing hole and mounting bolt.
Tighten:
Tighten the bracket mounting bolt to 12 N•m (106 lb in).
- Connect the vent valve pipe to the EVAP canister.
- Install the two vent valve pipe clips into the existing underbody holes.
- Connect the EVAP canister vent valve electrical connector, if equipped.
- Attach bulk 5/8” heater hose to the vent valve port and secure using a clamp. Run a length as needed along the frame rail routing to the area above the transmission.
- Cut the hose to determined length and install the supplied filter box. Secure using a clamp.
- Remove the transmission support and lower the transmission assembly as necessary to allow for access to the new filter box location.
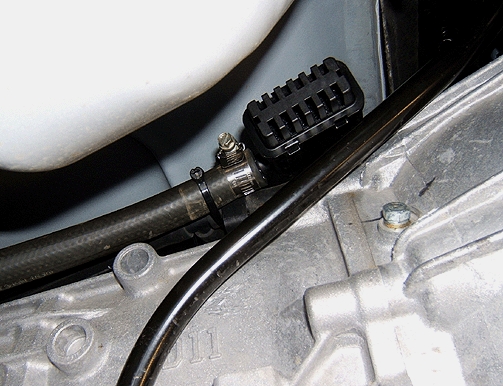
- Secure the filter box to the transmission vent hose just forward of the hose tee-section using a tie strap. DO NOT pinch or restrict the transmission vent hose. The filter box opening should be pointing downward.
- Raise the transmission and reinstall the transmission support.
- Tie strap the hose as needed along the frame rail in order to keep the hose away from pinch-points and heat sources.
- Lower the vehicle.
2004-2007 Model Year (Use Service Kit P/N 19207763)
- Raise the vehicle. Suitably support the vehicle.
- Disconnect the EVAP canister vent valve electrical connector.
- Disconnect the canister pipe from the vent valve.
- Push in the retainer and remove the existing canister vent valve from the fuel tank clip or mounting bracket. Discard the old valve.
- Cut back the existing canister pipe approximately 51 mm (2 in) to remove the quick connect end.
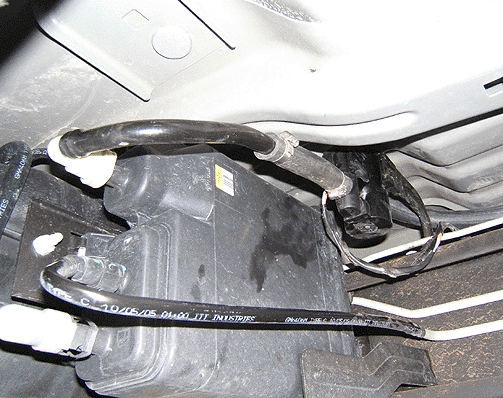
Crew Cab Short Box Shown Below, Other Configurations Similar
Extended Cab Short Box Shown Below, Other Configurations Similar
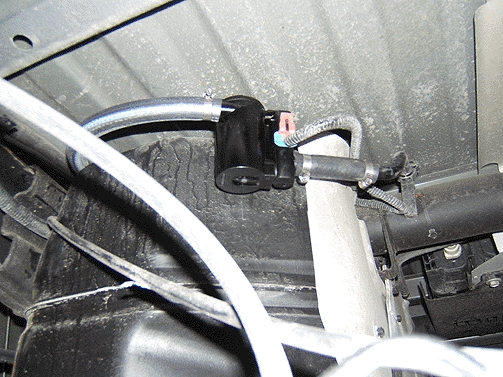
- Install the new canister vent valve solenoid to the fuel tank clip or mounting bracket as shown above. The valve port closest to the electrical connector must point towards the canister.
- Cut bulk 5/8” heater hose to a length of approximately 76 mm (3 in). Install the hose between the solenoid and the canister pipe and secure using clamps.
- Attach bulk 5/8” heater hose to the vent port and secure using a clamp. Run a length as needed along the frame rail routing to the area above the transmission.
- Cut the hose to determined length and install the supplied filter box. Secure using a clamp.
- Remove the transmission support and lower the transmission assembly as necessary to allow for access to the new filter box location.
- Secure the filter box to the transmission vent hose just forward of the hose tee-section using a tie strap. DO NOT pinch or restrict the transmission vent hose. The filter box opening should be pointing downward.
- Raise the transmission and reinstall the transmission support.
- Connect the EVAP canister vent valve electrical connector.
- Tie strap the hose as needed along the frame rail in order to keep the hose away from pinch-points and heat sources.
- Lower the vehicle.
Correction (2007-2010 New Style Models)
After following the published SI diagnostics and determining that the EVAP canister vent valve is the cause of the MIL light, replace the EVAP canister vent valve assembly and relocate the remote filter box. To ensure correct installation, follow the procedures below.
Important: DO NOT replace the EVAP canister assembly for this concern unless it fails the leak test.
Use Service Kit P/N 19207763
- Raise the vehicle. Suitably support the vehicle.
- Disconnect the EVAP canister vent valve electrical connector.
- Disconnect the vent valve pipe quick connect from the canister.
- Either cut the existing valve vent pipe and leave the remaining section of pipe in the vehicle or remove along with the valve.
- Push in the retainer and remove the existing canister vent valve from the fuel tank clip or mounting bracket.
- Cut back the existing canister pipe approximately 51 mm (2 in) and retain the pipe for use with new valve.
- Connect the canister pipe quick connect to the canister.
2500 Crew Cab Short Box Shown Below, Other Configurations Similar
1500 Extended Cab Short Box Shown Below, Other Configurations Similar
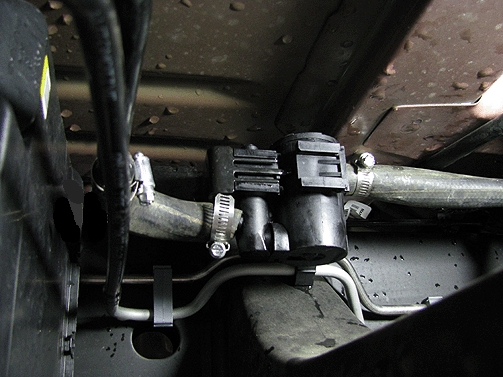
- Install the new canister vent valve solenoid to the fuel tank clip or mounting bracket as shown above. The valve port closest to the electrical connector must point towards the canister.
- Cut bulk 5/8” heater hose to a length of approximately 76 mm (3 in). Install the hose between the solenoid and the canister pipe and secure using clamps.
- Attach bulk 5/8” heater hose to the vent port and secure using a clamp. Run a length as needed along the frame rail routing to the passenger side area above the transmission.
- Cut the hose to determined length and install the supplied filter box. Secure using a clamp.
- Remove the transmission heat shield, if necessary.
- Remove the transmission support and lower the transmission assembly as necessary to allow for access to the new filter box location.
- Secure the filter box to the transmission vent hose just forward of the hose tee-section using a tie strap. DO NOT pinch or restrict the transmission vent hose. The filter box opening should be pointing downward.
- Raise the transmission and reinstall the transmission support.
- Reinstall the transmission heat shield.
- Connect the EVAP canister vent valve electrical connector.
- Tie strap the hose as needed along the frame rail in order to keep the hose away from pinch-points and heat sources.
- Lower the vehicle.
Parts Information
| Part Number | Description | Qty |
| 19207762
Genuine GM 19207762 Evaporator Emission Canister Vent Solenoid Valve Kit
|
(1999-2003 Model Year) Solenoid Kit, EVAP Emission Canister Vent Valve | 1 |
| 19207763
GM Genuine 19207763 Evaporator Emission Canister Vent Solenoid Valve Kit
|
(2004-2010 Model Year) Solenoid Kit, EVAP Emission Canister Vent Valve | 1 |
| 9438383
Genuine GM Parts - (S Hose (9438383)
|
Hose (5/8” X 25′ roll) | Cut to Length |
| 12337820
GM Strap - 12337820
|
Tie-Strap | 5 |
| 11609970
No products found. |
Clamp | 2 (1999-2003)
or 4 (2004-2008) |
Warranty Information
For vehicles repaired under warranty, use:
| Labor Operation | Description | Labor Time |
| J7908* | Replace Evaporative Emission (EVAP) Vent Valve Solenoid Assembly and Add/Relocate Filter Box Using Service Kit | 1.1 hrs** |
| * This is a unique labor operation for bulletin use only. It will not be published in the Labor Time Guide. **Diagnosis time is included in this labor time. |
||
SEOCONTENT-END
This product presentation was made with AAWP plugin.