
NHTSA ID Number: 10079701
Manufacturer Communication Number: GCUS-9-1466
Summary
14588C – SPECIAL COVERAGE (REVISED LABOR TIME). POLICE PATROL VEHICLES, IDLING THE ENGINE FOR EXTENDED PERIODS OF TIME CAN PREMATURELY WEAR THE ENGINE-COOLING-FAN MOTOR. IN THIS CONDITION, THE MOTOR MAY FAIL TO OPERATE OR OPERATE NOISILY. THIS CONDITION CAN ALSO DAMAGE MOTOR-CONTROL RELAYS IN THE VEHICLE’S UNDERHOOD BUSSED ELECTRICAL CENTER (UBEC). IF CONDITION OCCURS WITHIN STATED SPECIAL COVERAGE TERMS, DEALERS ARE TO DIAGNOSE AND REPLACE FAN MOTORS PER PI1384 REGARDING THE SEMI-ANNUAL PREVENTATIVE MAINTENANCE CHECK FOR POLICE VEHICLE COOLING FANS
10 Affected Products
Parts
| Description | Quantity/ Vehicle | Part Number |
| MOTOR KIT, ENG CLG FAN | 2 | 22762591 |
| MOTOR KIT, ENG CLG FAN (RIGHT) | 1 | 89018696
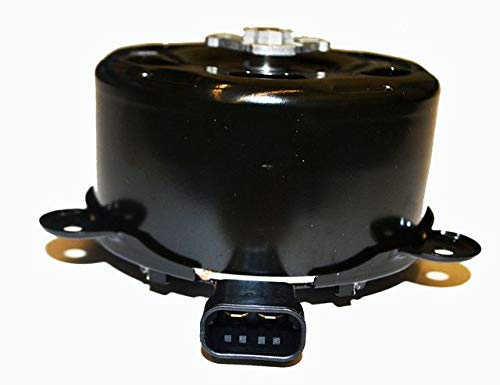
GENERAL MOTORS 89018696 MOTOR KITENG COOL FAN RH
|
| MOTOR KIT, ENG CLG FAN (LEFT) | 1 | 89018695 |
| BLADE KIT, ENG CLG FAN (RIGHT) | 1 | 89018693
No products found. |
| BLADE KIT, ENG CLG FAN (LEFT) | 1 | 89018691
No products found. |
| MOTOR KIT, ENG CLG FAN | 2 | 92191945

GM Genuine Parts 92191945 Engine Cooling Fan Motor
|
| RELAY JUMPER HARNESS | 1 | 84008379 |
| DURASEAL SPLICE TUBE | 2 | 19300089
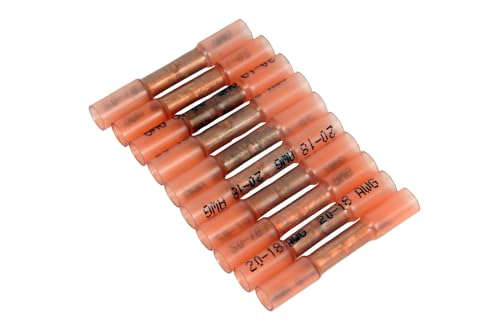
GM Genuine Parts 19300089 Salmon 20-18 Gauge Wire Splice Sleeve Kit with 10 Splices
|
| DURASEAL SPLICE TUBE | 4 | 19300091
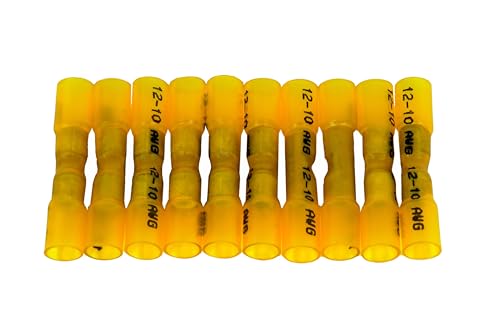
GM Genuine Parts 19300091 Yellow 10-12 Gauge Wire Splice Sleeve Kit with 10 Splices
|
| NYOGEL LUBE | As Required | 12377900
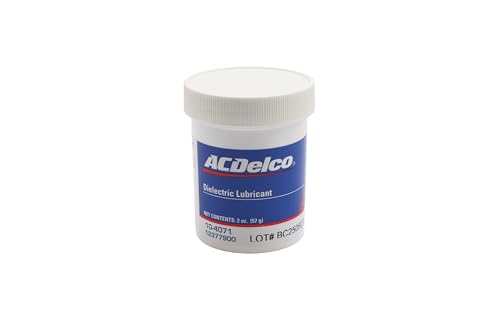
ACDelco GM Original Equipment 10-4071 Dielectric Grease - 2 oz
|
| TIE STRAP | 4 | 12337820

GM Strap - 12337820
|
| RIVET | 2 | 11561734 |

 22762591,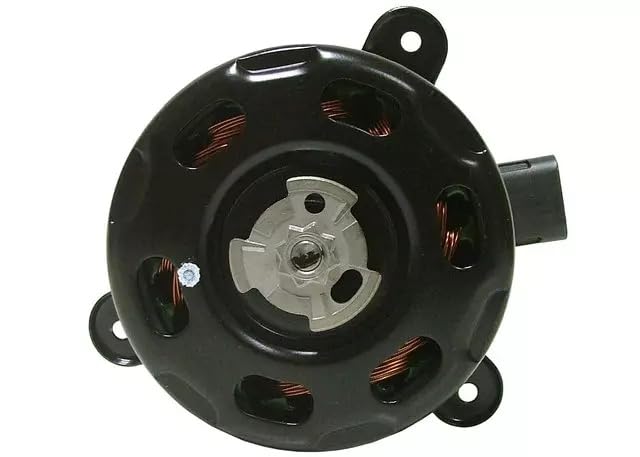

SEOCONTENT-END
SEOCONTENT-START
| Subject: | 14588B – Special Coverage Adjustment – Engine Cooling Fan Motor |
| Models: | 2011-2015 Chevrolet Caprice |
| 2012-2016 Chevrolet Impala | |
| Equipped as Police Patrol Vehicles (RPO 9C1 or 9C3) |
14588
2011-2015 model year Chevrolet Caprice and 2012-2016 model year Chevrolet Impala police patrol vehicles, idling the engine for extended periods of time can prematurely wear the engine-cooling-fan motor.
In this condition, the motor may fail to operate or operate noisily. This condition can also damage motor-control relays in the vehicle’s underhood bussed electrical center (UBEC).
This special coverage covers the condition described above for a period of 6 years or 100,000 miles (160,000 km), whichever occurs first, from the date the vehicle was originally placed in service, regardless of ownership.
Dealers are to diagnose and replace fan motors per PI1384 regarding the semi-annual preventative maintenance check for police vehicle cooling fans. The repairs will be made at no charge to the customer.
For vehicles covered by Vehicle Service Contracts, all eligible claims with repair orders on or after July 23, 2015, are covered by this special coverage and must be submitted using the labor operation codes provided with this bulletin. Claims with repair orders prior to July 23, 2015, must be submitted to the Service Contract provider.
Parts Information
| Part Number | Description | Quantity/ Vehicle |
| 22762591 | MOTOR KIT, ENG CLG FAN | 2 |
| 89018696
GENERAL MOTORS 89018696 MOTOR KITENG COOL FAN RH
|
MOTOR KIT, ENG CLG FAN (RIGHT) | 1 |
| 89018695 | MOTOR KIT, ENG CLG FAN (LEFT) | 1 |
| 89018693
No products found. |
BLADE KIT, ENG CLG FAN (RIGHT) | 1 |
| 89018691
No products found. |
BLADE KIT, ENG CLG FAN (LEFT) | 1 |
| 92191945
GM Genuine Parts 92191945 Engine Cooling Fan Motor
|
MOTOR KIT, ENG CLG FAN | 2 |
| 84008379 | RELAY JUMPER HARNESS | 1 |
| 19300089
GM Genuine Parts 19300089 Salmon 20-18 Gauge Wire Splice Sleeve Kit with 10 Splices
|
DURASEAL SPLICE TUBE | 2 |
| 19300091
GM Genuine Parts 19300091 Yellow 10-12 Gauge Wire Splice Sleeve Kit with 10 Splices
|
DURASEAL SPLICE TUBE | 4 |
| 12377900
ACDelco GM Original Equipment 10-4071 Dielectric Grease - 2 oz
|
NYOGEL LUBE | As Required |
| 12337820
GM Strap - 12337820
|
TIE STRAP | 4 |
| 11561734 | RIVET | 2 |
Service Procedure
Note: There are multiple Technical Service Bulletins related to the coolant fan motors in these vehicles. Please refer to Service Information for proper diagnostic procedures.
Caprice Only
- Using the diagnostic steps in Service Information and Technical Service Bulletins, determine if the engine coolant fan motors need to be replaced.
- If necessary, replace the coolant fan motors. Refer to Engine Coolant Fan Motor Replacement in Service Information.
Impala Only
Inspect the vehicle and service history to determine if the updated engine cooling fan wiring harness kit has been installed.
- If the revised engine coolant fan wiring harness has been installed, proceed to step #1 below.
- If the revised engine coolant fan wiring harness has NOT been installed, proceed to the Engine Cooling Fan Wiring Harness Installation section below.
- Using the diagnostic steps in Service Information, determine if the engine coolant fan motors need to be replaced.
- If necessary, replace the coolant fan motors. Refer to Engine Coolant Fan Motor Replacement in Service Information.
Engine Coolant Fan Motor Wiring Harness Installation
- Disconnect the battery.
- Remove the passenger side motor compartment front cross brace.
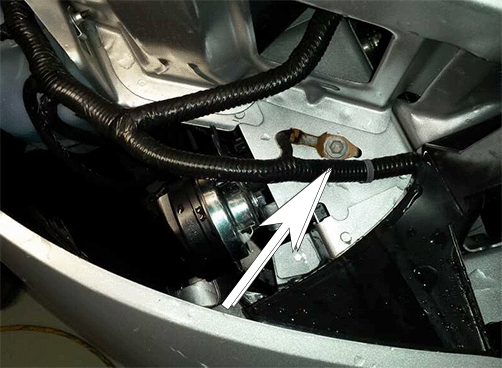
- Remove the passenger side head lamp and the G101 ground bolt.
- Disconnect the cooling fan wiring harness from the fans. Carefully disengage the retainer clips of the factory harness from the fan shroud. Use care to not damage the attachment features on the shroud, they will be reused.
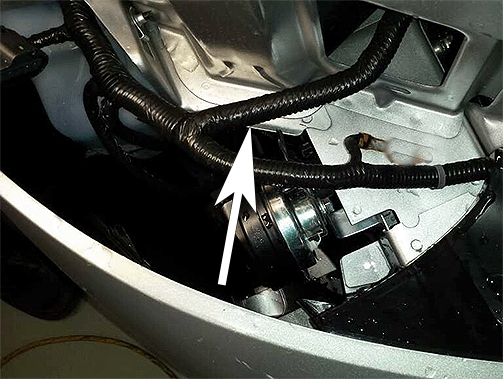
- Cut the cooling fan wiring branch at the headlamp opening area. Measure approximately 100mm from the main wire bundle. This branch contains the White, Black, Grey and Light Blue wires. Remove and discard the cut off fan harness.
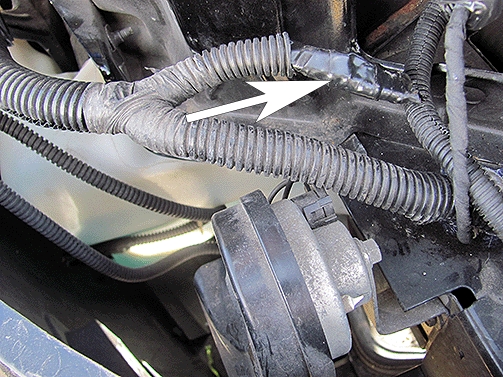
- Seal the four cut leads of the harness with four Duraseal Splice Tubes. Wrap the cut harness section with electrical tape to prevent moisture damage.
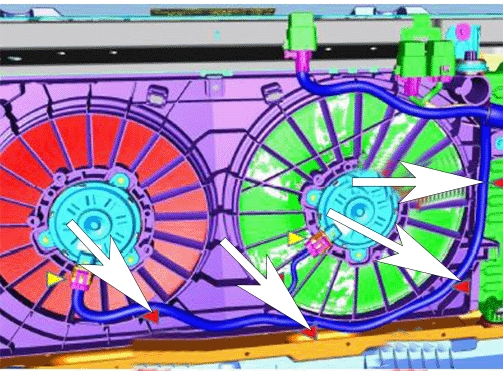
- Route the new harness along the bottom of the fan shroud and engage the retainer clips into the mounting holes in the fan shroud.
- Add Nyogel Lube to the terminals of both fan connectors on the new harness. Connect the fan connectors to the fan motors.
- Route the new fan harness into the passenger side headlamp pocket area.
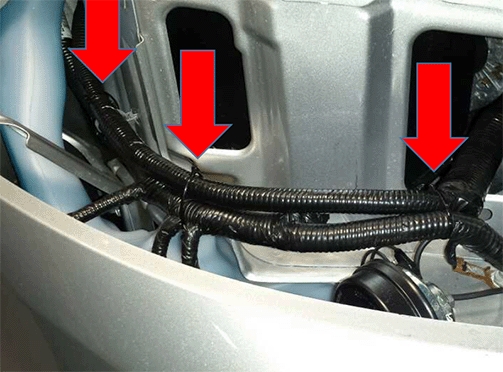
- Route the harness through the headlamp area, inboard of the windshield washer fluid bottle, then outboard of the UBEC. Loosely install three tie straps, do not tighten the straps at this time.
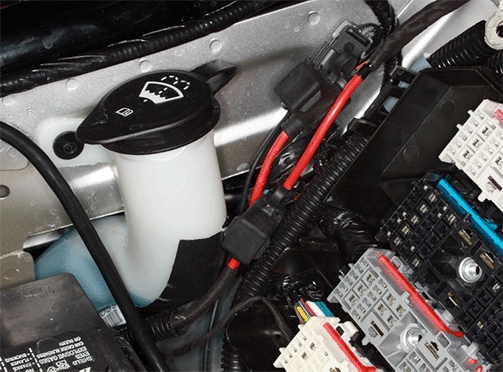
- Route the fan control wires (D-GN and D-BU) outboard of the UBEC to the engine harness, in the area where it enters the UBEC. Place the two harness fuses outboard of the UBEC.
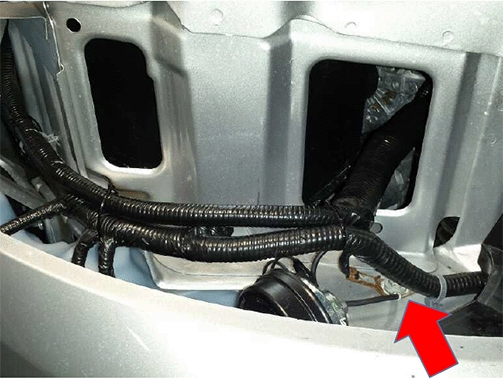
- Route the ground wire of the new harness through the passenger side head lamp opening and install over the G101 ring terminal (see below). Reinstall the ground bolt.
Tighten
Tighten the bolt to 10 +/- 2 Nm.
- Remove the UBEC cover.
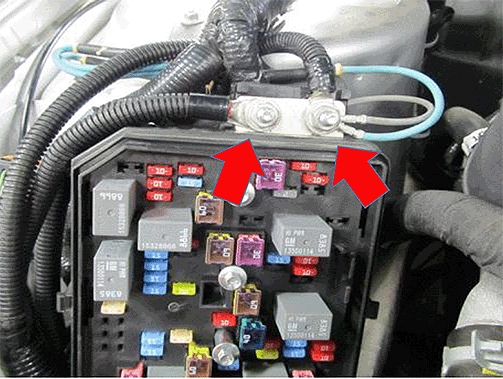
- Remove the nuts from both UBEC battery studs, and remove all ring terminals. The convoluted conduit on the left ring terminal may not be present in some vehicles. It may appear as double-crimped fusible links to a single ring terminal.
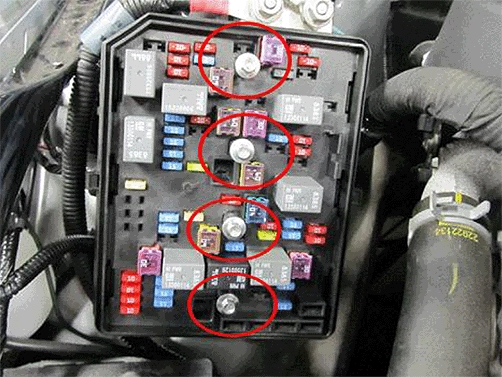
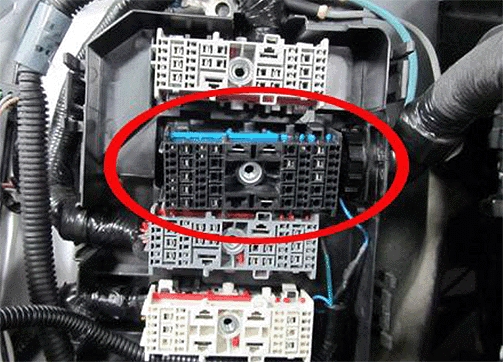
- Remove the engine harness connector and turn over to access the wiring.
- Find the fan control wires in the engine harness: D-GN wire, 22 AWG, circuit 335 (Cavity H7), and D-BU wire, 22 AWG, circuit 473 (Cavity C7).
Note: There is 1 additional D-GN/WH stripe wire (22 AWG) and 1 DK-GN wire (20 AWG). The required D-GN wire is a 22 AWG wire.
- Extract the D-GN and D-BU control wires and cut the wires. Stagger wire cut points to permit splices to lay end-to-end. Apply electrical tape to the wire ends going into the UBEC connector.
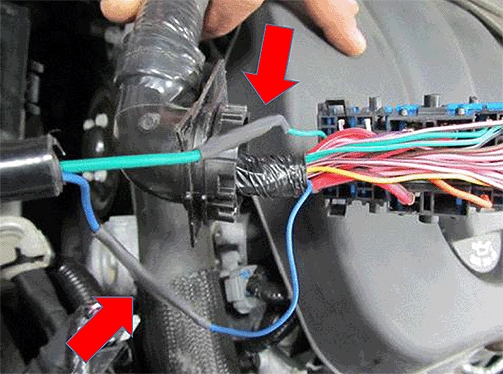
- Splice the new fan relay control wires from new harness (D-GN and D-BU) to the matching cut wire ends leading to PCM. Apply heat to the heat shrink tubes to seal the splices.
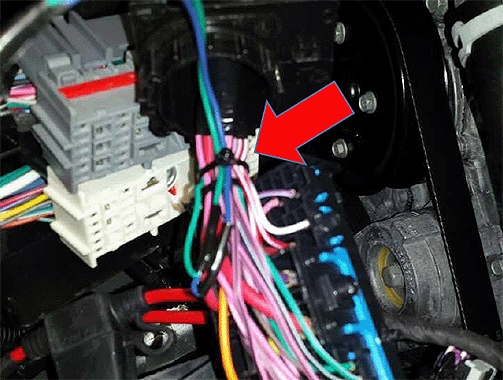
- Return the spliced wires into the UBEC splash shield between the connectors, routing them so they will not be crushed during the UBEC re-installation. Using a tie strap, secure the spliced wires near the existing tie strap on the engine harness connector.
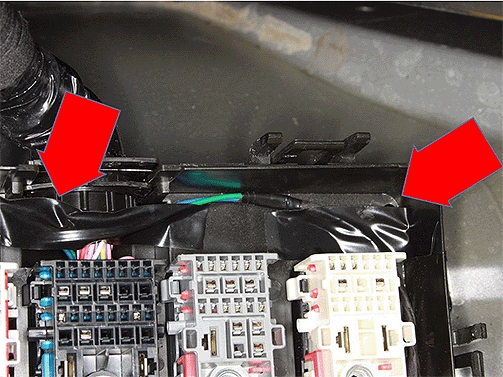
- Use electrical tape to keep the two wire leads in place during UBEC re-installation.
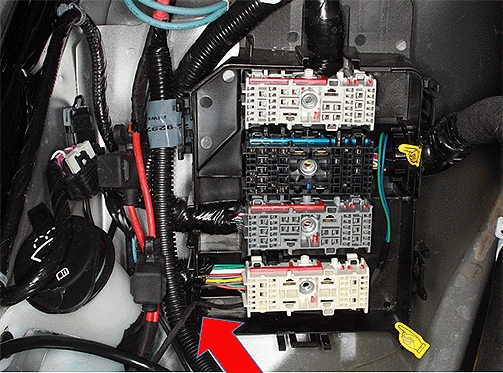
- Route the two wires out of the UBEC.
- Install the UBEC back in place and tighten the 4 connector bolts.
Tighten
Tighten the bolt to 6 +/- 2 Nm.
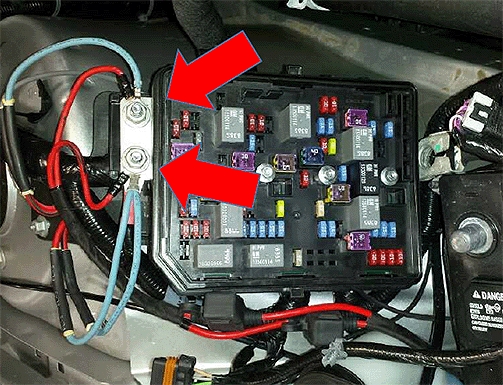
- Re-install all original ring terminals to the UBEC battery studs. Install the 2 ring terminals (RED) of the new harness to the studs as follows: route the shortest ring terminal lead to the RH UBEC stud and the longest lead to the LH battery stud. Orient the ring terminals with the crimp up and displaced angularly to permit all the ring terminals to lie flat. Reinstall the nuts.
Tighten
Tighten the nuts to 15 +/- 3 Nm.
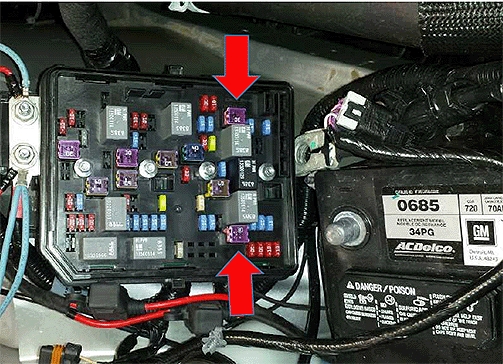
- Remove, and discard, both Cooling Fan Fuses in UBEC. They are on each side of the Cooling Fan Relays.
- Reinstall the UBEC cover.
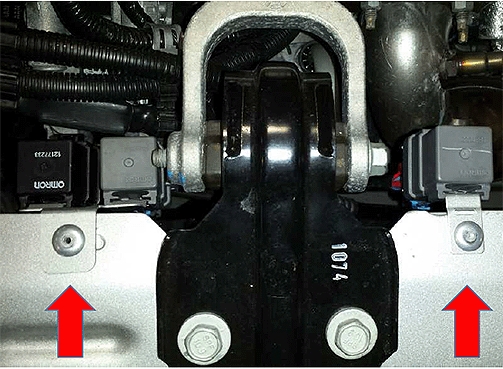
- Position the relay and bracket assemblies on the upper radiator support as shown, Mark the drill location with a paint pen. Note that the double relay bracket is located on the passenger side of the upper engine mount.
Note: Avoid drilling spot welds in the radiator support.
- Using a 5mm drill bit, drill the 2 relay bracket mounting holes in the upper radiator support. Treat all exposed metal with GM Super Lube®, or equivalent.
- Install the relay brackets to the radiator support using two (2) rivets.
- Re-install the passenger side cross brace.
Tighten
Tighten the nuts to 10 Nm.
- Check all routing, especially the position of the J-Case fuse holders and the leads to the UBEC near the cross brace.
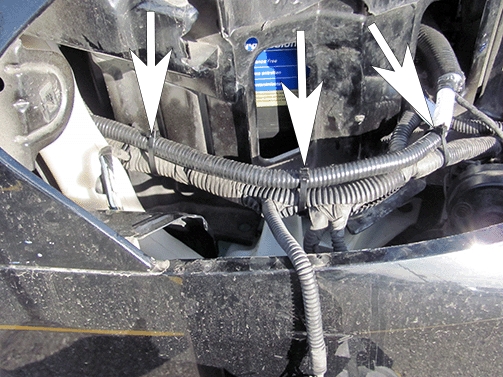
- Tighten the 3 tie straps after checking all routing of the new harness.
- Install the passenger side head lamp.
- Reconnect the negative battery cable.
Tighten
Tighten the nut to 6 +/- 2 Nm.
- Perform a test of the fan harness by turning the engine ON, and activating the A/C. Both fans should start operating instantly.
SEOCONTENT-END
NHTSA ID Number: 10079701
Manufacturer Communication Number: GCUS-9-1466
Bulletin No.: 14588B
Date: November 2015
To View or Download this Document Click Here
Bulletin No.: 14588A
Date: October 2015
To View or Download this Document Click Here
Bulletin No.: 14588A
Date: October 2015
To View or Download this Document Click Here
Bulletin No.: 14588
Date: July 2015
To View or Download this Document Click Here
Bulletin No.: 14588
August 2015
To View or Download this Document Click Here
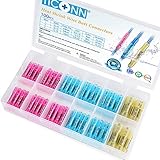
- Solid Crimp: Seamless tinned copper barrel grips each wire without splitting, giving these butt connectors a strong hold that helps reduce the risk of short circuits; The thick copper barrel helps reduce voltage drop, supports high current flow, and minimizes heat buildup for dependable electrical connectors
- Watertight Seal: These heat shrink butt connectors feature dual-wall tubing with a 3:1 shrink ratio and a heat-activated adhesive lining, creating a secure 360-degree seal around each crimp; The dual-wall tubing helps seal out moisture and reduce corrosion, making these heat shrink wire connectors suitable for underground conduit, engine bays, and other demanding environments
- Color-Coded Sizing: Color-coded tubing lets you quickly identify the right butt splice connectors by wire gauge, with red for AWG 22–16, blue for AWG 16–14, yellow for AWG 12–10, black for AWG 14–12, and white for AWG 24–22; Strip, insert, and crimp with a standard tool, then apply heat to create secure wire connectors for a wide range of wiring projects
- Wide Applications: Ideal for marine, automotive, home, trailer, and outdoor wiring projects; These marine butt connectors provide dependable connections for boat consoles, bilge pumps, vehicle wiring, outdoor speakers, and other electrical installations where moisture protection is important
- Available Options: This assortment includes red, blue, and yellow waterproof butt connectors for wire sizes from AWG 22–10; Choose the appropriate color-coded connector to match your wire gauge for marine wire connectors, vehicle harnesses, home electrical wiring, and other electrical applications

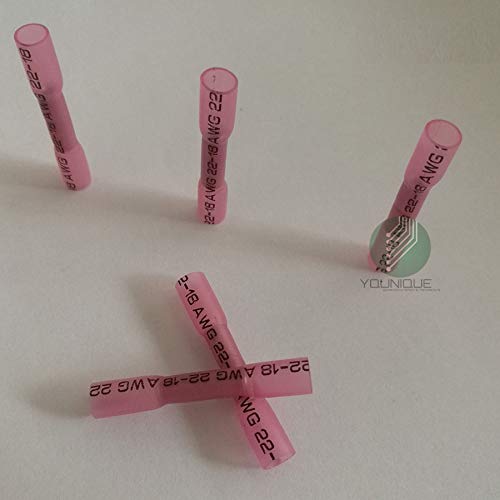
- HIGH QUAILTY COPPER CORE: Core Heat shrink butt connectors use the copper core with high thickness, which is up to 0. 7mm. Make connection project safer! High thickness copper core calls the attention of buyers
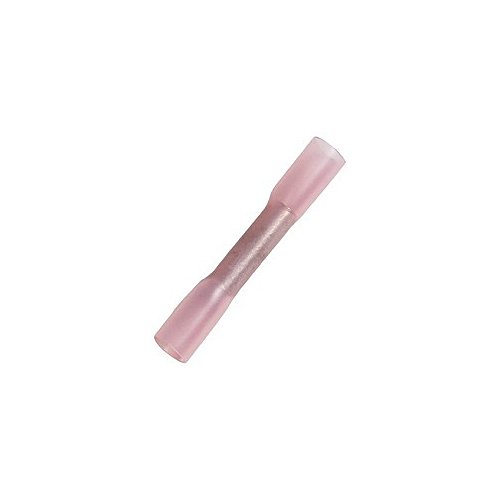
- HIGH QUALITY HEAT SHRINK: Translucent heat shrink tubing provides high tensile strength and resistance to stretch and mechanical damage. Thick barrel ensures strong crimp every time. The inner wall of heat-shrinkable tube has enough hot melt adhesive to ensure waterproof performance. Your wire will never slip out of these heat shrink butt connectors
- APPLICATION AREAS: Application in areas such as automotive, watercraft, electrical and electronics industries, with 3 different sizes, So that repair work is much easier
- COMPLIANT WITH ALL RELEVANT STANDARDS: Our heat shrink butt connectors are compliant with ROHS, ISO 9001: 2008, SGS and CE standards
- RECOGNIZABLE: tubings of different colors with the mark of wire gauge are easy to recognize. Measure the wiring, and by checking the mark of wire gauge of the polyolefin tubing, you can choose the right connector very easily
- The UPC of the product is 805089657011
- This product is a lawn and garden tool accessories
- This product is manufactured in China
This product presentation was made with AAWP plugin.