| “This site contains affiliate links for which OEMDTC may be compensated” |
NHTSA ID Number: 10089221
Manufacturer Communication Number: 07-00-89-021Q
Summary
THIS INFORMATIONAL BULLETIN IS TO INFORM DEALERS OF SPECIAL PROCEDURES NECESSARY WHEN TOWING A TRAILER OR WHEN TOWING THE VEHICLE BEHIND A RECREATIONAL VEHICLE.
39 Affected Products
Vehicles
BUICK | BUICK | 9999 |
BUICK | ENCLAVE | 2008-2017 |
| CHEVROLET | CHEVROLET | 9999 |
| CHEVROLET | TRAVERSE | 2008-2017 |
| GMC | ACADIA | 2007-2017 |
| GMC | GM | 9999 |
SATURN | OUTLOOK | 2007-2010 |
SATURN | SATURN | 9999 |
Parts
SEOCONTENT-START
Bulletin No.: 07-00-89-021Q
Date: June, 2016
| Subject: | Supplemental Information on Trailer Towing and Recreational Vehicle Towing (Dinghy Towing) |
| Models: | 2008-2017 Buick Enclave Enclave |
| 2009-2017 Chevrolet Traverse | |
| 2007-2016 GMC Acadia | |
| 2017 GMC Acadia Limited | |
2007-2010 Saturn OUTLOOK OUTLOOK |
|
| Attention: | This Bulletin also applies to any of the above models that may be Export from North America vehicles. |
This bulletin has been revised to add the 2014-2017 Model Years. Please discard Corporate Bulletin Number 07-00-89-021P.
The purpose of this bulletin is to inform dealers of special procedures necessary when towing a trailer or when towing the vehicle behind a recreational vehicle.
Towing a Trailer
Trailer Weight Information
The following chart shows how much the trailer can weigh, based on the vehicle powertrain combination and whether the vehicle is equipped with Trailer Provision (RPO V92). Retailers should refer customers to the appropriate Owner Manual for important trailering tips, vehicle maintenance, and safety rules before towing a trailer.
| Vehicle | Maximum Trailer Weight for Vehicles Built Prior to 12/04/08 | Maximum Trailer Weight for Vehicles Built After to 12/04/08 |
2007-2016 GMC Acadia, 2017 Acadia Limited, 2007-2010 Saturn OUTLOOK Equipped with Trailer Provisions (RPO V92) OUTLOOK Equipped with Trailer Provisions (RPO V92) |
4,500 lb. (2,041 kg) | 5,200 lb. (2,359 kg) |
2007-2016 GMC Acadia, 2017 Acadia Limited, 2007-2010 Saturn OUTLOOK Equipped without Trailer Provisions (RPO V92) OUTLOOK Equipped without Trailer Provisions (RPO V92) |
2,000 lb. (907 kg) | 2,000 lb. (907 kg) |
2008-2017 Buick Enclave Equipped with Trailer Provisions (RPO V92) Enclave Equipped with Trailer Provisions (RPO V92) |
4,500 lb. (2,041 kg) | 4,500 lb. (2,041 kg) |
2008-2017 Buick Enclave Equipped without Trailer Provisions (RPO V92) Enclave Equipped without Trailer Provisions (RPO V92) |
2,000 lb. (907 kg) | 2,000 lb. (907 kg) |
| 2009-2017 Chevrolet Traverse Equipped with Trailer Provisions (RPO V92) | 5,200 lb. (2,359 kg) | 5,200 lb. (2,359 kg) |
| 2009-2017 Chevrolet Traverse Equipped without Trailer Provisions (RPO V92) | 2,000 lb. (907 kg) | 2,000 lb. (907 kg) |
Important: The following modifications are intended to address the ability to update a vehicle to allow the electrical function for trailer lighting when trailer towing is desired only. Modification of a non-V92 vehicle to bring it up to the towing capacity of a V92 equipped vehicle is not practical or recommended. The V92 package when ordered as part of the original build of the vehicle includes additional cooling capability, engine and transmission calibrations to include a Tow/Haul mode, which are not available for retrofit. The towing capability will remain at the non-V92 limits, even after the recommended electrical updates included in this bulletin to allow trailer lighting to function.
Towing a Trailer with a Vehicle without Trailer Provisions (RPO V92) (2007 Model Year Only)
These vehicles must be modified by installing a new underhood bussed electrical center (UBEC) to provide full functionality for 4 circuits: ground, tail lamps, RH and LH stop/turn lamps. Perform this modification only if the customers will be using the vehicle to tow.
The replacement of the UBEC remains the best solution to upgrade the vehicles wiring for towing. The electrical circuitry for the tail/stop lamps is controlled by the BCM and splicing into the body harness is not recommended.
The backup lamp circuit will also need to be modified using the following procedure:
- Disconnect the X7 connector from the Body Control Module (BCM).
- Remove the terminal for pin 3 from the BCM X7 connector. The wire to this terminal is dark blue and is the 38 circuit.
- Re-connect the X7 connector to the BCM.
- Cut the terminal off the end of this wire and strip the end of the wire.
- Splice this wire into the 24 circuit wire that goes into BCM connector X6, pin 2. The 24 circuit is light green.
Towing a Trailer with a Vehicle without Trailer Provisions (RPO V92) (2008-2012 Model Year Built Prior to May 01, 2012)
These vehicles must be modified by installing a new underhood bussed electrical center (UBEC) to provide full functionality for 4 circuits: ground, tail lamps, RH and LH stop/turn lamps. Perform this modification only if the customers will be using the vehicle to tow.
The replacement of the UBEC remains the best solution to upgrade the vehicles wiring for towing. The electrical circuitry for the tail/stop lamps is controlled by the BCM and splicing into the body harness is not recommended.
Towing a Trailer with a Vehicle without Trailer Provisions (RPO V92) (2012–2017 Model Year Built After April 30, 2012)
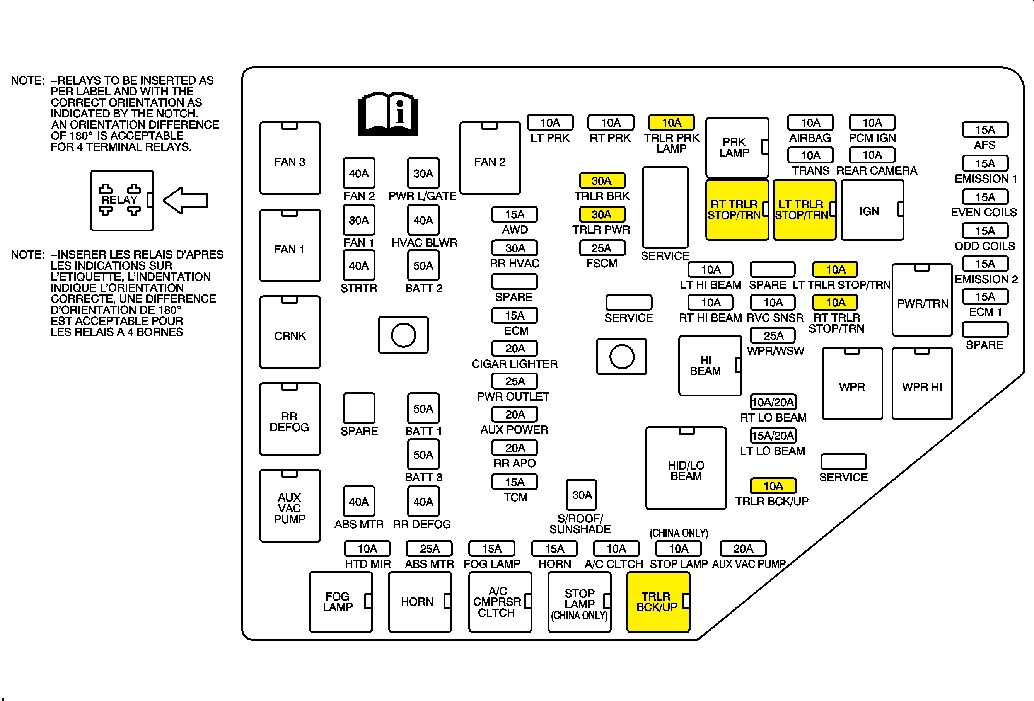
These vehicles must be modified by installing the necessary relays and fuses into the underhood bussed electrical center (UBEC) to provide full functionality for 4 circuits: ground, tail lamps, RH and LH stop/turn lamps. Refer to the illustration below for relay and fuse locations. Perform this modification only if the customers will be using the vehicle to tow.
Recreational Vehicle Towing (Dinghy Towing)
Recreational Vehicle Towing Information
Important: Vehicles that are “dinghy towed” must be started at the beginning of each day and at each fuel stop for a minimum of five minutes.
Recreational vehicle towing means towing the vehicle behind another vehicle – such as behind a motorhome. The two most common types of recreational vehicle towing are known as “dinghy towing” (towing the vehicle with all four wheels on the ground) and “dolly towing” (towing the vehicle with two wheels on the ground and two wheels up on a device known as a “dolly”). With the proper preparation and equipment, many vehicles can be towed in these ways. Refer to the appropriate model/model year Owner Manual for towing preparation guidelines and dolly and dinghy towing procedures. The Towing Chart below summarizes powertrain combination compatibility with dolly and dinghy towing methods.
| Recreational Vehicle Towing Chart | |||
|---|---|---|---|
| Powertrain Combination and Towing Method | Rear Wheels on a Tow Dolly | Front Wheels on a Tow Dolly | All Four Wheels on the Ground (Dinghy) |
| 3.6L V6 Engine with Front-Wheel Drive and 6T75 Six-Speed Automatic Transaxle (MY9) | No | Yes | Yes* |
| 3.6L V6 Engine with All-Wheel Drive and 6T75 Six-Speed Automatic Transaxle (MH6) | No** | No** | Yes* |
*Caution: These vehicle can be dinghy towed from the front for unlimited miles at 65 mph (105 km/h). To avoid vehicle damage, never exceed 65 mph (105 km/h) while towing these vehicles. The repairs would not be covered by the warranty.
**Caution: Dolly towing an all-wheel drive vehicle may result in premature failure of the rear drive module.
Dinghy Towing Procedure (2007-2008 Model Year)
Caution: If you tow your vehicle without performing each of the steps listed under “Dinghy Towing,” you could damage the automatic transmission. Be sure to follow all steps of the dinghy towing procedure prior to and after towing your vehicle.
Caution: Don’t tow a vehicle with the front drive wheels on the ground if one of the front tires is a compact spare tire. Towing with two different tire sizes on the front of the vehicle can cause severe damage to the transmission.
Important: All-wheel drive vehicles may only be dinghy towed from the front, with all four wheels on the ground.
- Position the vehicle to tow. Shift the transmission to PARK (P) and turn the ignition to OFF.
- Securely attach the vehicle being towed to the tow vehicle.
- Set the parking brake.
- Turn the ignition to ACCESSORY.
- Shift your transmission to NEUTRAL (N).
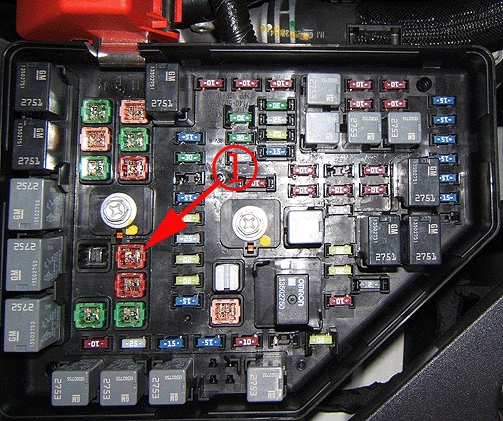
- To prevent your battery from draining while the vehicle is being towed, remove the 50 amp BATT1 fuse (1) in the UBEC and store in a safe location.
- Release the parking brake.
Once you have reached your destination, do the following steps:
- Set the parking brake.
- Reinstall the BATT1 fuse.
- Shift the transmission to PARK (P), turn the ignition key to OFF and remove the key from the ignition.
- Release the parking brake.
Dinghy Towing Procedure (2009-2012 Model Year Built Prior to May 01, 2012)
Caution: If you tow your vehicle without performing each of the steps listed under “Dinghy Towing,” you could damage the automatic transmission. Be sure to follow all steps of the dinghy towing procedure prior to and after towing your vehicle.
Caution: Don’t tow a vehicle with the front drive wheels on the ground if one of the front tires is a compact spare tire. Towing with two different tire sizes on the front of the vehicle can cause severe damage to the transmission.
Important: All-wheel drive vehicles may only be dinghy towed from the front, with all four wheels on the ground.
- Position the vehicle to tow. Shift the transmission to PARK (P) and turn the ignition to OFF.
- Securely attach the vehicle being towed to the tow vehicle.
- Set the parking brake.
- Turn the ignition to ACCESSORY.
- Shift your transmission to NEUTRAL (N).
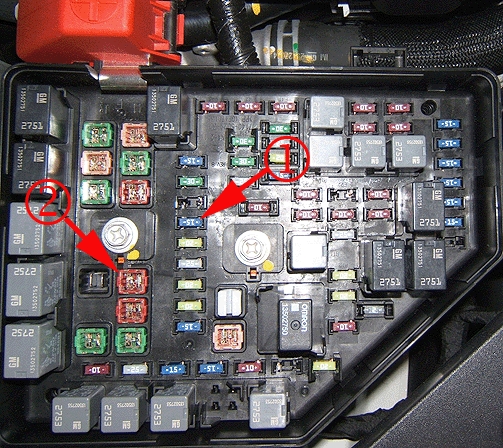
Important: The fuses must be removed in the order specified.
- Remove the 15 amp ECM fuse (1) in the UBEC and store in a safe location.
- To prevent your battery from draining while the vehicle is being towed, remove the 50 amp BATT1 fuse (2) in the UBEC and store in a safe location.
- Release the parking brake.
Once you have reached your destination, do the following steps:
- Set the parking brake.
- Reinstall the BATT1 fuse.
- Reinstall the ECM fuse.
- Shift the transmission to PARK (P), turn the ignition key to OFF and remove the key from the ignition.
- Release the parking brake.
Dinghy Towing Procedure (2012–2017 Model Year Built After April 30, 2012)
Caution: If you tow your vehicle without performing each of the steps listed under “Dinghy Towing,” you could damage the automatic transmission. Be sure to follow all steps of the dinghy towing procedure prior to and after towing your vehicle.
Caution: Don’t tow a vehicle with the front drive wheels on the ground if one of the front tires is a compact spare tire. Towing with two different tire sizes on the front of the vehicle can cause severe damage to the transmission.
Important: All-wheel drive vehicles may only be dinghy towed from the front, with all four wheels on the ground.
- Position the vehicle to tow. Shift the transmission to PARK (P) and turn the ignition to OFF.
- Securely attach the vehicle being towed to the tow vehicle.
- Set the parking brake.
Note: If the ignition is turned to the RUN position during this step, the MIL will illuminate with DTCs U0100 and P0700 set in the transmission control module (TCM). To clear the DTCs, the ignition must be cycled three times.
- Turn the ignition to ACCESSORY.
- Shift your transmission to NEUTRAL (N).
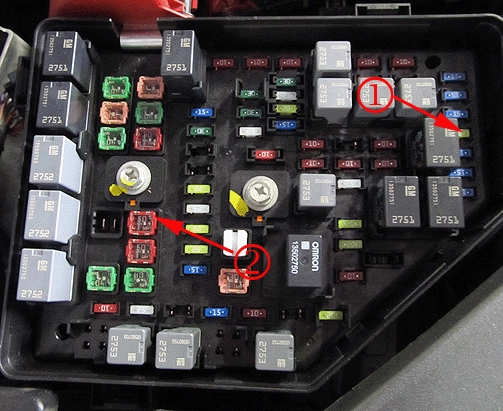
Important: The fuses must be removed in the order specified.
- Remove the 20 amp ECM 1 fuse (1) in the UBEC and store in a safe location.
- To prevent your battery from draining while the vehicle is being towed, remove the 50 amp BATT1 fuse (2) in the UBEC and store in a safe location.
- Release the parking brake.
Once you have reached your destination, do the following steps:
- Set the parking brake.
- Reinstall the BATT1 fuse.
- Reinstall the ECM 1 fuse.
- Shift the transmission to PARK (P), turn the ignition key to OFF and remove the key from the ignition.
- Release the parking brake.
Parts Information (2007-2012 Model Year Built Prior to May 01, 2012)
For part numbers and usage of the UBEC, see Group 02.483 of the appropriate Parts Catalog. Saturn retailers should refer to the appropriate model year Parts & Illustration Catalog for the vehicle. Order the UBEC with the same option content including RPO V92.
Parts Information (2012–2017 Model Year Built After April 30, 2012)
| Description | Qty | Part Number |
| Relay | 3 | 19116059 |
| 30 Amp Fuse | 2 | 19116050 |
| 10 Amp Fuse | 4 | 19116042 |
Warranty Information
Please advise the customer that the installation and cost of the new underhood bussed electrical center (UBEC) will not be covered under the vehicle’s warranty.
SEOCONTENT-END
Bulletin No.: 07-00-89-021Q
Date: June, 2016
To View or Download this Document Click Here
 Loading...
Bulletin No.: 07-00-89-021P
Date: Mar-2013
To View or Download this Document Click Here
 Loading...
Bulletin No.: 07-00-89-021P
Date: March, 2013
To View or Download this Document Click Here
 Loading...
Bulletin No.: 07-00-89-021P
Date: March, 2013
To View or Download this Document Click Here
 Loading...
Bulletin No.: 07-00-89-021O
Date: Nov-2012
To View or Download this Document Click Here
 Loading...
Bulletin No.: 07-00-89-021O
Date: Nov-2012
To View or Download this Document Click Here
 Loading...
Bulletin No.: 07-00-89-021O
Date: December, 2012
To View or Download this Document Click Here
 Loading...
Bulletin No.: 07-00-89-021O
Date: December, 2012
To View or Download this Document Click Here
 Loading...
Bulletin No.: 07-00-89-021N
Date: Oct-2012
To View or Download this Document Click Here
 Loading...
Bulletin No.: 07-00-89-021N
Date: November, 2012
To View or Download this Document Click Here
 Loading...
Bulletin No.: 07-00-89-021N
Date: November, 2012
To View or Download this Document Click Here
 Loading...
NHTSA ID Number: 10021820
Manufacturer Communication Number: 070089021
| “This site contains affiliate links for which OEMDTC may be compensated” |
- VERSATILE: The Brakeman IV digital brake controller is compatible with a wide range of vehicles including Ford
 , GM, Chevy, Dodge, RAM, Toyota
 , Jeep, and more with 2, 4, 6, and 8 brakes (1-4 axles). Vehicle-specific Tekonsha Plug & Play brake controller wiring harness sold separately.
 - TIME-DELAYED DIGITAL BRAKE CONTROLLER: Applies braking power that ramps up, or increases over a period of time, at a fixed rate. This makes the REESE Brakeman IV brake controller ideal for basic towing needs.
- EASILY INSTALL: The Brakeman IV trailer brake controller has a Plug & Play connection for easy installation. As a time-based controller with a compact design, the unit can be installed above or below the dash, in any direction, as it is within reach of the driver.
- EASY-TO-READ INDICATOR: This controller has an LED light display those changes from green to red to indicate trailer connectivity and power output.
- MANUAL BRAKING AVAILABLE: If you ever need to manually apply the brakes, simply move the manual control lever to the left. The Brakeman IV will apply power to your trailer’s brakes up to the amount of power previously set.
- PROPORTIONAL ELECTRIC BRAKE CONTROLLER: Provides automatic braking based on the intensity and rate at which you apply your tow vehicle’s brakes, giving you smooth braking thanks to an internal inertia sensor. This makes the Primus IQ brake controller ideal for general and heavy-duty emergency braking.
- EASILY INSTALL AND STOW, THANKS TO PLUG & PLAY: The Primus IQ trailer brake controller has a snap-in dash mounting clip, Plug & Play port for two plug adapters, and removeable electrical connector so the unit can be easily unplugged, unclipped, and stored.
- EASY-TO-READ LED DISPLAY: Digital LED display shows settings, real-time diagnostics, and alerts.
- BOOST FEATURE PROVIDES EXTRA BRAKING POWER: Boost provides up to three levels of additional stopping power at the touch of a button, giving you confidence in stopping safely when you’re hauling heavier loads and/or need more power to stop.
- VERSATILE: The Primus IQ electric brake controller is compatible with a wide range of vehicles including Ford
 , GM, Chevy, Dodge, RAM, Toyota
 , Jeep, and more with 2, 4, or 6
 , GM, Chevy, Dodge, RAM, Toyota
 . Wiring Harness is NOT Included." rel="nofollow noopener sponsored" target="_blank">
TEKONSHA 8508220 Brake-EVN Proportional Brake Controller for Trailers with 1-4 Axles, Compatible with Ford, GM, Chevy, Dodge, RAM, Toyota. Wiring Harness is NOT Included.
- COMPATIBILITY: The BRAKE-EVN electric brake controller is compatible with a wide range of vehicles including Ford
 , GM, Chevy, Dodge, RAM, Toyota
 , Jeep, and more with 2, 4, 6, and 8 brakes (1-4 axles). VEHICLE-SPECIFIC TEKONSHA PLUG & PLAY BRAKE CONTROLLER WIRING HARNESS SOLD SEPARATELY.
 - PROPORTIONAL ELECTRIC BRAKE CONTROLLER: Provides automatic braking based on the intensity and rate at which you apply your tow vehicle’s brakes, thanks to an internal inertia sensor. This makes the Tekonsha BRAKE-EVN brake controller ideal in any braking situation.
- EASILY INSTALL THANKS TO PLUG & PLAY: The BRAKE-EVN trailer brake controller has a Plug & Play port for two plug adapters and a removeable electrical connector so the unit can be easily unplugged.
- EASY-TO-READ LED DISPLAY: Digital LED display shows settings, real-time diagnostics, and alerts.
- MANUAL BRAKING AVAILABLE: If you ever need to manually apply the brakes, simply move the manual control lever to the left. The BRAKE-EVN will apply power to your trailer’s brakes up to the amount of power previously set.
- PORTABLE — The Echo trailer brake controller has a non-invasive install and is easily transferrable from one vehicle to another. It plugs into any 7-way connector, wirelessly links to your smartphone using Bluetooth
- SMARTPHONE-READY — The Echo brake controller wirelessly syncs with your Apple or Android phone, turning it into a brake controller interface with the Smart Control app (Warning: Avoid distracted driving. Only make adjustments when vehicle is stationary)
- ZERO-TOOL INSTALL — Installing this trailer brake controller is as easy as plugging in a 7-way trailer wiring connector. It requires no tools, no extra wires and no hardware. A locking tab and strap keep it firmly connected. NOTE: Strap stored inside cap
- HIGHLY RESPONSIVE — Echo uses a triple-axis accelerometer to provide smooth, safe braking. It maintains responsive braking, even when your phone screen is locked, receives incoming calls or if the Bluetooth connection is lost
- VERSATILE — This electronic trailer brake controller easily transfers between vehicles and trailers and works on virtually any trailer with 1 to 2 axles (2 to 4 brakes). It is also fully compatible with cruise control, anti-lock brakes, low-voltage systems
- New
- Same Day Shipping on Request
- Best Value and Performance in its Class
- 15-Years as premier solution provider
- Complimentary White Glove Service - Just-Ask-We-Take-Care-of-It
- PROFESSIONAL TRAILER BRAKE CONTROLLER: Ensure safe towing with the Briidea professional trailer brake controller. Designed for reliability, it gives you peace of mind by ensuring smooth braking, significantly reducing the risk of accidents and vehicle damage
- TIME-DELAY TRAILER BRAKE CONTROLLER: The time delay brake controller can activate the trailer brake by applying varying power within a set period of time. Once engaged, the LED display conveniently shows the gain setting, ensuring your safety while driving
- SAFETY PROTECTION: Our trailer brake controllers has advanced overcurrent protection, short circuit protection and fault detection for your road safety. With LED display, real-time display of your current Settings, output voltage and fault diagnosis, so that you can solve problems in a timely manner
- EASY TO INSTALL: Includes a versatile mounting bracket and accessories for installation in any position or angle. For optimal placement, we recommend mounting it under the dashboard to ensure it doesn't obstruct your view while driving. This allows you to conveniently operate and monitor trailer brake activity from the cab
- COMPATIBILITY: The trailer brake controller kit is compatible with any vehicle now your driving, designed to operate 1 to 4 braked axles (2- 8 brakes), ideal for light duty towing and Occasional towing, etc
- Time-based braking
- Mounts at any angle
- Percentage of braking power shown
- Plug-In Simple! with vehicle specific wiring kit
- Intuitive vertical manual slide
- TIME-DELAYED DIGITAL BRAKE CONTROLLER: Applies braking power that ramps up, or increases over a period of time, at a fixed rate. This makes the Tekonsha Brakeman IV brake controller ideal for basic, light-duty towing needs
- VERSATILE OF BRAKE CONTROLLER: The Brakeman IV digital brake controller is compatible with a wide range of vehicles including Ford
 , GM, Chevy, Dodge, RAM, Toyota
 , Jeep, and more with 2, 4, 6, and 8 brakes (1-4 axles). Vehicle-specific Tekonsha Plug & Play brake controller wiring harness sold separately
 - EASILY INSTALL: The Brakeman IV trailer brake controller has a Plug & Play port for easy installation. As a time-based controller with a compact design, the unit can be installed above or below the dash, in any direction, as it is within reach of the driver
- VEHICLE APPLICATIONS FOR BRAKE CONTROLLER HARNESS: 2015-2022 Cadillac
 Escalade, 2014-2018 Chevrolet Silverado 1500, 2015-2019 Chevrolet Silverado 2500 HD, 2015-2019 Chevrolet Silverado 3500 HD, 2015-2023 Chevrolet Suburban, 2015-2023 Chevrolet Tahoe, 2014-2019 GMC Sierra 1500, 2015-2019 GMC Sierra 2500 HD, 2015-2019 GMC Sierra 3500 HD, 2015-2023 GMC Yukon.
 - CUSTOM DESIGN OF HARNESS: Tekonsha trailer brake controller harnesses are designed to make connecting your brake controller to your vehicle quick and easy. These harnesses fit into any Tekonsha brake controller with a Plug & Play port. The other end fits into the factory plug in your vehicle.
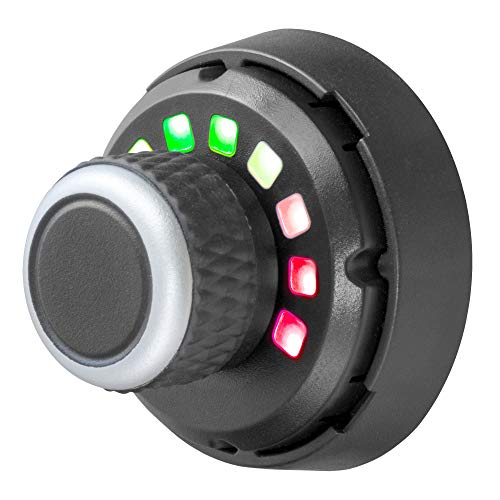
- FACTORY LOOK. The Spectrum trailer brake controller is designed to mount onto the dash of your vehicle and integrate with the other controls like a factory brake controller; It allows you to control and monitor all brake settings using a simple knob. Compatible with low-volt, PWM, ABS, cruise control and electric over hydraulic
- HIDDEN MAIN MODULE; To maintain powerful trailer brake operation without obstructing your vehicle dash, the computer module of this brake controller is separate from the control knob and can be mounted out of sight
- INTELLIGENT BRAKING; This trailer brake controller operates with an integrated circuit called a triple-axis accelerometer; This circuit detects motion on three planes and provides braking power accordingly, up or down a hill
- EASY ADJUSTMENT; The Spectrum electric brake controller is highly adjustable to accommodate different vehicles, trailers and loads; The push-button knob offers easily accessible manual override whenever needed
- VERSATILE OF BRAKE CONTROLLER: The Primus IQ electric brake controller is compatible with a wide range of vehicles including Ford
 , GM, Chevy, Dodge, RAM, Toyota
 , Jeep, and more with 2, 4, or 6 brakes (1-3 axles). Vehicle-specific Tekonsha Plug & Play brake controller wiring harness sold separately.
 - EASILY INSTALL AND STOW, THANKS TO PLUG & PLAY BRAKE CONTROLLER: The Primus IQ trailer brake controller has a snap-in dash mounting clip, Plug & Play port for two plug adapters, and removeable electrical connector so the unit can be easily unplugged, unclipped, and stored.
- PROPORTIONAL ELECTRIC BRAKE CONTROLLER: Provides automatic braking based on the intensity and rate at which you apply your tow vehicle’s brakes, giving you smooth braking thanks to an internal inertia sensor. This makes the Primus IQ brake controller ideal for general and heavy-duty emergency braking.
- VEHICLE APPLICATIONS FOR HARNESS: 1994-96 Ford
 Bronco , 1992-08 Ford
 E-150 Econoline , 2000-05 Ford
 Excursion , 1997-12 Ford
 Expedition , 2004 Ford
 F-150 Heritage , 1994-08 Ford
 F-150 , 1997 Ford
 F-250 HD , 1999-04 Ford
 F-250 Super Duty , 1999-04 Ford
 F-450 Super Duty Cab & Chassis, 1995-03 Ford
 Windstar w/Factory Tow Package, 2005-09 Land Rover LR3 , 2005-14 Land Rover Range Rover , 2006-08 Lincoln Mark LT , 1998-12 Lincoln Navigator , 1997-99 Ford
 F-250 Styleside
 - ADDITIONAL APPLICATION: 1992-08 Ford
 E-350 Econoline RV Cutaway, w/Factory Tow Prep Plug, 2003-08 Ford
 E-450 Econoline Super Duty RV Cutaway, w/Factory Tow Prep Plug, 2002-23 Ford
 Explorer w/Factory Tow Package, 2012-19 Land Rover Range Rover Evoque , 2002-10 Mercury Mountaineer w/Factory Tow Package, 2003-05 Lincoln Aviator w/Factory Tow Package, 2007-10 Ford
 Explorer Sport Trac w/Factory Tow Package, 2000-02 Ford
 E-450 Econoline Super Duty Stripped RV Cutaway, w/Factory Tow Prep Plug
Last update on 2025-05-08 / Affiliate links / Images from Amazon Product Advertising API
This product presentation was made with AAWP plugin.
