
NHTSA ID Number: 10126004
Manufacturer Communication Number: GCUS-3-796
Summary
16147 Customer Satisfaction. On certain vehicles, the center high mount stop lamp (CHMSL) fasteners may back off over time and cause a water leak, allowing water to flow into the rear compartment battery tub. When the battery tub fills with water to a height of 50mm or more, the DC/DC converter module board and connector are exposed to water which may cause corrosion. If water drains below the DC/DC converter, a resistive short may occur on the printed circuit board which could result in an unattended fire when the DC/DC converter is powered. Dealers are to inspect for water damage in the battery tub electrical components, and replace the CHSML gaskets and nuts (adding Loctite to the nut).
2 Affected Products
Vehicle
| CHEVROLET | CRUZE | 2016-2017 |
Parts
| 4 | Nuts (20 nuts per package) | 11609737 |
| 1 | Gasket Kit (4 gaskets per kit) | 84279073 |
SEOCONTENT-START
Customer Satisfaction Program
16147 Center High Mount Stop Lamp Water Leak
| Subject: | 16147 — Center High Mount Stop Lamp Water Leak |
| Models: | 2016–2017 Chevrolet Cruze |
| Reference Number: | N162064340 | Release Date: | April 2017 |
| Revision: | 01 | ||
| Revision Description: This bulletin has been revised to update the part information section, correction statement, and information regarding the training video, and to remove steps pertaining to the use of threadlocker within the service procedure. Please discard all copies of bulletin 16147. | |||
| Attention: | This program is in effect until January 31, 2019. |
| Make | Model | Model Year | RPO | Description | |
|---|---|---|---|---|---|
| From | To | ||||
| Chevrolet | Cruze | 2016 | 2017 | ||
Involved vehicles are marked “open” on the Investigate Vehicle History screen in GM Global Warranty Management system. This site should always be checked to confirm vehicle involvement prior to beginning any required inspections and/or repairs.
| Condition | On certain 2016-2017 model year Chevrolet Cruze vehicles, the center high mount stop lamp (CHMSL) fasteners may back off over time and cause a water leak, allowing water to flow into the rear compartment battery tub. When the battery tub fills with water to a height of 50mm or more, the DC/DC converter module board and connector are exposed to water which may cause corrosion. If water drains below the DC/DC converter, a resistive short may occur on the printed circuit board which could result in an unattended fire when the DC/DC converter is powered. |
| Correction | Dealers are to inspect for water damage in the battery tub electrical components, and replace the CHSML gaskets and nuts (adding Loctite to the nut). |
Parts Information
| Quantity | Part Name | Part No. |
| 4 | Nuts (20 nuts per package) | 11609737 |
| 1 | Gasket Kit (4 gaskets per kit) | 84279073 |
Important: Due to limited initial parts availability, dealers are encouraged not to order recall parts for use as shelf stock.
Reminder: Parts may be removed from Retail Inventory Management (RIM) management. Dealers should review the affected parts to confirm RIM managed status. Parts may have quantity limiters in effect.
Warranty Information
| Labor Code | Description | Labor Time | Trans. Type | Net Item |
| 9102790 | Replace High Mount Stop Lamp Nuts and Gaskets
Add: Drain Water from Battery Tub Replace Multifunction Power Supply Converter Replace Fuel Pump Power Control Module Replace Fuse Block |
0.6
0.2 0.3 0.2 0.4 |
ZFAT | N/A |
Service Procedure
Note: A training video is available on the GM Center of Learning web site (centerlearning.com) to aid technicians with this repair. After logging into the website, U.S. dealers should select the Resources tab near the top left of the page and select “Video On Demand” from the drop down menu. Scroll down and click on the arrow in front of GM TechTube in the Channels list on the left side. Select “Auto Body & Paint” and click on this video: Bulletin 16147 – Cruze CHMSL Water Leak. The course number is 52523.01V. Canadian dealers should access the Video On Demand Resource within the GM Centre of Learning and perform a search for “Recall 16147”.
- Open the rear compartment lid.
- Remove the rear compartment floor panel trim. Refer to Rear Compartment Floor Panel Trim Replacement in SI.
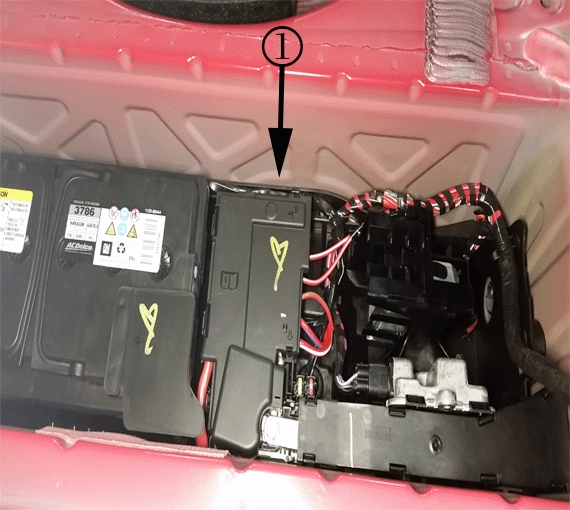
- Inspect the battery tub (1) for the evidence of a water leak or standing water.
- If evidence of a water leak or standing water is NOT found, proceed to step 14.
- If evidence of a water leak or standing water is found, proceed to the next step.
Warning: Failure to disconnect the battery negative cable could result in a vehicle fire.
- Disconnect the battery negative cable. Refer to Battery Negative Cable Disconnection and Connection in SI.
- Raise and support the vehicle. Refer to Lifting and Jacking the Vehicle in SI.
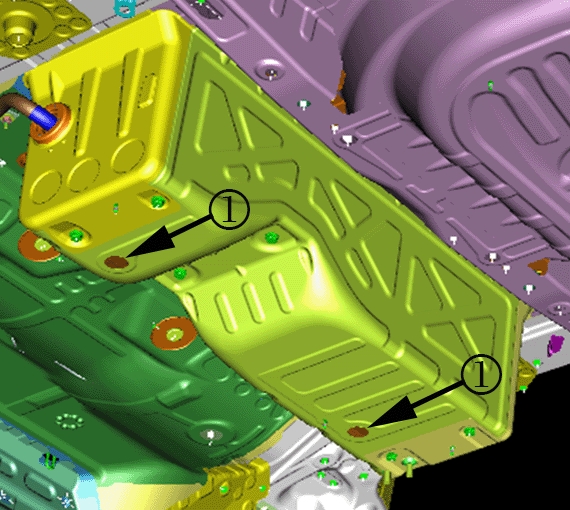
- Remove the body plugs (1) to drain the water out of the battery tub.
- Completely drain any water that is in the battery tub.
- Install the body plugs into the battery tub.
- Lower the vehicle. Refer to Lifting and Jacking the Vehicle in SI.
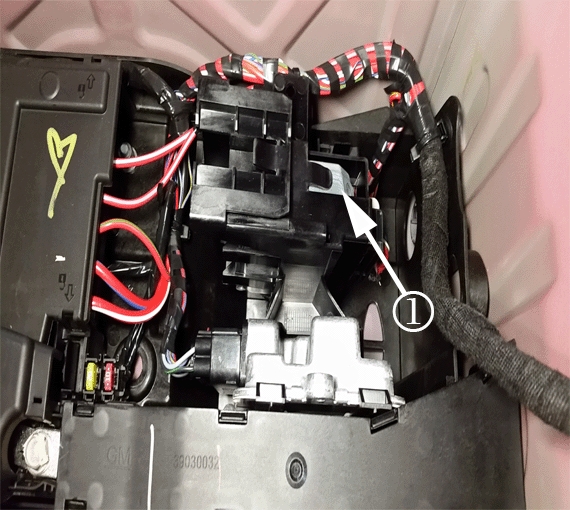
- Replace the multifunction power supply converter. Refer to Multifunction Power Supply Converter Replacement in SI.
- Inspect the fuel pump power control module for signs of water contacting the electrical connector or signs of terminal corrosion in the electrical connector or module.
- If there is NOT any evidence of water contacting the electrical connector or corrosion, proceed to the next step.
- If there is any evidence of water contacting the electrical connector or corrosion, replace the fuel pump power control module. Refer to Fuel Pump Power Control Module Replacement in SI.
- Inspect the fuse block for signs of corrosion or blown fuses.
- If there is NOT any evidence of corrosion or blown fuses, proceed to the next step.
- If there is any evidence of corrosion or blown fuses, replace the affected component. Refer to Fuse Block Replacement in SI.
- Inspect all connectors and terminals on the wire harness for signs of corrosion.
- If there is NOT any evidence of corrosion, proceed to the next step.
- If there is any evidence of corrosion, replace the affected component.
- Open the rear doors.
- Fold down the rear seat.
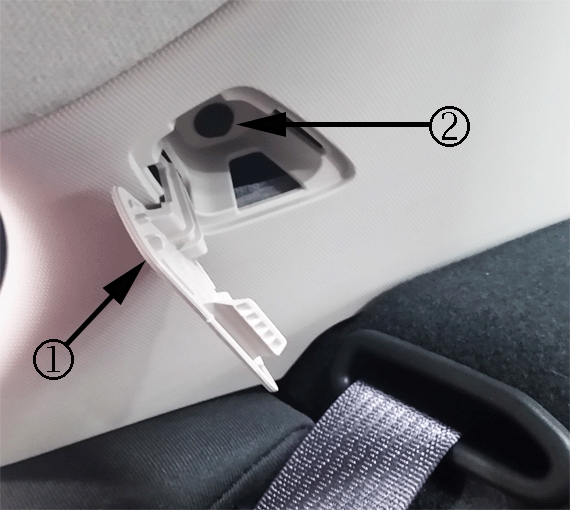
- Open the fastener cap (1) on both body side rear window garnish moldings.
- Remove the top fastener (2) from both body side rear window garnish moldings.
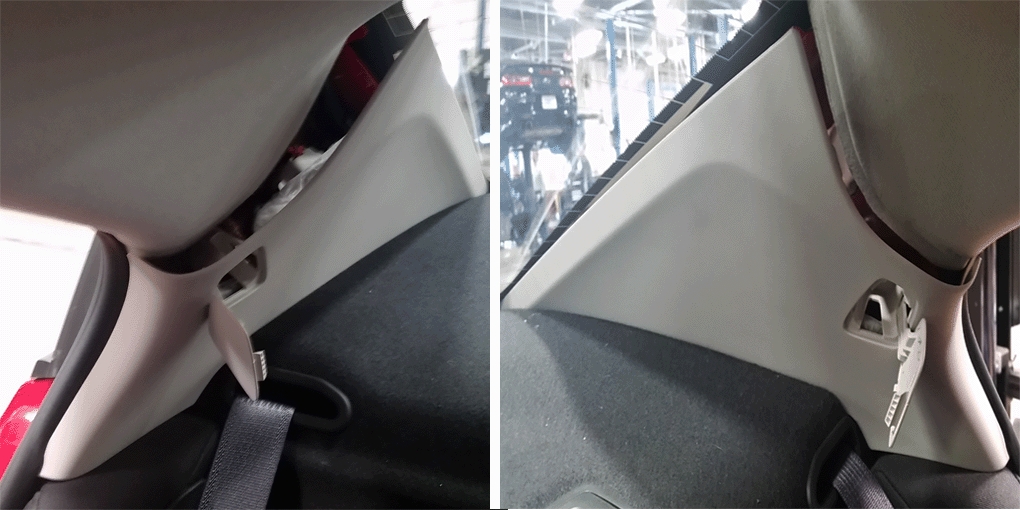
Note: It is NOT necessary to remove the lower fastener from the body side rear window garnish moldings.
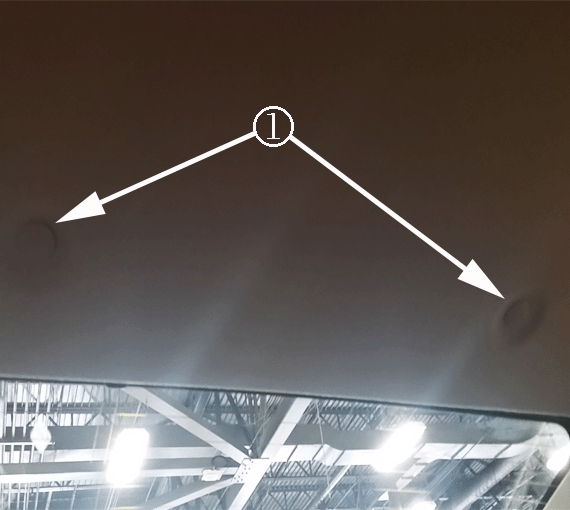
Warning: Do not attempt to repair or alter the head impact energy-absorbing material glued to the headliner or to the garnish trims. If the material is damaged, replace the headliner and/or the garnish trim. Failure to do so could result in personal injury.
Caution: If a vehicle is equipped with a head curtain inflator module ensure that the inflator module and tether are undamaged. If tether or curtain airbag are damaged in any way, they must be replaced.
Caution: Use care when working around the head curtain inflator module. Sharp tools may puncture the curtain airbag. If the head curtain inflator module is damaged in any way, it must be replaced.
- Release the two headlining trim panel retainers (1).
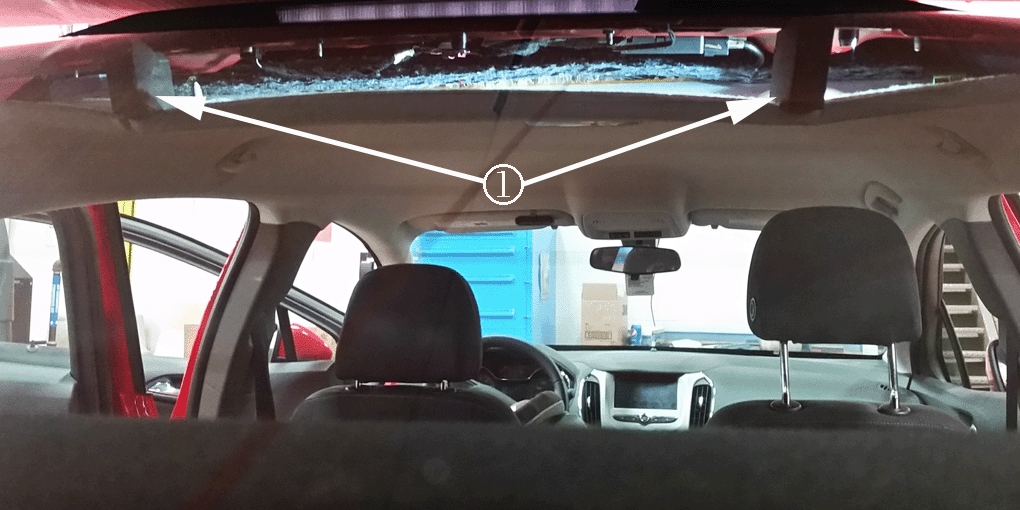
- Install two foam blocks (1) between the roof of the vehicle and the headlining trim panel to gain access to the high mount stop lamp nuts.
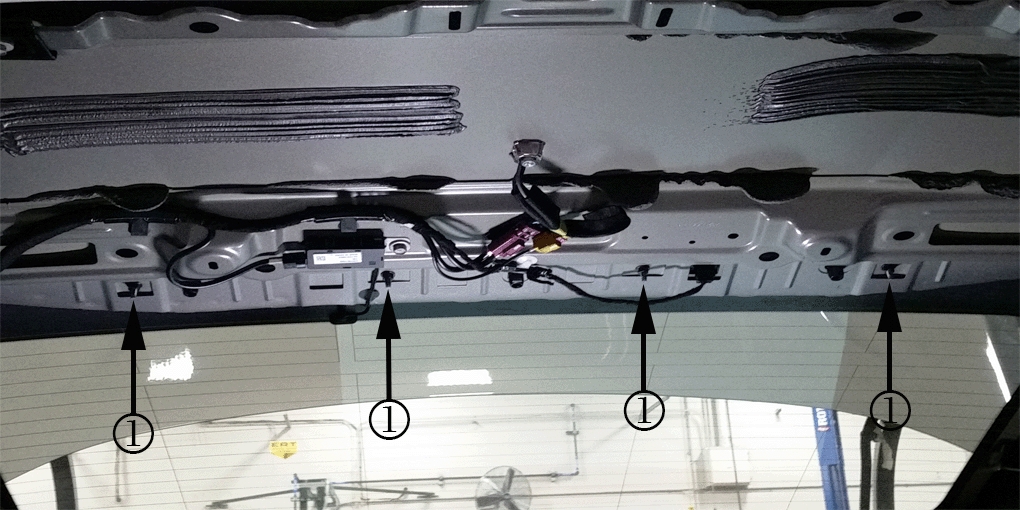
- Remove the high mount stop lamp nuts (1) and DISCARD.
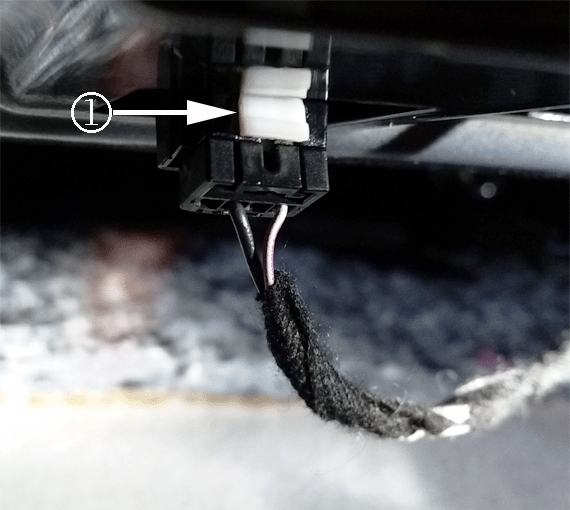
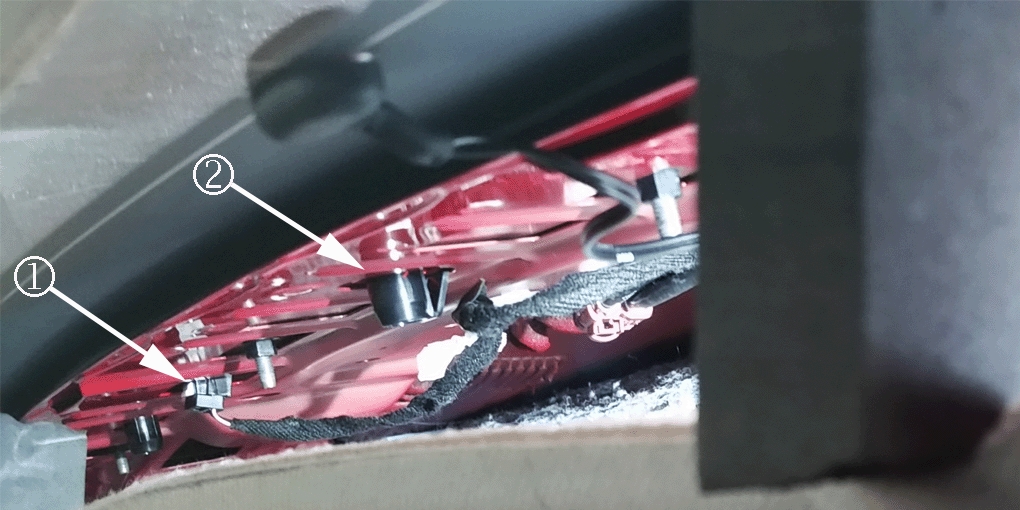
- Disconnect the high mount stop lamp electrical connector (1).
- Disengage the retainer (2) securing the high mount stop lamp to the vehicle.
- Remove the high mount stop lamp from the vehicle.
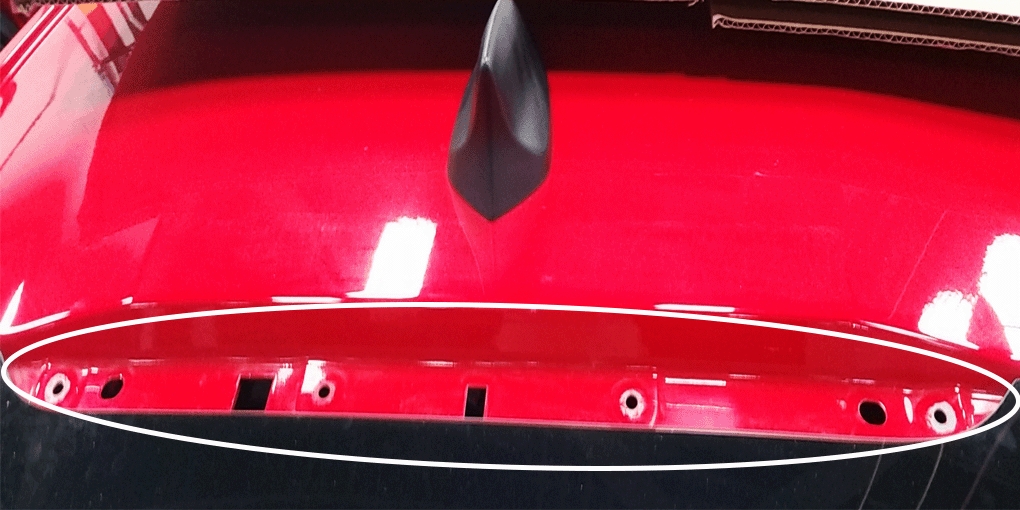
- Clean the body mating surface with a clean lint free rag.
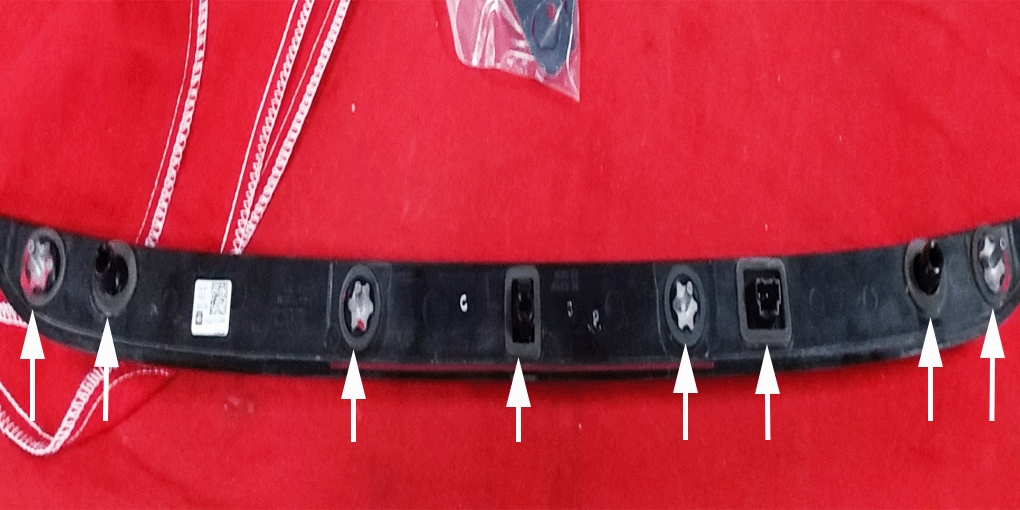
Caution: Do NOT use sharp tools or any chemicals to remove the gaskets from the high mount stop lamp as part damage may occur.
Note: Ensure that all foam residue is removed from the high mount stop lamp.
- Remove the gaskets from the high mount stop lamp and DISCARD.
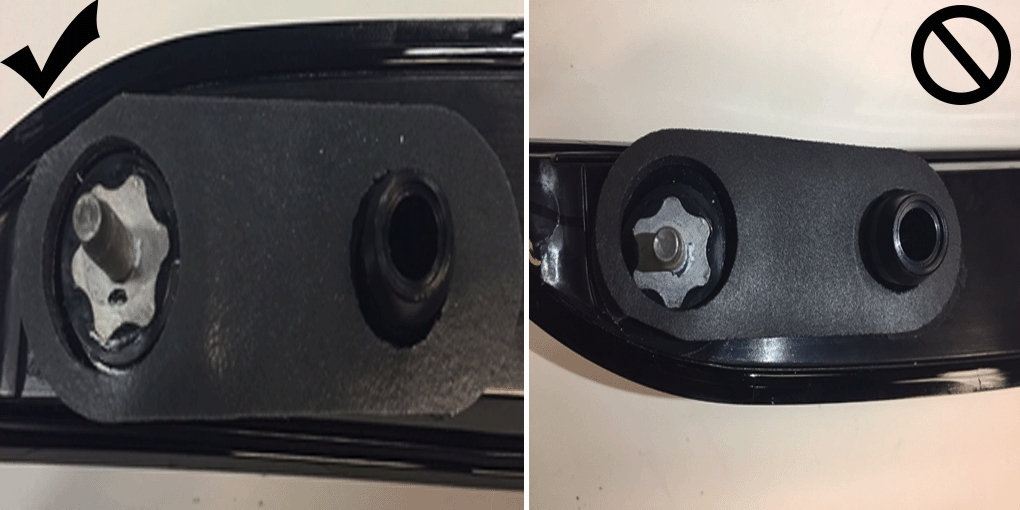
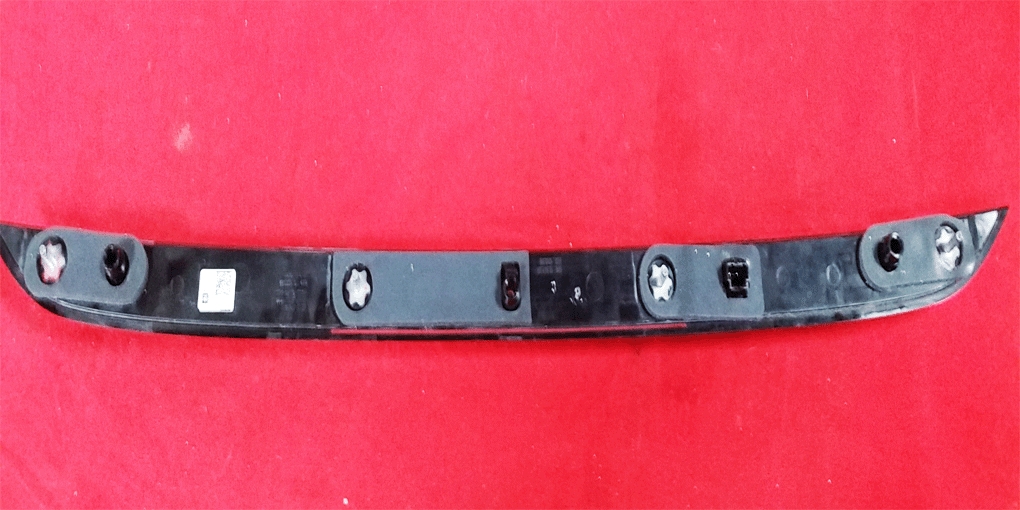
Caution: Make sure the gasket is centered and does NOT ride up the fastener joint. A water leak may occur if the gasket is not installed properly. Refer to the pictures above.
- Install NEW gaskets on the high mount stop lamp.
- Install the high mount stop lamp in the vehicle.
Note: Ensure the connector and connector position assurance (CPA) are fully seated.
- Connect the high mount stop lamp electrical connector.
- Install the NEW high mount stop lamp nuts and hand tighten.
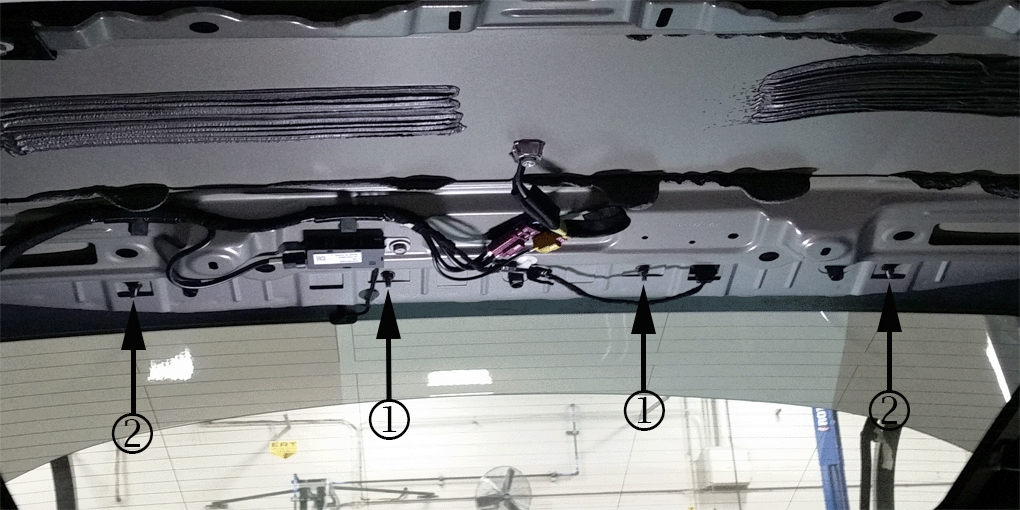
Note: The two middle high mount stop lamp nuts (1) MUST be torqued first.
- Torque the two middle high mount stop lamp nuts (1) to 8 Nm (71 lb in).
- Torque the two outside high mount stop lamp nuts (2) to 8 Nm (71 lb in).
- Perform a two minute water leak test on the high mount stop lamp using a water hose.
- If a water leak is NOT found, proceed to step 37.
- If a water leak is found, verify the high mount stop lamp nuts are properly torqued and proceed to the next step.
- Re-water test the high mount stop lamp using a water hose.
- If a water leak is NOT found, proceed to step 37.
- If a water leak is found, replace the high mount stop lamp gaskets and high mount stop lamp nuts following steps 23-35.
- Remove the foam blocks.
- Secure the two headlining trim panel retainers.
- Secure the body side rear window garnish moldings to the vehicle.
- Install the top fastener (2) from both body side rear window garnish moldings.
- Close the fastener cap (1) on both body side rear window garnish moldings.
- Fold the rear seat up.
- Close the rear doors.
Dealer Responsibility
All new, used, GM Certified Used, courtesy transportation vehicles, dealer shuttle vehicles, etc. in dealers’ possession and subject to this program must be held and inspected/repaired per the service procedure of this bulletin before customers take possession of these vehicles. Involved vehicles must be held and not delivered to customers, dealer-traded, released to auction, used for demonstration, or any other purpose.
All GM Certified Used vehicles currently in the dealers’ inventory within the Certified Pre-Owned Inventory System (CPOIS) will be de-certified and must be held and remedied per the service procedure in this bulletin. Upon submitting an accepted/paid warranty transaction in the Global Warranty Management (GWM) system, the vehicle can be re-certified for sale within the CPOIS system, or once again be used in the CTP program.
Dealers are to service all vehicles subject to this program at no charge to customers, regardless of mileage, age of vehicle, or ownership, through January 31, 2019. Customers who have recently purchased vehicles sold from your vehicle inventory, and for which there is no customer information indicated on the involved vehicle listing, are to be contacted by the dealer. Arrangements are to be made to make the required correction according to the instructions contained in this bulletin. A copy of the customer letter is provided in this bulletin for your use in contacting customers. Program follow-up cards should not be used for this purpose, since the customer may not as yet have received the notification letter.
In summary, whenever a vehicle subject to this program enters your vehicle inventory, or is in your facility for service through January 31, 2019, you must take the steps necessary to be sure the program correction has been made before selling or releasing the vehicle.
Dealer Reports
For dealers with involved vehicles, a listing with involved vehicles has been prepared and will be provided to U.S. and Canadian dealers through the GM GlobalConnect Recall Reports, or sent directly to export dealers. The listing may contain customer names and addresses obtained from Motor Vehicle Registration Records. The use of such motor vehicle registration data for any purpose other than follow-up necessary to complete this program is a violation of law in several states/provinces/countries. Accordingly, you are urged to limit the use of this report to the follow-up necessary to complete this program.
Courtesy Transportation — For USA & Canada
Courtesy transportation is available for customers whose vehicles are involved in a product program and still within the warranty coverage period. See General Motors Service Policies and Procedures Manual, Sections 1.4 and 6.1.10, for courtesy transportation program details.
Customer Notification
USA & Canada – General Motors will notify customers of this program on their vehicle (see copy of customer letter included with this bulletin).
Export – Letters will be sent to known owners of record located within areas covered by the US National Traffic and Motor Vehicle Safety Act. For owners outside these areas, dealers should notify customers using the attached sample letter.
January 2017
This notice applies to your vehicle, VIN:_______________________
Dear General Motors Customer:
We have learned that your 2016 or 2017 model year Chevrolet Cruze may have a condition in which the center high mount stop lamp (CHMSL) fasteners may back off over time and cause a water leak, allowing water to flow into the rear compartment battery tub. When the battery tub fills with water to a height of 50mm or more, the DC/DC converter module board and connector are exposed to water which may cause corrosion. If water drains below the DC/DC converter, a resistive short may occur on the printed circuit board which could result in an unattended fire when the DC/DC converter is powered.
Your satisfaction with your Chevrolet Cruze is very important to us, so we are announcing a program to prevent this condition or, if it has occurred, to fix it.
What We Will Do: Your GM dealer will inspect for water damage in the battery tub electrical components, and replace the CHSML gaskets and nuts. This service will be performed for you at no charge until January 31, 2019. After that, any applicable warranty will apply.
What You Should Do: To limit any possible inconvenience, we recommend that you contact your dealer as soon as possible to schedule an appointment for this repair. By scheduling an appointment, your dealer can ensure that the necessary parts will be available on your scheduled appointment date.
If you have any questions or concerns that your dealer is unable to resolve, please contact the appropriate Customer Assistance Center at the number listed below.
| Division | Number | Text Telephones (TTY) |
| Chevrolet | 1-800-630-2438 | 1-800-833-2438 |
| Puerto Rico – English | 1-800-496-9992 | |
| Puerto Rico – Español | 1-800-496-9993 | |
| Virgin Islands | 1-800-496-9994 |
We sincerely regret any inconvenience or concern that this situation may cause you. We want you to know that we will do our best, throughout your ownership experience, to ensure that your Chevrolet Cruze provides you many miles of enjoyable driving.
Terry M. Inch
Executive Director
Global Connected Customer Experience
16147
SEOCONTENT-END
Reference Number: N162064340
Release Date: December 2016
Revision: 00
To View or Download this Document Click Here
- Lock and Seal Fasteners: Prevents loosening of metal fasteners caused by vibration on small motors, mowers, and power equipment
- Prevents Rust and Corrosion: Protects from leaks, rusting, and corrosion and eliminates need to stock up on expensive lock nuts and washers
- Removable: Can be removed with hand tools
- Easy and Quick: Sets in 10 minutes and fully cures in 24 hours
- For 6-19mm Fasteners: Medium-strength formula for use on threads for 6mm to 19mm nuts and bolts


- Threadlocker: Thread locker has strong adhesion and can fix screws, nuts, and metal fasteners to prevent loosening due to vibration
- Sealing and leakage prevention: Using thread locker cores instead of solid gaskets, close contact, perfect sealing, and effective leakage prevention
- Prevents Rust and Corrosion: Protects from leaks, rusting, and corrosion and eliminates need to stock up on expensive lock nuts and washers
- Easy to use: Simply apply the threadlocker evenly to the thread, tighten the nut, and cure initially for 20 minutes, then fully cure within 24 hours
- Wide application: Whether you're installing a valve cover, water pump, or just tightening down some furniture screws, blue threadlocker has you covered. Our screw glue can be used on a variety of automotive, industrial and furniture applications

- ELIMINATE SPILLS WITH PATIENCE: GH1200 thread lock gives you the luxury to get rid of messy spills and wasted time cleaning up after unreliable applicators. Our product features a robust, precision-engineered nozzle that ensures a clean, controlled application, preventing leaks. keep your project area spotless with our Seal Fasteners threadlocker.
- STOP LEAKS AND FRUSTRATION: Our Seal Fasteners thread locker saves you from leaky valves, drips from loose water pumps & loose bolts in machinery. Our threadlocker forms a secure, long-lasting bond that prevents leaks, vibrations, and loosening. Keep your projects secure and frustration-free with GH1200 thread locker.
- NEVER RUN OUT: This convenient pack of threadlock provides high strength.The threadlocker offer the perfect solution for all your fastening needs. you'll have plenty on hand for various projects without worrying about running out anytime soon.
- SECURE PROJECTS FOR LONG HAUL: Our thread lock creates a powerful bond. The screw lock prevents loosening,. even under heavy loads and frequent use. Our thread lock gives you the peace of mind knowing your projects are built to last, without the constant worry of parts coming loose.
- VERSATILITY YOU CAN COUNT ON: From intricate automotive components to everyday household repairs our liquid thread lock is your one-stop solution for a wide range of applications. The fast-curing formula of thread lock works effectively on all types of fasteners, metals, and threaded connections. GH1200 thread locker automotive is the perfect addition to any toolbox.

- Size: 50 ml
- Color: Blue
- Characteristic odor
- A general-purpose, medium-strength threadlocker with improved oil tolerance
- Oil-tolerant curing on as-received fasteners without cleaning

- Locks And Seals While Preventing Parts Loosening Due To Vibration
- Protects Threads From Corrosion
- Ideal For All Nut And Bolt Applications 1/4" To 3/4" (6Mm To 20Mm)
- Removable With Hand Tools For Easy Disassembly
This product presentation was made with AAWP plugin.