
NHTSA ID Number: 10113891
Manufacturer Communication Number: PIP4989D
Summary
This Preliminary Information communication provides the technician with the steps to diagnose and repair a vehicle with a broken, noisy, worn or misaligned Drive Motor Generator belt resulting in a no charge concern. Dealer will follow the instructions to replace the belt if broken and use a laser belt alignment tool to correctly align the new belt. Inspect the drive belt tensioner strut assembly to ensure that it is installed correctly. If the strut is upside down remove and install correctly.
Condition/Concern
Customer or Technician may comment that there is a broken, noisy, worn or misaligned Drive Motor Generator (MGU) Belt resulting in a no charge concern.
There may be a Battery Saver message illuminated with or without DTCs P1A6F or P0A90 being set.
5 Affected Products
Vehicles
1 Associated Document
Manufacturer Communications
Bulletin No.: PIP4989D
Date: Mar-2016
MC-10113891-9999.pdf 766.178KB
NHTSA ID Number: 10112923
Manufacturer Communication Number: PIP4989C
Summary
This Preliminary Information communication provides the technician with the steps to diagnose and repair a vehicle with a broken, noisy, worn or misaligned Drive Motor Generator belt resulting in a no charge concern. Dealer will follow the instructions to replace the belt if broken and use a laser belt alignment tool to correctly align the new belt. Inspect the drive belt tensioner strut assembly to ensure that it is installed correctly. If the strut is upside down remove and install correctly.
1 Associated Document
Manufacturer Communications
Bulletin No.: PIP4989C
Date: Mar-2013
MC-10112923-9999.pdf 766.668KB
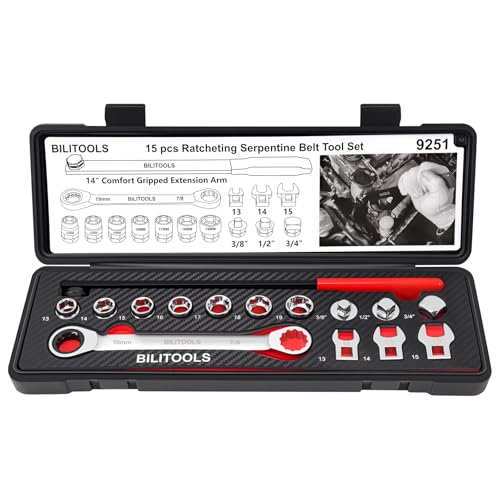
- Complete tool set for removing or installing the serpentine belt on vehicles with a spring-loaded belt tensioner pulley.
- Combines the advantages of a ratcheting wrench with the requirements of the serpentine belt removal tool to provide the best possible combination.
- Comes with extension for hard-to-reach belt tensioners. Eight low profile sockets and extension help to fit into tight spots.
- Includes Drive Tools: 14" extension arm, ratcheting wrench with 19 mm and 7/8" female ratchet drive, and 3/8", 1/2" and 3/4" square adapters
- Includes Sockets: 13 mm, 14 mm, 15 mm, 16 mm, 17 mm, 18 mm and 19 mm. Includes Crowfoot Wrenches: 13 mm, 14 mm and 15 mm.


- Efficient Belt Maintenance: Designed for effortless removal and installation of serpentine belts, providing the necessary leverage and clearance to release spring pressure and remove the tensioner pulley.
- Durable Construction: Crafted from durable alloy steel with a black oxide finish, this serpentine belt tool set resists rust, ensuring longevity and reliable performance job after job.
- Versatile Compatibility: Comes with 3/8 inch drive steel handle, 1/2 inch drive adapter, and sockets in sizes 13 mm, 15 mm, 16 mm, and 18 mm, making it compatible with almost all serpentine belt applications.
- Ease of Access: The thin, sturdy design allows for easy access to tensioners in tight spaces, enhancing job efficiency and reducing the time needed for belt maintenance tasks.
- Customer Appreciated: Mechanics and DIY automotive enthusiasts value the tool's quality and versatility, noting its substantial contribution to simplifying serpentine belt maintenance.

- Designed to provide access and leverage to hard to reach pulleys
- COMFORT: Dipped handle for comfort and secure grip
- Durable contruction
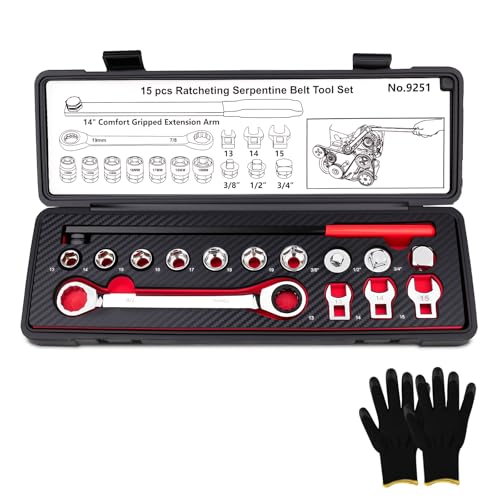
- Professional Belt Replacement: This serpentine belt tool kit is designed for removing and installing serpentine belts on vehicles with spring-loaded tensioners. It makes changing the serpentine belt easier
- Extended Design for Tight Spaces: Featuring a 14" extension bar and a 9" ratcheting wrench, this belt tensioner tool can easily access tensioner pulleys in narrow engine compartments, to smoother operation and a better working experience
- Premium Materials: Made from chrome-vanadium steel, this serpentine belt tool kit offers excellent strength and hardness for dealing with high-torque applications. The polished finish simplifying maintenance after use
- Organized Storage: This serpentine belt tool set is neatly stored in a durable blow-molded case and the engraved sizes on the parts and case liner enable quick identification of the right key for the task at hand
- Package Includes: This serpentine belt tensioner kit contains a 14" extension bar, a ratchet wrench, 7 sockets, 3 crowfoot wrenches, and 3 adapters, covering multiple sizes for a range of serpentine belt service tasks

- 【Why Use a Tool】- Using a tool allows for convenient removal and installation of lock nuts and component mounting bolts, which are often difficult to reach directly.
- 【When to Use】- Nuts and bolts are typically hidden in the engine compartment, behind components, and often close to the radiator or other obstacles. To easily tighten or loosen automotive parts, we provide this tool set, which enables efficient disassembly and installation while offering protection for repair personnel.
- 【Premium Material】- The handle tool is made of 45# steel, and the remaining components are forged from chrome-molybdenum steel (Cr-Mo). These materials exhibit excellent hardness and strength, along with good corrosion resistance, wear resistance, and high-temperature resistance.
- 【Package Includes】- This belt pulley wrench set features a long curved handle for easy access and includes 13 interchangeable adapters, suitable for almost all types of vehicles. The adapters include: 5 x Torx: E10, E12, E14, E16, E18 and 8 x 12-point: 12, 13, 14, 15, 16, 17, 18, 19mm (0.47"-0.74").
- 【Confident Purchase】- At DIPMOTOR, we prioritize product quality and customer satisfaction. We promise to provide you with high-quality products and reliable after-sales service. If you encounter any issues or have any concerns during the purchasing process, please don't hesitate to contact us. Our professional team is dedicated to resolving any problems and providing satisfactory solutions.
SEOCONTENT-START
Bulletin No.: PIP4989D
Date: Mar-2016
Subject: BAS+ (HYBRID) eAssist Drive Motor Generator Belt Broken Noisy Worn Or Misaligned Models: 2012 – 2013 Buick LaCrosse and Regal eAssist 2013 Chevrolet Malibu Eco eAssist
All with RPO HP6 This PI was superseded to update Administrative Details. Please discard PIP4989C.
The following diagnosis might be helpful if the vehicle exhibits the symptom(s) described in this PI. Condition/Concern
Customer or Technician may comment that there is a broken, noisy, worn or misaligned Drive MotorGenerator (MGU) Belt resulting in a no charge concern. There may be a Battery Saver messageilluminated with or without DTCs P1A6F or P0A90 being set.
Recommendation/Instructions
Important: If the 12V system voltage has fallen below a predetermined level (approximately 9V), useGDS2 to command the Battery Pack Cooling Fan on to make sure it operates.
– If the Battery Pack Blower Fan is inoperative replace the Battery Pack Cooling Fan.
– Consider viewing the December 2011 Emerging Issues Video 10211.12D for more info on the TorqueWrench Adapter and Tensioner replacement procedure if necessary before performing any repairs
Note: Prior to the removal of any components, the following steps must be performed.
1. Inspect the under hood area for any damage (engine, CV boots, etc.) that may have been inducedwhen the belt had broken.
2. Inspect the Drive Belt and note whether it looks like the belt just snapped cleanly, if it is shredded orworn due to misalignment, incorrect tension, or damaged due to contamination from any fluids. Take adigital photo of the broken belt ends and note the belt date code. The code is four numbers followed by”MX” printed in red lettering as shown below.
1 3. If a Laser Belt Alignment Tool (EN-49228 or equivalent) is available, use it to check for proper pulley alignment.
4. Inspect the drive belt Tensioner strut assembly to ensure that it is installed correctly – “TOP” is stamped on the upper rounded end of the tensioner strut housing as shown below. If it is installed upside down or if the upper and lower retaining bolts have been reversed during previous repairs, it could 2 cause an alignment concern as shown below. It is not necessary to remove the tensioner bolts from the bracket or remove the spring from the tensioner. The upper bolt of the tensioner is longer than the lower bolt. 5. Check for clearance/gap between tensioner stop and the tensioner assembly
– Loosen M6 tensioner stop bolt. Using a 19mm socket, rotate the hex feature beneath the strut counter-clockwise to extend the strut. Tighten M6 tensioner stop bolt and confirm you now have clearance/gap between tensioner stop and the tensioner asm.
– Check and note if the tensioner stop is in place and the bolt is tight.
– Remove the top tensioner bolt (requires 1st removing stop, then compressing strut, then removing belt (if present)).
– Verify that the tensioner assembly rotates about center pivot, but that the pivot or bolt is not loose. The tensioner should be able to move back and forth smoothly with only a small amount of force. 3 Important: When checking the center pivot bolt torque, it is necessary to use the Torque Wrench Adapter J-45025 when performing this repair. Without this tool, the torque specification in SI will be inaccurate. Achieving the correct torque specification is critical or the bolt may loosen, resulting in premature wear or breakage. The specification in SI is considering that the tech has the Torque Wrench Adapter installed on a 3/8 drive Torque Wrench while they are both kept in a straight line with each other. 6. Check the Tensioner pivot bolt torque by marking the head of the tensioner pivot bolt with a marker (see call-out 3 in photo below), torqueing it to 42 Nm (31 lb/ft) with the J-45025 / EN-45025 torque tool, and noting the mark again. Please take a digital photo if several degrees of movement (90 Degrees, etc.) are noted.
7. After following the steps above and gathering all of the requested information, follow order a new drive belt.
8. Follow the 2.4L Drive Belt Replacement Procedure in SI to install the new drive belt. As mentioned in this SI procedure, the tensioner stop below (1) must be removed before the tensioner is compressed with the EN-48932 compressor or tensioner/bracket damage may occur. Also, as mentioned, the tensioner assembly should be rotated out of the way to allow more clearance, which will make it easier to install the tensioner stop. Once the stop is installed, ensure that the dowel (2) is fully engaged to the bracket and that the tensioner stop sits flush against the bracket before the tensioner stop bolt is torqued to specification. 4 Warranty Information
The correction for this concern may be one of several repairs described above. For vehicles repaired under warranty, please use the appropriate warranty labor operation based on the original cause in addition to well documented straight time.
Please follow this diagnostic or repair process thoroughly and complete each step. If the condition exhibited is resolved without completing every step, the remaining steps do not need to be performed. GM bulletins are intended for use by professional technicians, NOT a “do-it-yourselfer”. They are written to inform these technicians of conditions that may occur on some vehicles, or to provide information that could assist in the proper service of a vehicle. Properly trained technicians have the equipment, tools, safety instructions, and know-how to do a job properly and safely. If a condition is described, DO NOT assume that the bulletin applies to your vehicle, or that your vehicle will have that condition. See your GM dealer for information on whether your vehicle may benefit from the information. WE SUPPORT VOLUNTARY TECHNICIAN CERTIFICATION
5
**************************************************************************************************************
**************************************************************************************************************
SEOCONTENT-END
This product presentation was made with AAWP plugin.
Hi,
I own chevy malibu 2012 2.4 cc electric/gas, when i drive from 60km and up speed after pushing brake pedal the belt makes slip.
can you help me to solve this problem?