| “This site contains affiliate links for which OEMDTC may be compensated” |
March 4, 2004 NHTSA CAMPAIGN NUMBER: 04V110000
FUEL LEAKAGE, IN THE PRESENCE OF AN IGNITION SOURCE, COULD RESULT IN A FIRE.
NHTSA Campaign Number: 04V110
Manufacturer GENERAL MOTORS CORP.
CORP.
Components FUEL SYSTEM, GASOLINE
Potential Number of Units Affected 483,477
Summary
SOME PASSENGER VEHICLES EQUIPPED WITH 4.0L V8 ENGINES HAVE A CONDITION IN WHICH THE NYLON TUBING USED IN THE FUEL RAIL CONSTRUCTION MAY DEGRADE AND CRACK. ADDITIONALLY, THE 1995 MODEL YEAR USES A UNIQUE UNDERHOOD FUEL RETURN LINE THAT MAY CRACK. CRACKING OF THE FUEL RAIL OR RETURN LINE TUBING CAN RESULT IN A FUEL LEAK INTO THE ENGINE COMPARTMENT.
Remedy
DEALERS WILL INSPECT AND, IF NECESSARY, REPLACE THE ENGINE FUEL RAIL WITH A NEW STAINLESS STEEL FUEL RAIL. DEALERS WILL ALSO INSTALL A REVISED CHASSIS FUEL RETURN LINE. THE RECALL BEGAN ON JUNE 2, 2004, FOR 1996-1997 OLDSMOBILE AURORA VEHICLES. OWNERS OF 1995 CADILLACS AND 1996-1997 OLDSMOBILE
 AURORA WERE SENT LETTERS ON AUGUST 6, 2004. ADDITIONAL LETTERS TO OWNERS WILL BE FORTHCOMING. OWNERS SHOULD CONTACT OLDSMOBILE
 AT 1-800-630-6537.
Notes
GM RECALL NO. 04014. CUSTOMERS CAN ALSO CONTACT THE NATIONAL HIGHWAY TRAFFIC SAFETY ADMINISTRATION’S AUTO SAFETY HOTLINE AT 1-888-DASH-2-DOT (1-888-327-4236).
Check if your Vehicle has a Recall
SEOCONTENT-START
| Subject: | 04014E — Engine Fuel Rail – Replace |
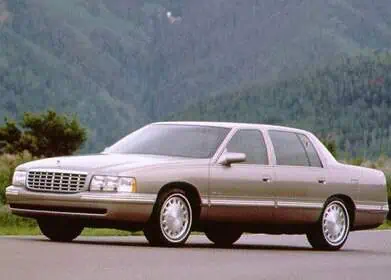
| Models: | 1995-1997 Cadillac DeVille Concours, Seville, Eldorado DeVille Concours, Seville, Eldorado |
1996-1997 Cadillac DeVille DeVille |
|
| Equipped with 4.6L V8 (RPO LD8 – VIN Y; RPO L37 – VIN 9) Engine | |
1995-1997 Oldsmobile Aurora Aurora |
|
| Equipped with 4.0L V8 (RPO L47 – VIN C) Engine |
Information regarding parts ordering been revised in the Part Information section. Please discard all copies of bulletin 04014D.
It is a violation of Federal law for a dealer to deliver a new motor vehicle or any new or used item of motor vehicle equipment (including a tire) covered by this notification under a sale or lease until the defect or noncompliance is remedied.
All involved vehicles that are in dealer inventory must be held and not delivered to customers, dealer traded, or used for demonstration purposes until the repair contained in this bulletin has been performed on the vehicle.
Condition
General Motors has decided that a defect which relates to motor vehicle safety exists in all 1995-1997 Cadillac
 DeVille Concours, Seville and Eldorado, 1996-1997 Cadillac
 DeVille; and 1995-1997 Oldsmobile
 Aurora model vehicles.
These vehicles have a condition in which the original equipment nylon tubing used in the fuel rail construction may degrade and crack.
Additionally, the 1995 Oldsmobile Aurora uses a unique underhood fuel return line that may crack at unusually high rates.
Cracking of the fuel rail can result in a fuel leak into the engine compartment.
The operator may experience fuel odor and possibly engine stalling due to loss of fuel pressure to the engine.
If this event were to occur, and if an ignition source were present, an engine compartment fire could occur.
Correction
Dealers are to inspect and, if necessary, replace the engine fuel rail with a new stainless steel fuel rail.
Dealers will also replace the chassis fuel lines on 1995 Oldsmobile Aurora model vehicles.
Vehicles Involved
Involved are all 1995-1997 Cadillac DeVille Concours, Seville and Eldorado, 1996-1997 Cadillac
 DeVille; and 1995-1997 Oldsmobile
 Aurora model vehicles; and built within these VIN breakpoints:
| Year | Division | Model | From | Through |
| 1995 | Cadillac |
DeVille Concours | SU200002 | SU309069 |
| 1995 | Cadillac |
Seville | SU800001 | SU838932 |
| 1995 | Cadillac |
Eldorado | SU600001 | SU625230 |
| 1996 | Cadillac |
DeVille | TU200001 | TU311280 |
| 1996 | Cadillac |
Seville | TU800001 | TU838241 |
| 1996 | Cadillac |
Eldorado | TU600004 | TU620816 |
| 1997 | Cadillac |
DeVille | VU200001 | VU830483 |
| 1997 | Cadillac |
Seville | VU800001 | VU845283 |
| 1997 | Cadillac |
Eldorado | VU600001 | VU833269 |
| 1995 | Oldsmobile |
Aurora | S4100001 | S4147771 |
| 1996 | Oldsmobile |
Aurora | T4100001 | T4124133 |
| 1997 | Oldsmobile |
Aurora | V4100001 | V4127927 |
Important: Dealers should confirm vehicle eligibility through GMVIS (GM Vehicle Inquiry System) before beginning recall repairs.
For US
For dealers with involved vehicles, a Campaign Initiation Detail Report containing the complete Vehicle Identification Number, customer name and address data has been prepared and will be loaded to the GM DealerWorld, Recall Information website.
Dealers that have no involved vehicles currently assigned will not have a report available in GM DealerWorld.
For IPC
For dealers with involved vehicles, a Campaign Initiation Detail Report containing the complete Vehicle Identification Number, customer name and address data has been prepared and is being furnished to involved dealers.
Dealers that have no involved vehicles currently assigned will not receive a report with the recall bulletin.
The Campaign Initiation Detail Report may contain customer names and addresses obtained from Motor Vehicle Registration Records.
The use of such motor vehicle registration data for any other purpose is a violation of law in several states/provinces/countries.
Accordingly, you are urged to limit the use of this report to the follow-up necessary to complete this program.
Parts Information
Parts required to complete this recall are to be obtained from General Motors Customer Care and Aftersales (GMCCA). Parts are currently in limited supply. Order parts on a CSO = Customer Special Order. If a SPAC case is required, dealers should place a CSO order (not CSO3) and upgrade the order to a SPAC case themselves. Parts may have quantity limiters in effect.
Important: Due to limited parts availability, dealers are encouraged not to order recall parts for use as shelf stock. Parts should only be ordered when inspection determines that it is necessary to replace the Engine Rail Fuel.
| Part Number | Description | Qty |
| 12583147 |
Rail Kit, M/Port F/Injn Fuel (1995-96 Cadillac ) ) |
1 |
| 17800051 |
Seal Kit, M/Port F/Injr (1995 Cadillac ) ) |
1 |
| 12583148 |
Rail Kit, M/Port F/Injn Fuel (1997 Cadillac ) ) |
1 |
| 17800053 |
Seal Kit, M/Port F/Injr (1996-97 Cadillac ) ) |
1 |
| 12583146 | Rail Kit, M/Port F/Injn Fuel (1995 Oldsmobile ) ) |
1 |
| 17800050 | Seal Kit, M/Port F/Injr (1995 Oldsmobile ) ) |
1 |
| 10384811 | Pipe Kit, F/Injn Fuel Feed & Rtn (1995 Oldsmobile ) ) |
1 |
| 12583145 | Rail Kit, M/Port F/Injn Fuel (1996-97 Oldsmobile ) ) |
1 |
| 17800052 | Seal Kit, M/Port F/Injr (1996-97 Oldsmobile ) ) |
1 |
| 8919354 | Conduit, Plastic | 6 ft |
| 12345579 |
Grease, Dielectric Silicone (1 oz) | As needed |
Service Procedure
Important: The service procedure contained in this recall is different from the service procedure found in the appropriate service manual. As a result, the labor time allowance has been revised to correspond with this new service procedure. In the near future the service manual and labor time guide will be updated with this new information.
Inspection Procedure
- Prep the vehicle.
- Remove the acoustic engine cover and inspect the fuel rail for replacement qualification.
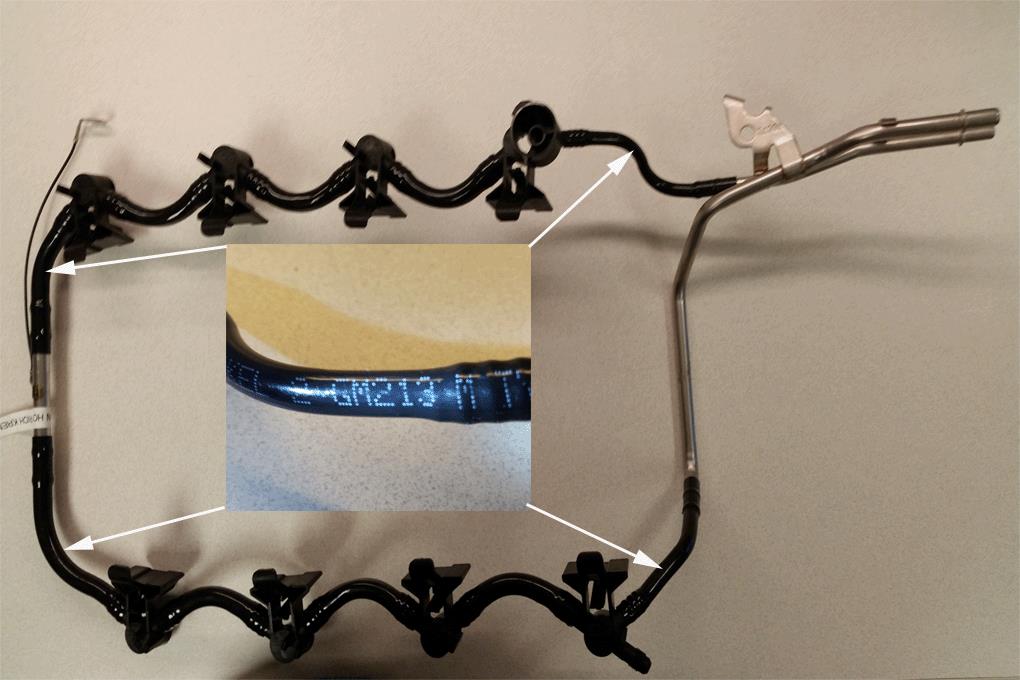
2.1 If the fuel rail has the words “GM213M Type F” or “M-Bond” written on the tubing with a dot ink-jet type white/yellow printing, it is a service fuel rail with the M-Bond tubing and does not need replacement. Submit a claim for inspect only and close the recall.
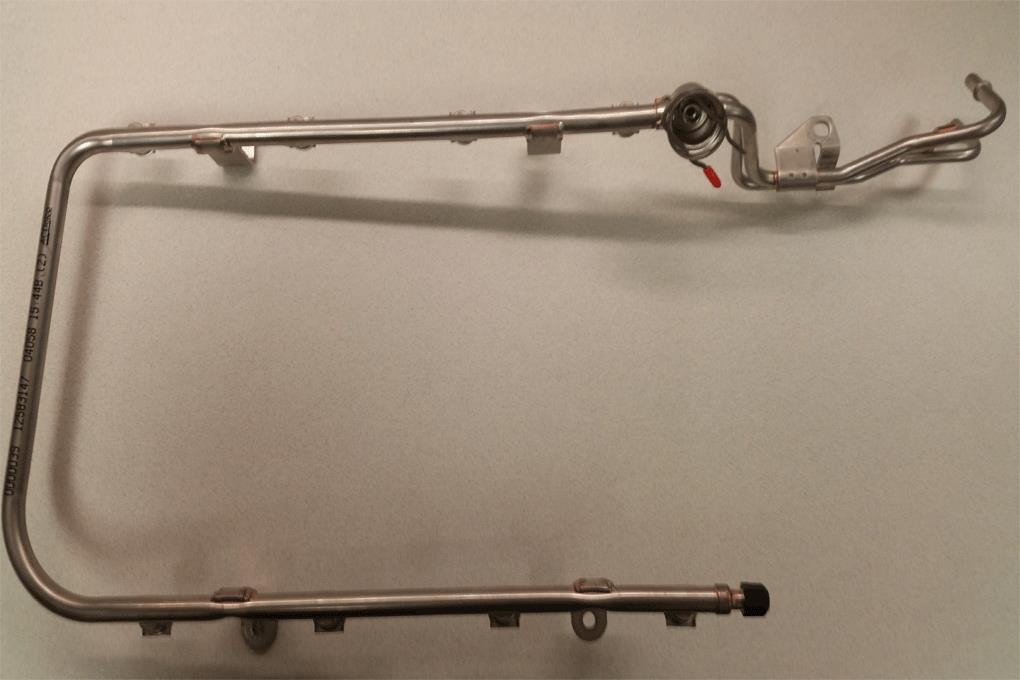
2.2 If the fuel rail is a stainless steel material, it is a service fuel rail and does not need replacement. Submit a claim for inspect only and close the recall.
2.3 If the words “GM213M Type F” or “M-Bond” are not clearly readable on the tubing or the rail is not constructed of stainless steel, the fuel rail requires replacement. Continue with the fuel rail removal and replacement procedure.
Fuel Rail Removal and Replacement Procedure
Tools Required
Notice: Do NOT remove the air cleaner assembly, intake air duct, throttle body or EGR pipe. The replacement fuel rail does not require the removal of these components due to the revised design. Removal of components not necessary for this procedure will require replacement of damaged gaskets and EGR pipe.
Fuel Rail Removal
- Allow the engine too cool to ambient temperature.
- Note the customer’s radio settings.
- Raise the hood.
Aurora
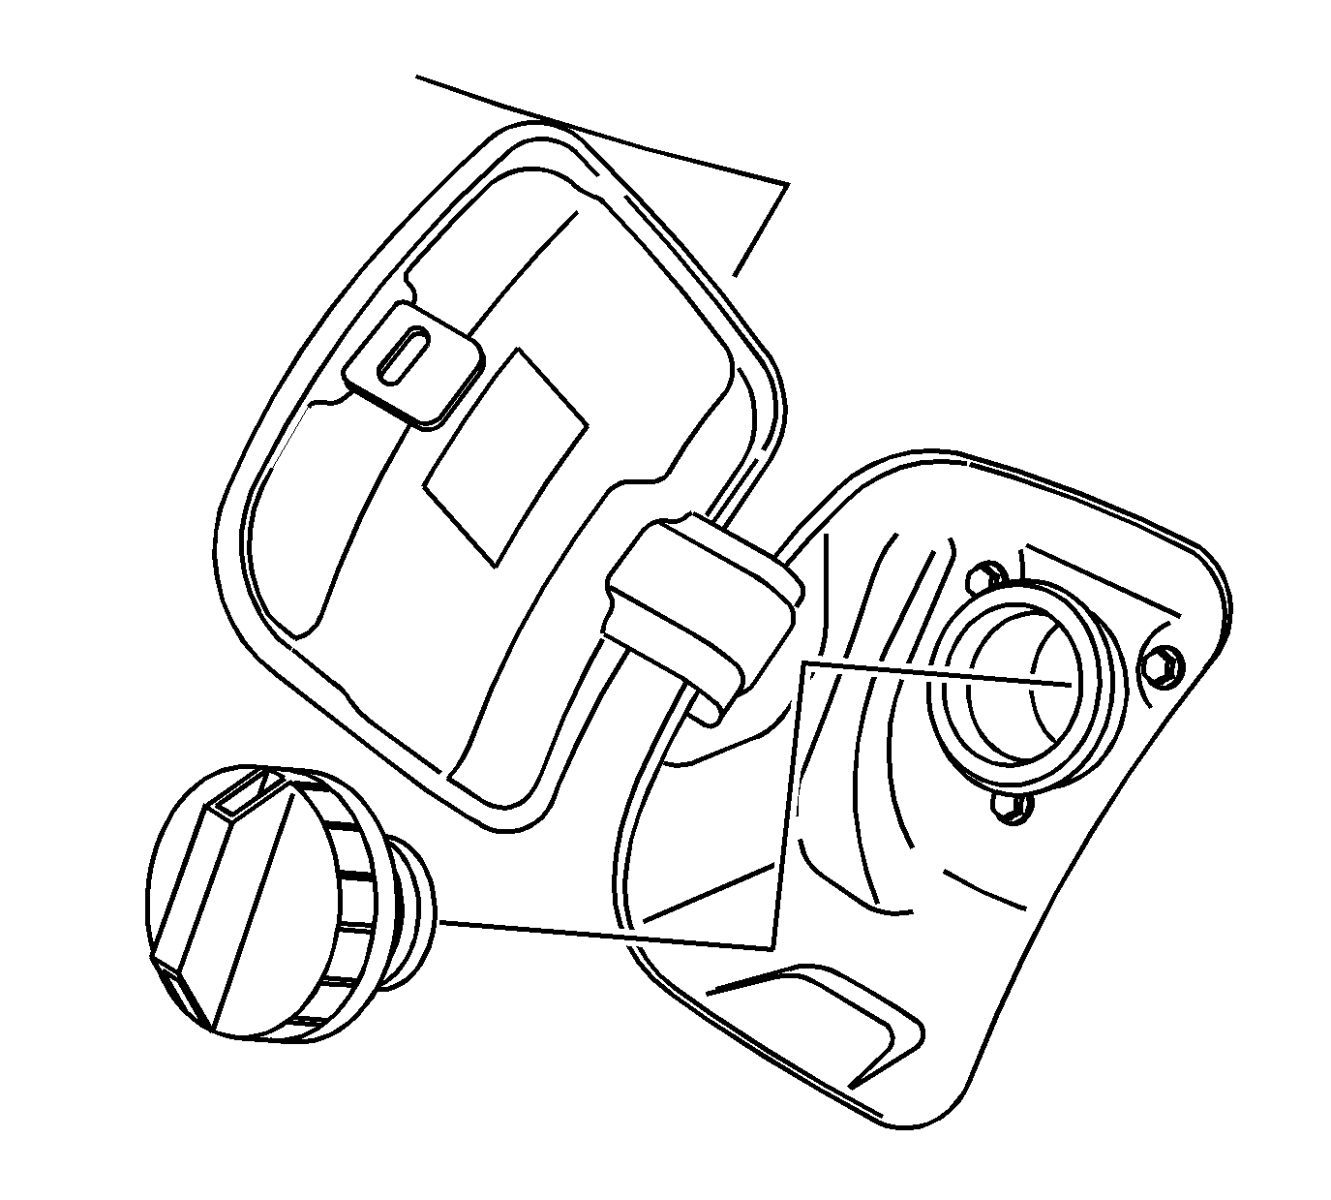
1995-96 Cadillac
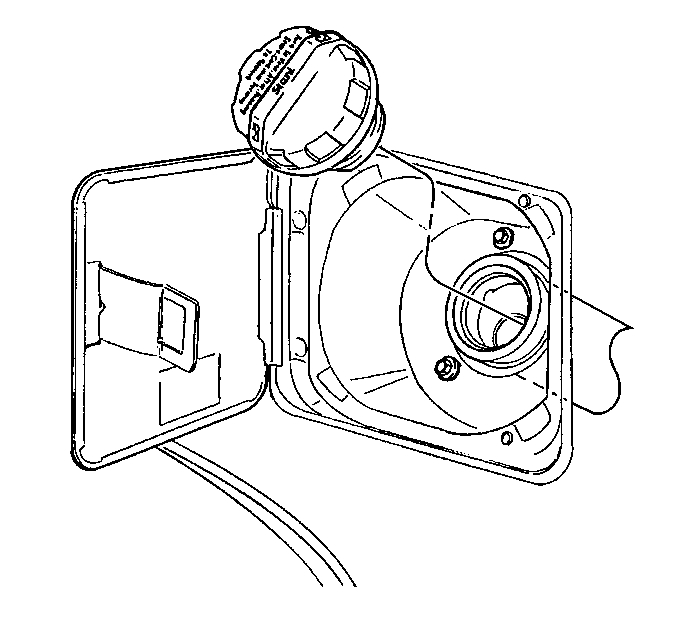
1997 Cadillac
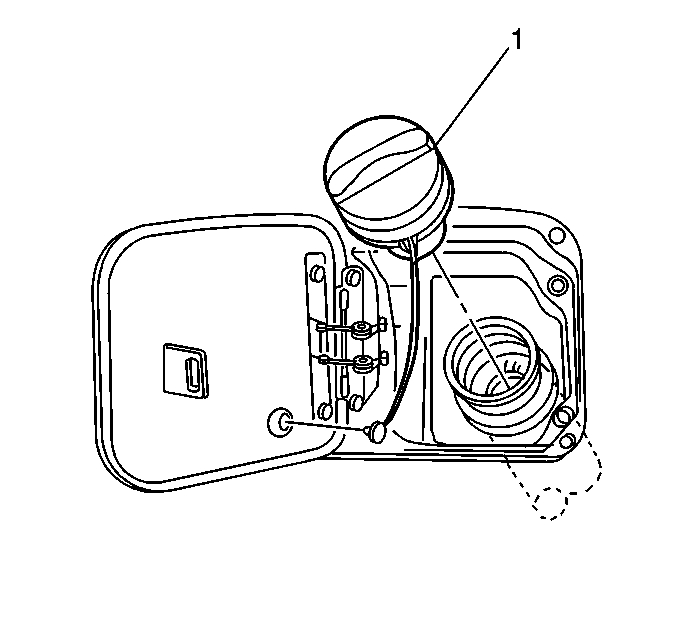
- Open the fuel filler door.
- Unscrew the fuel filler cap in order to relieve gas tank pressure.
Aurora
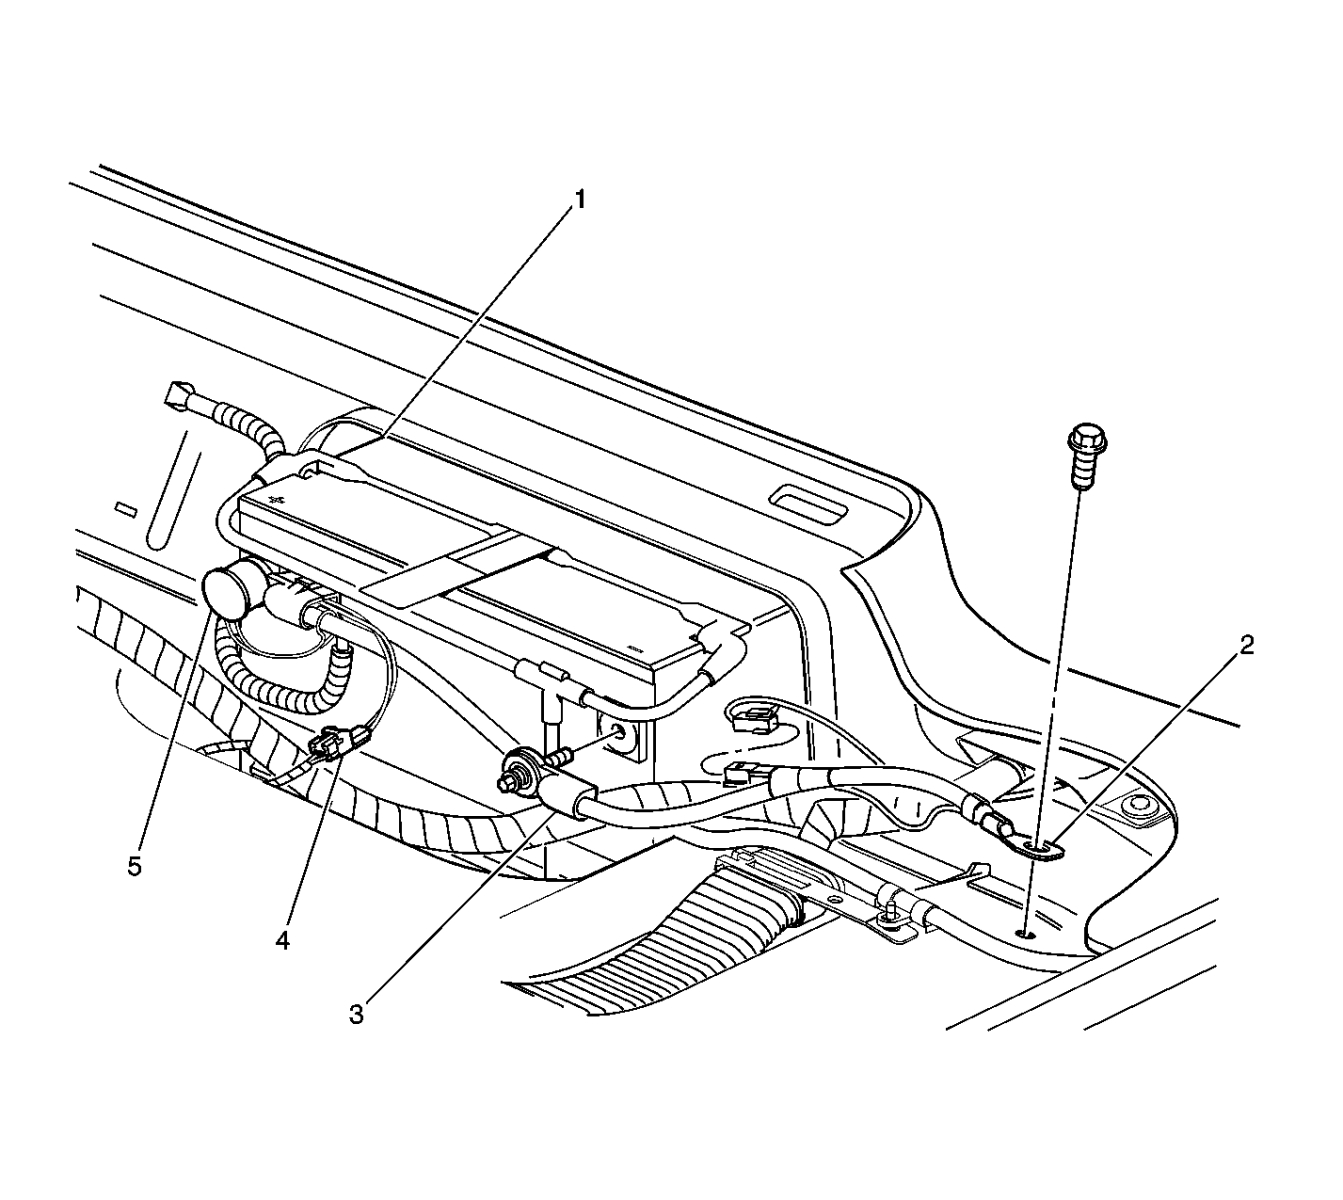
Cadillac
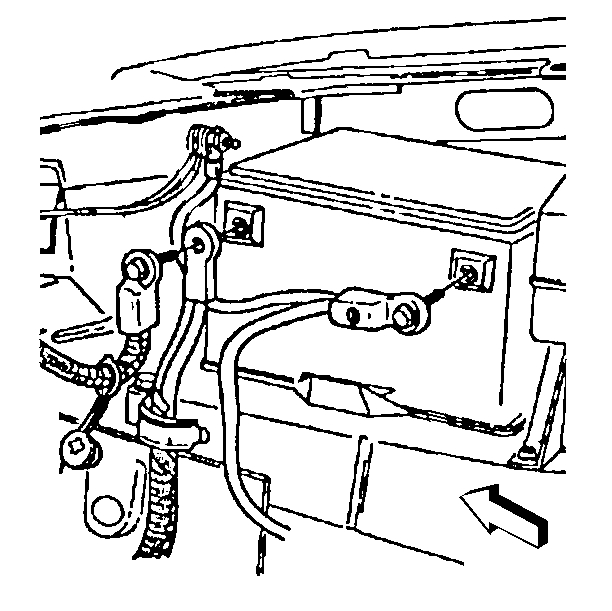
Caution: Before servicing any electrical component, the ignition key must be in the OFF or LOCK position and all electrical loads must be OFF, unless instructed otherwise in these procedures. If a tool or equipment could easily come in contact with a live exposed electrical terminal, also disconnect the negative battery cable. Failure to follow these precautions may cause personal injury and/or damage to the vehicle or its components.
- Disconnect the negative cable at the battery.
Aurora
Cadillac
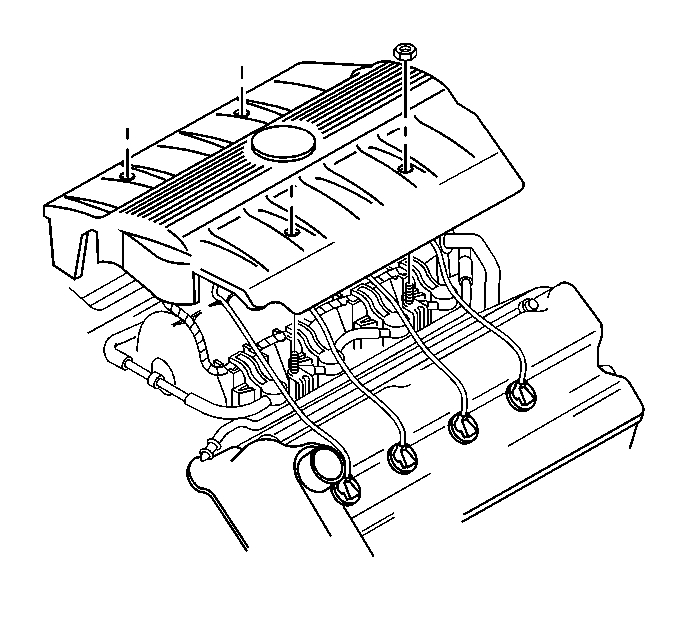
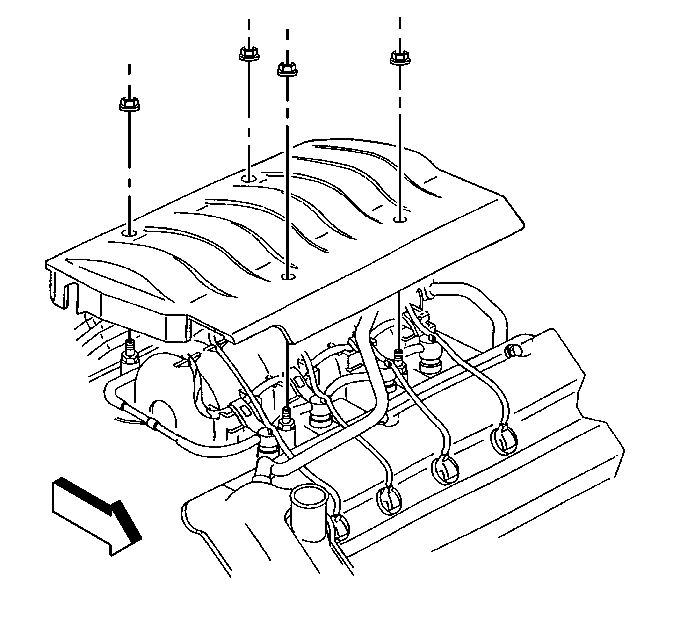
- Remove the 4 fuel injector sight shield nuts.
- Remove the fuel injector sight shield.
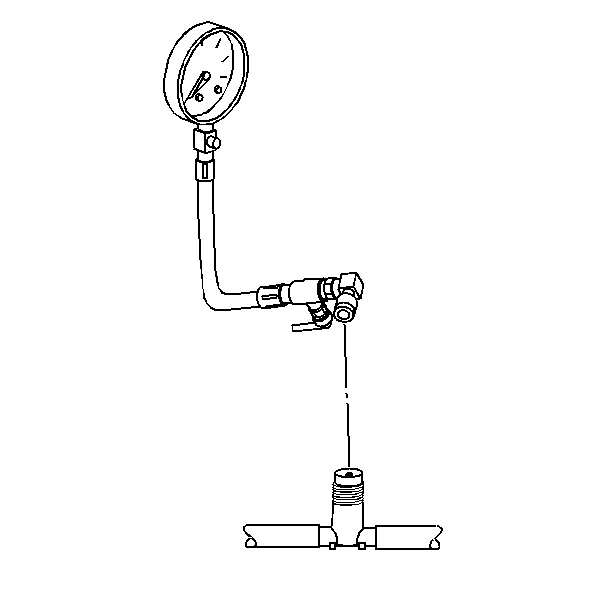
Caution: Relieve the fuel system pressure before servicing fuel system components in order to reduce the risk of fire and personal injury.
After relieving the system pressure, a small amount of fuel may be released when servicing the fuel lines or connections. In order to reduce the chance of personal injury, cover the regulator and the fuel line fittings with a shop towel before disconnecting. This will catch any fuel that may leak out. Place the towel in an approved container when the disconnection is complete.
- Relieve the fuel rail pressure at test port connection with the J 34730-1A.
9.1 Wrap a shop towel around test port connection while connecting gauge to avoid spillage.
9.2 Connect the gauge to the test port connection.
9.3 Install the bleed hose into an approved container.
9.4 Open bleed valve to bleed system pressure.
9.5 Drain any fuel remaining in the J 34730-1A into an approved container.
Aurora

1995-96 Cadillac

1997 Cadillac

- Tighten the fuel filler cap.
- Close the fuel filler door.
Important: Steps 12–18 MY1995-96 Cadillac ONLY.
ONLY.
- Disconnect the vacuum manifold from the intake manifold adapter and reposition.
- Disconnect the transmission vent tube from the retainer on the cruise control servo bracket.
- Release the retainer holding the vacuum hoses onto the cruise control servo bracket.
- Remove the cruise control servo bracket bolts.
- Disconnect the vacuum hoses from the cruise control servo.
- Disconnect the cruise control servo cable from the throttle body cruise control servo cam.
- Reposition the cruise control servo.
Caution: Wear safety glasses when using compressed air, as flying dirt particles may cause eye injury.
- Blow dirt our from around fuel injectors, fuel pressure regulator, and the fuel injector wiring harness connectors using compressed air.
Important: Step 20 MY1995-97 Cadillac ONLY.
ONLY.
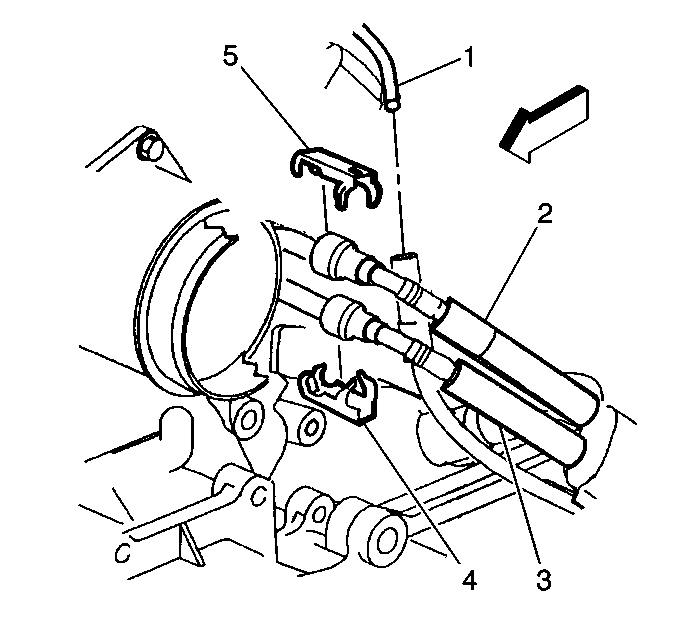
- Remove the retainer (4, 5) from the quick-connect fittings of each fuel line.
Aurora
Cadillac
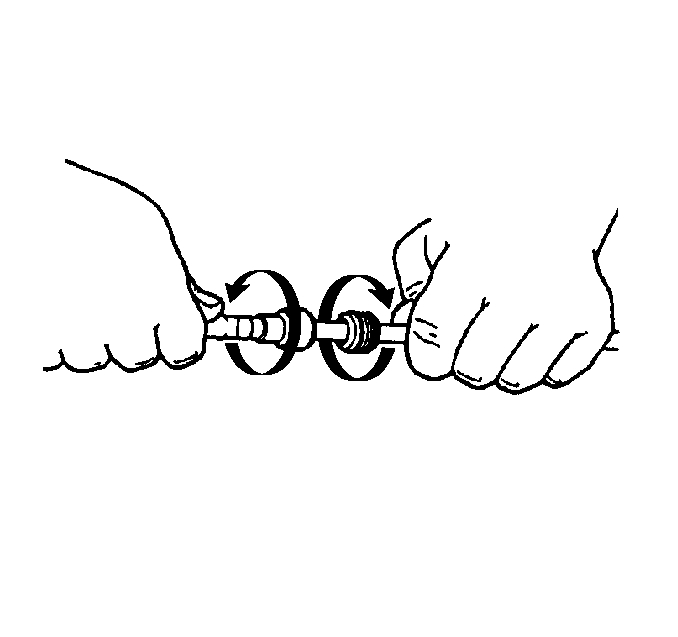
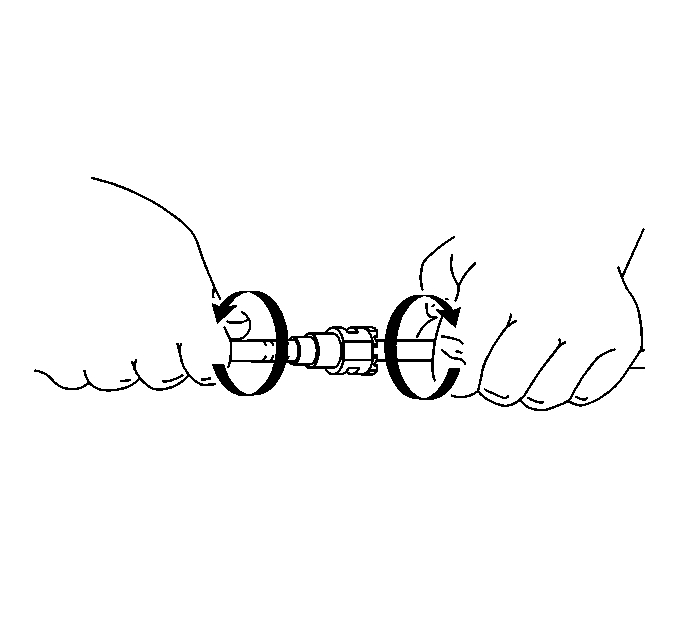
- Grasp both sides on either side of the quick-connect fitting and twist the female (rail side) connector 1/4 turn in each direction to loosen any dirt within the fitting.
- Repeat Step 21 to second fuel line.
Aurora
Cadillac

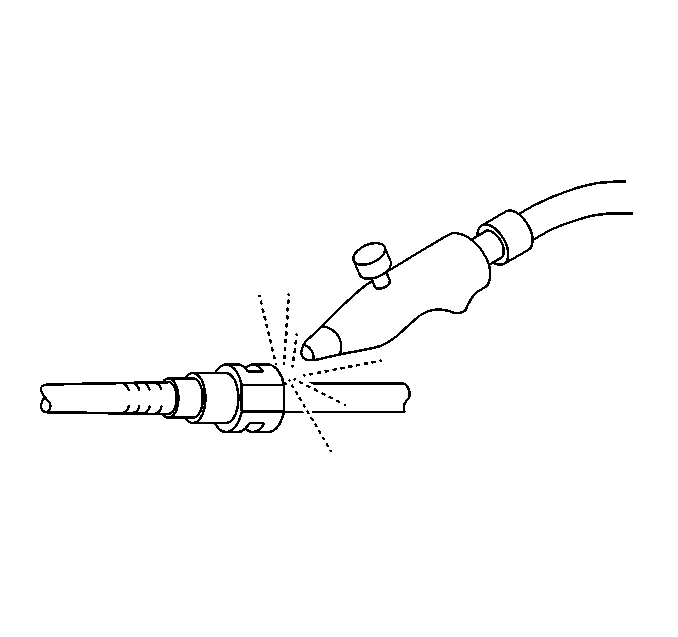
- Blow dirt out of the fittings using compressed air.
Important: Steps 24-29 MY1995-97 Cadillac ONLY.
ONLY.
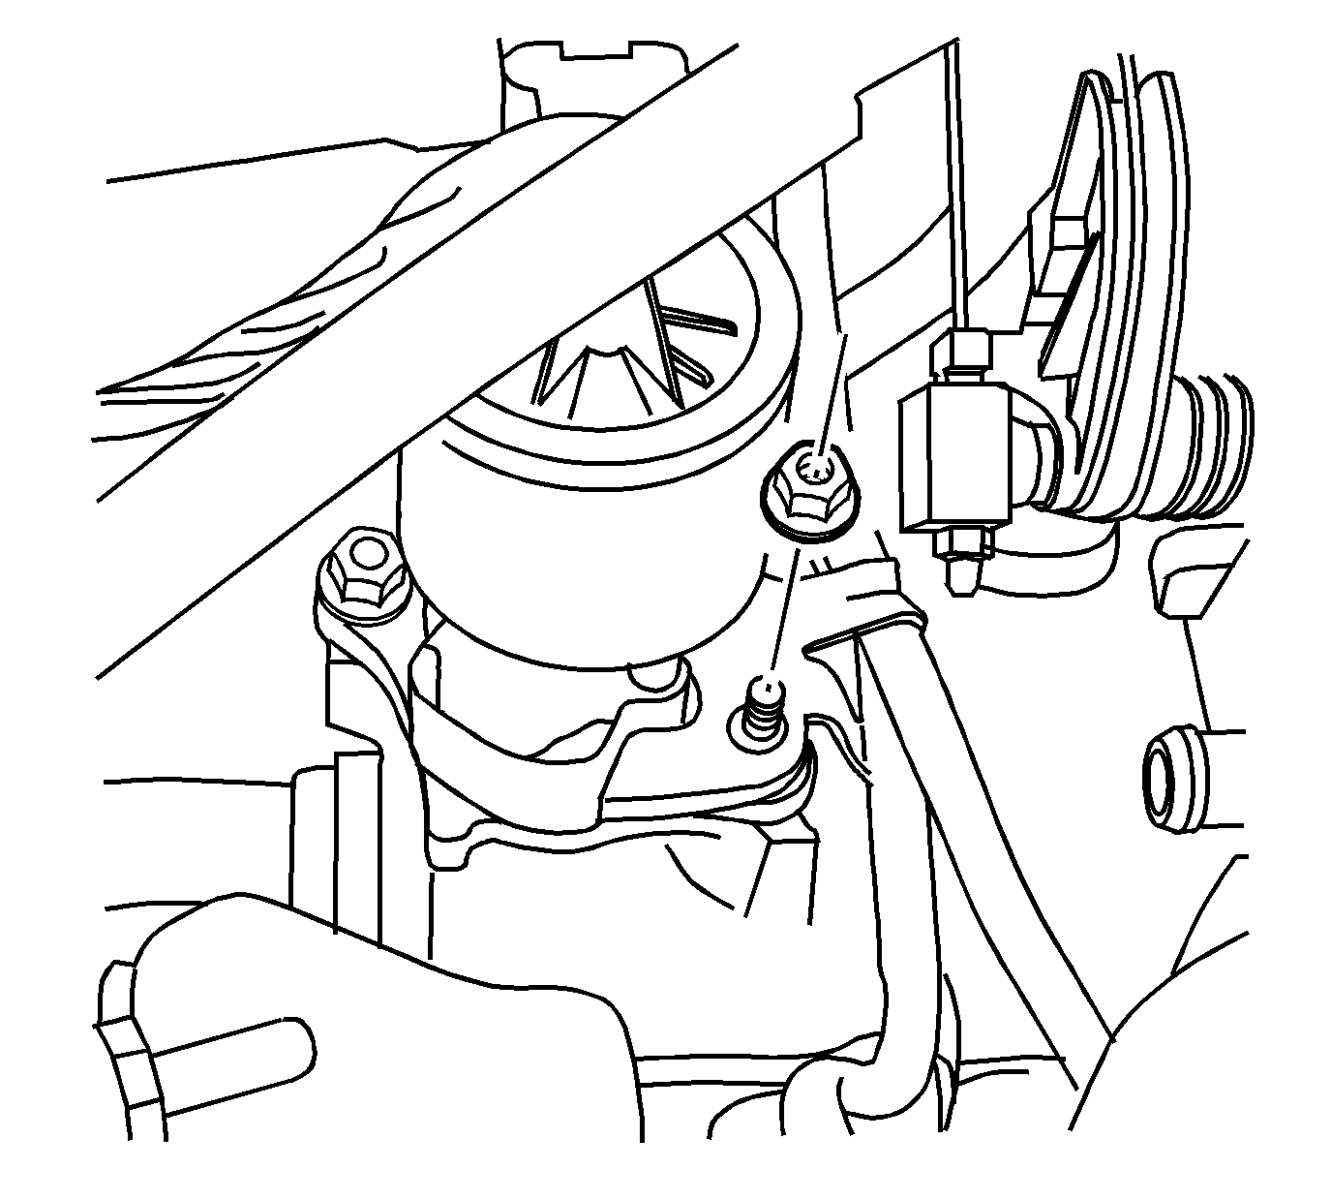
- Remove the fuel rail bracket nut from the EGR stud.
- Place a shop towel below the fuel line fittings while disconnecting to avoid spillage.
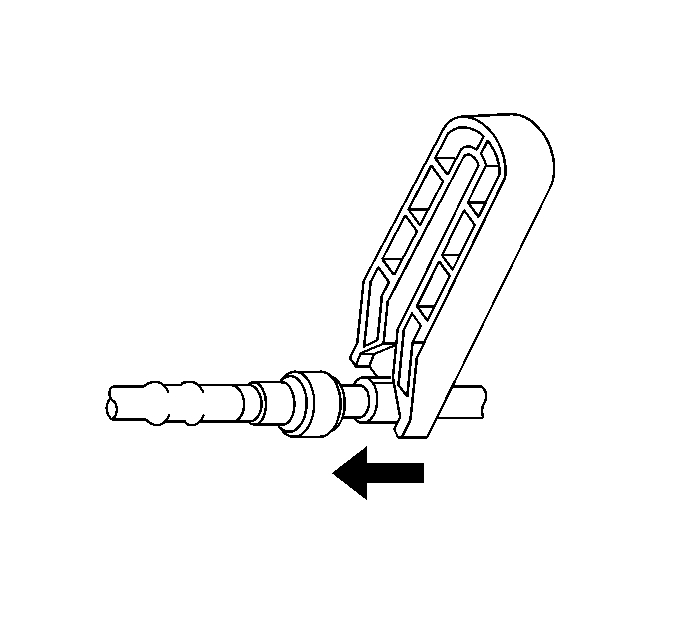
- Using the proper sized tool for the upper fuel line (J 37088-1, 3/8 in) from the J 37088-A tool set, insert the tool into the female connector and push in, in order to release the locking tabs.
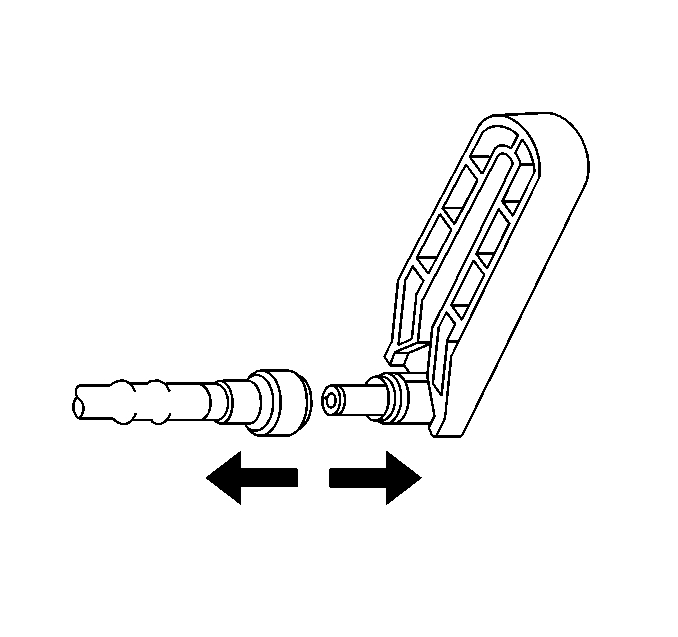
- Pull the upper fuel line connection apart.
- Using the proper sized tool for the lower fuel line (J 37088-2, 5/16 in) from the J 37088-A tool set, insert the tool into the female connector and push in, in order to release the locking tabs.
- Pull the lower fuel line connection apart.
Important: Steps 30-34 MY1995-97 Aurora ONLY.
- Place a shop towel below the fuel line fittings while disconnecting to avoid spillage.
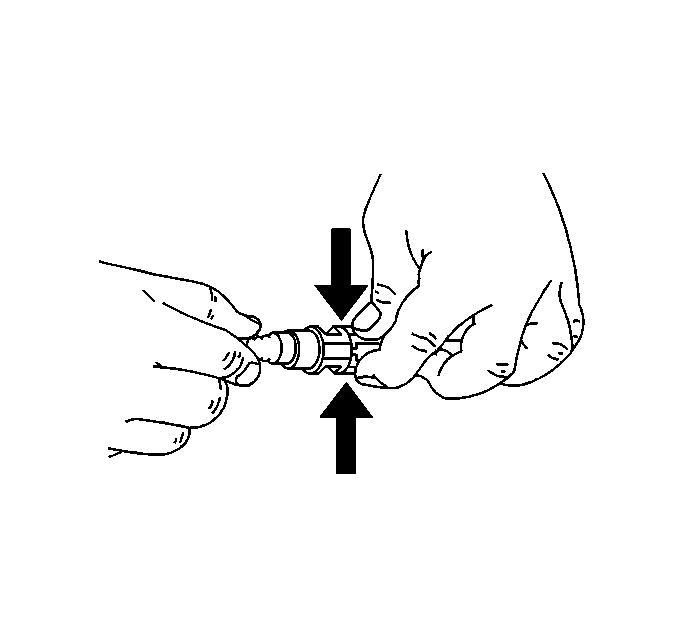
- Squeeze the plastic retainer tabs in order to release the locking tabs.
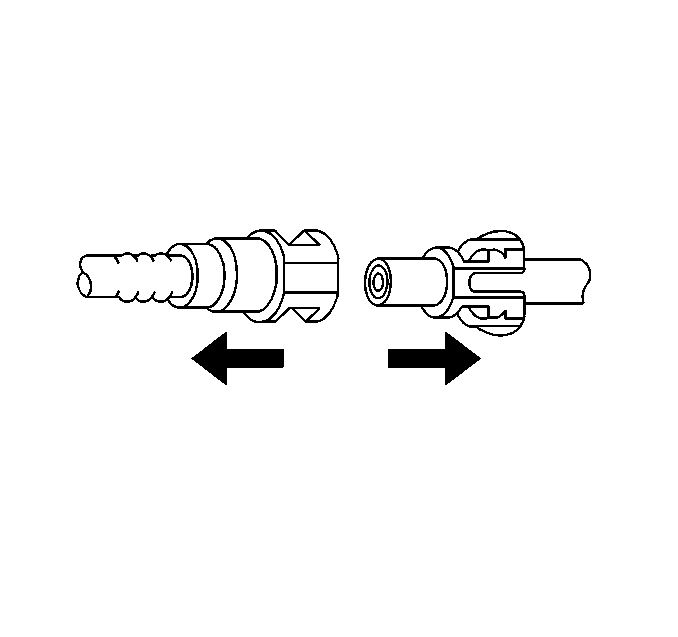
- Pull the upper fuel line connection apart.
- Repeat Steps 31 and 32 for the lower fuel line.
- Remove the PCV rear hose.
Important: Step 35 MY1997 Cadillac ONLY.
ONLY.
- Disconnect and remove the PCV front hose.
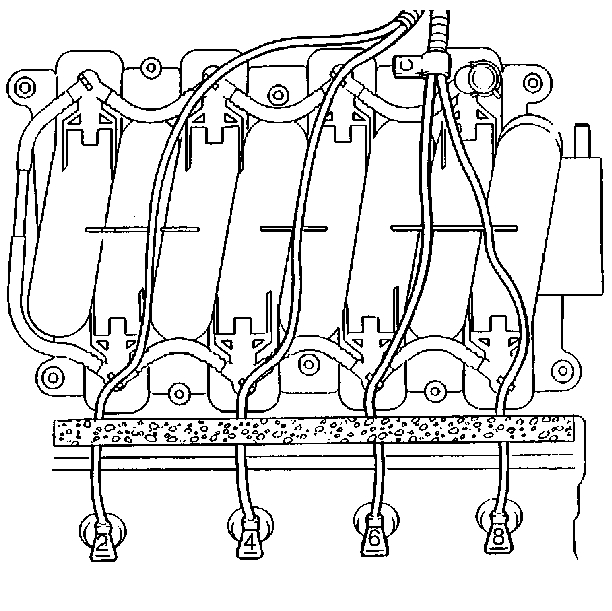
- Remove the spark plug harness retainer from the fuel injector sight shield stud.
- Disconnect the front spark plug wires from the front spark plugs and reposition.
Important: Steps 38-41 MY1997 Cadillac ONLY.
ONLY.
- Disconnect and remove the PCV front hose.
- Disconnect and remove the brake booster hose.
- Disconnect and remove the EVAP tube between the intake manifold adapter and the EVAP solenoid.
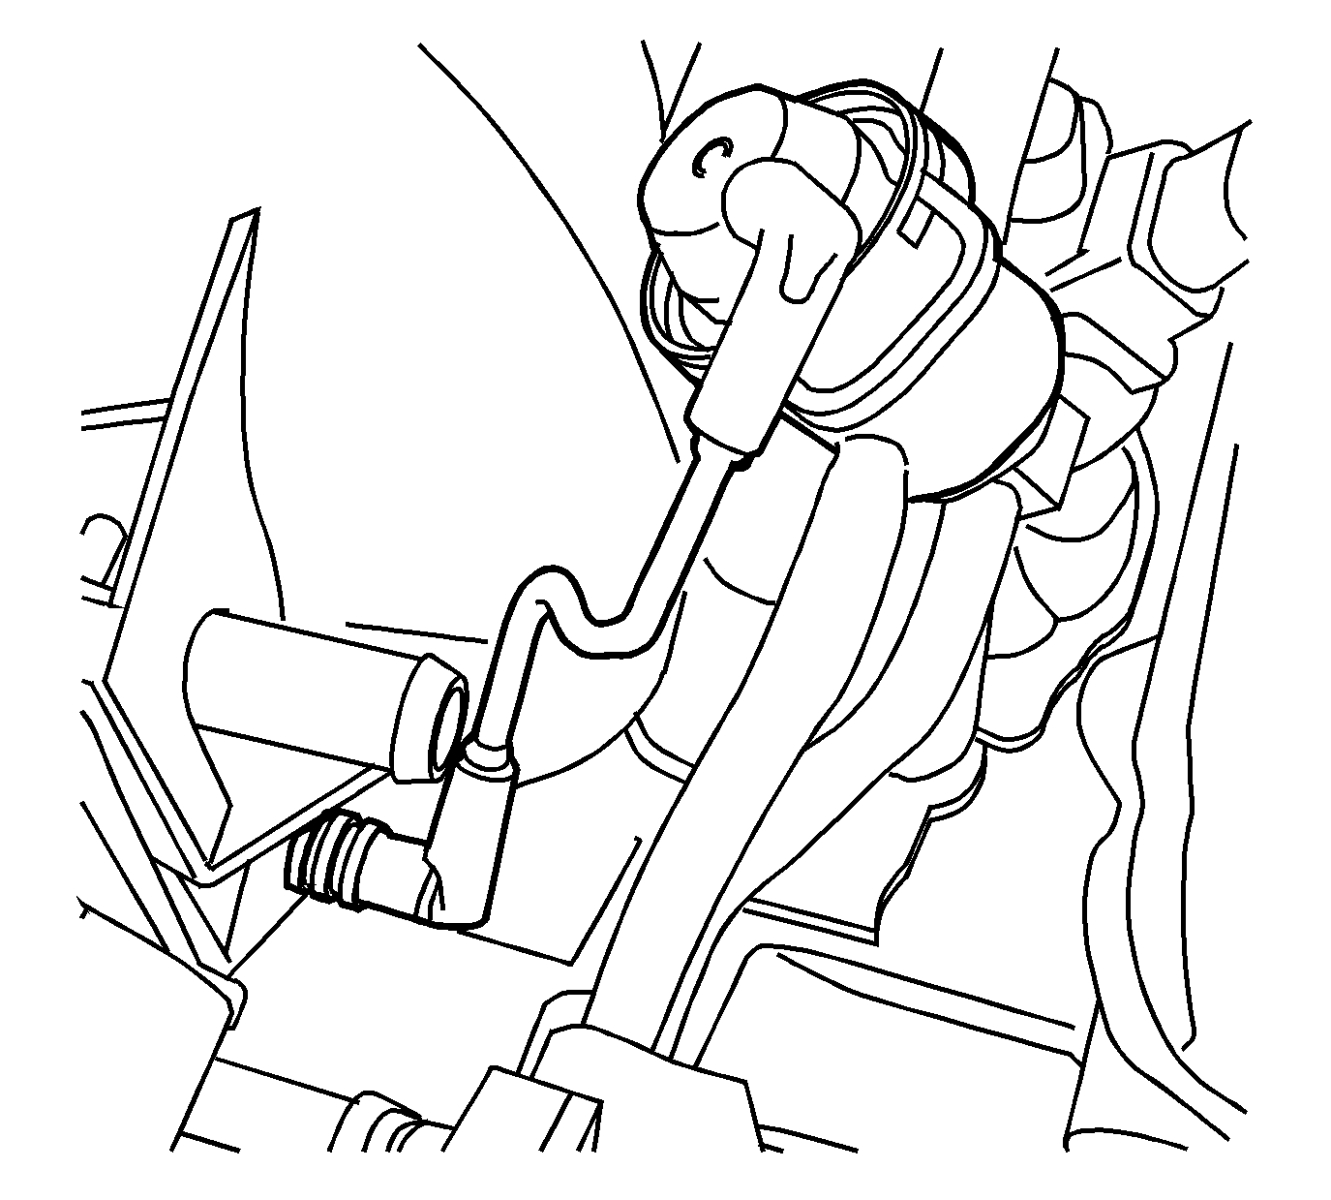
- Disconnect and remove the fuel pressure regulator hose.
Important: Steps 42-47 MY 1995-97 Cadillac ONLY.
ONLY.
- Disconnect the remove the PCV rear hose.
- Disconnect the brake booster hose from the intake manifold adapter and reposition.
- Disconnect and remove the fuel pressure regulator hose.
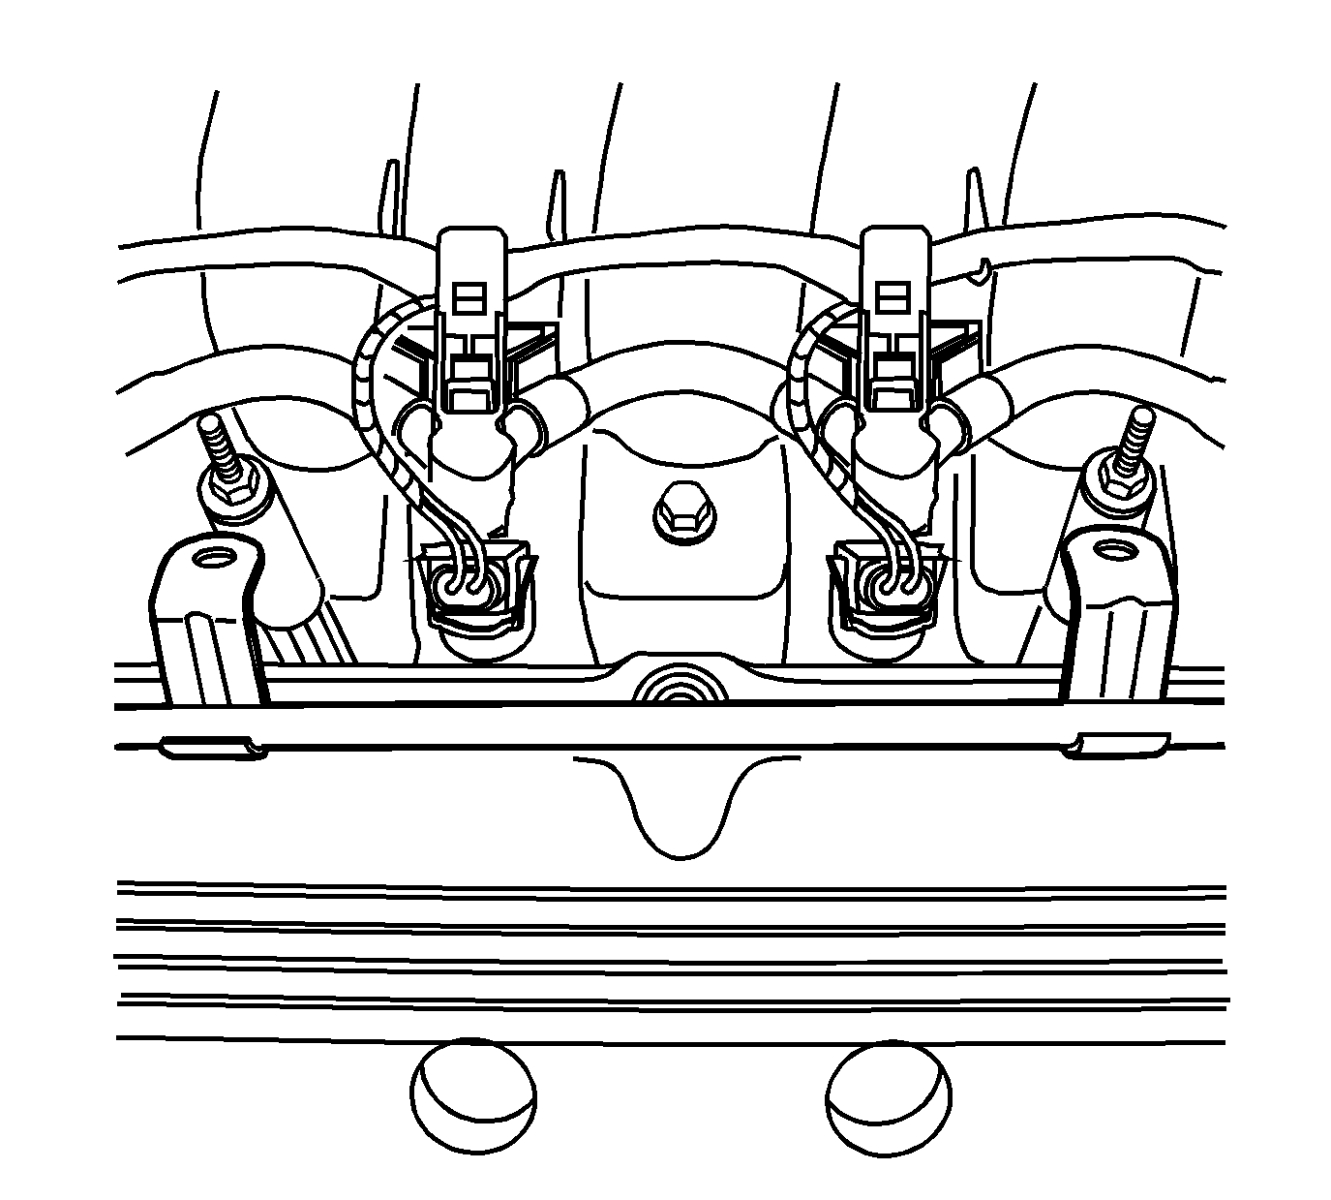
- Remove any retainers and pull the throttle body heater pipe off of the fuel injector sight shield studs and reposition.
- Remove the fuel injector sight shield studs and spacers.
- Disconnect the fuel injector wiring harness from the 8 fuel injectors and reposition the fuel injector wiring harness.
Important: Steps 48-51 MY 1995-97 Aurora ONLY.
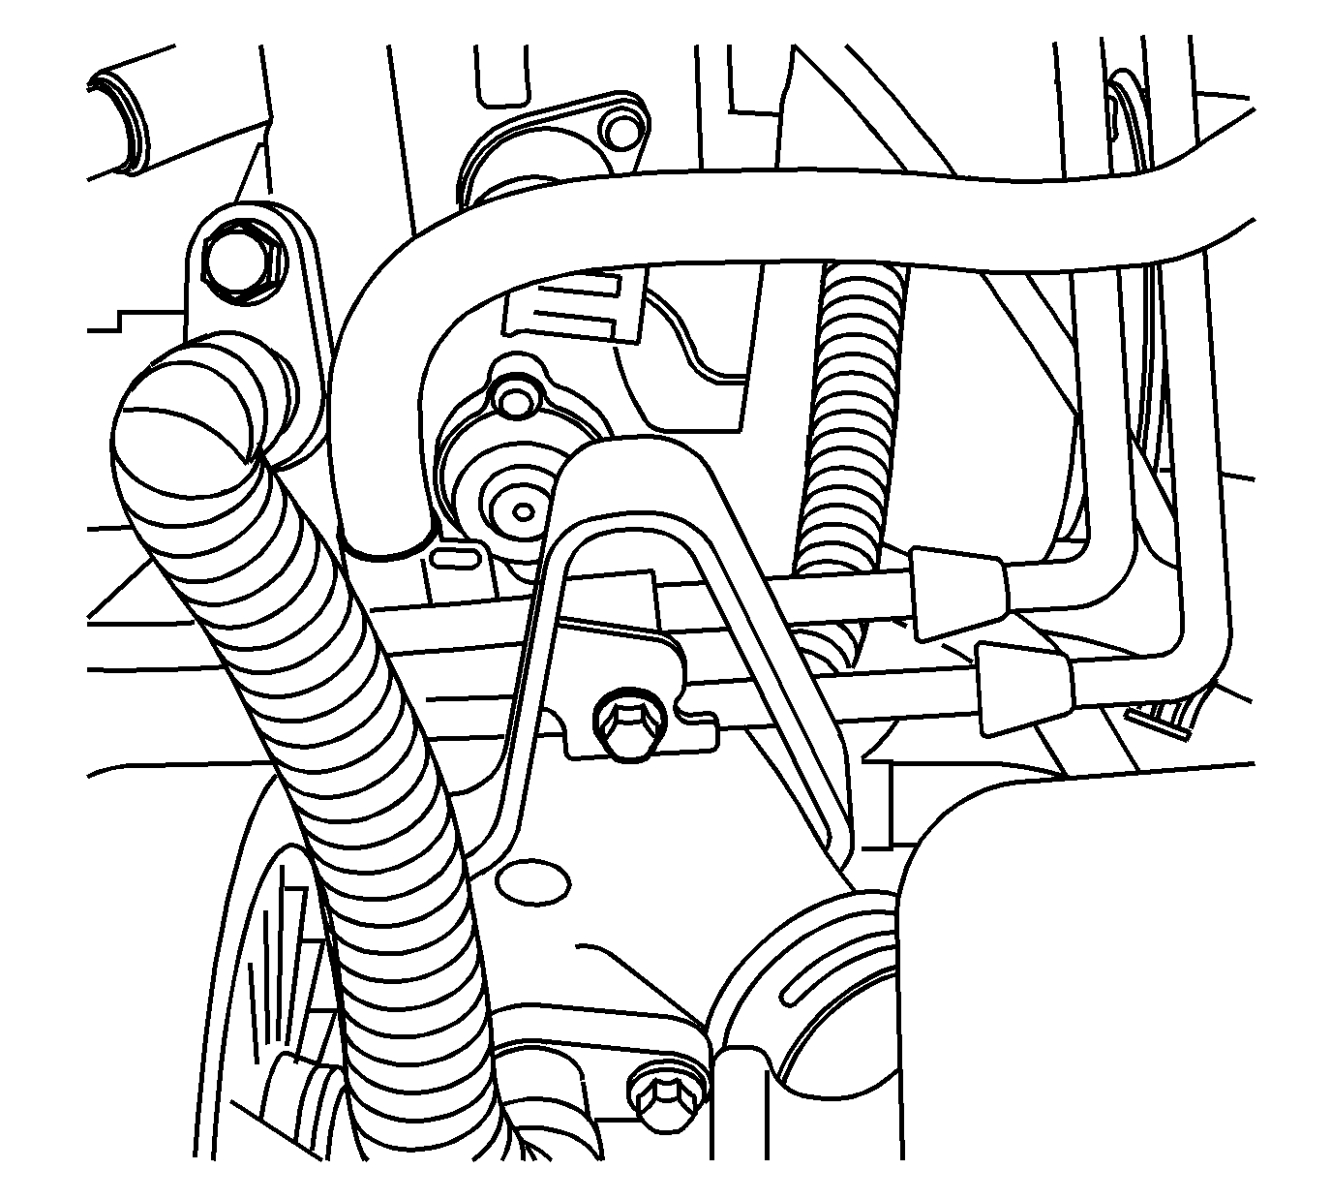
- Disconnect the fuel regulator hose from the fuel regulator.
95 Aurora
96-97 Aurora
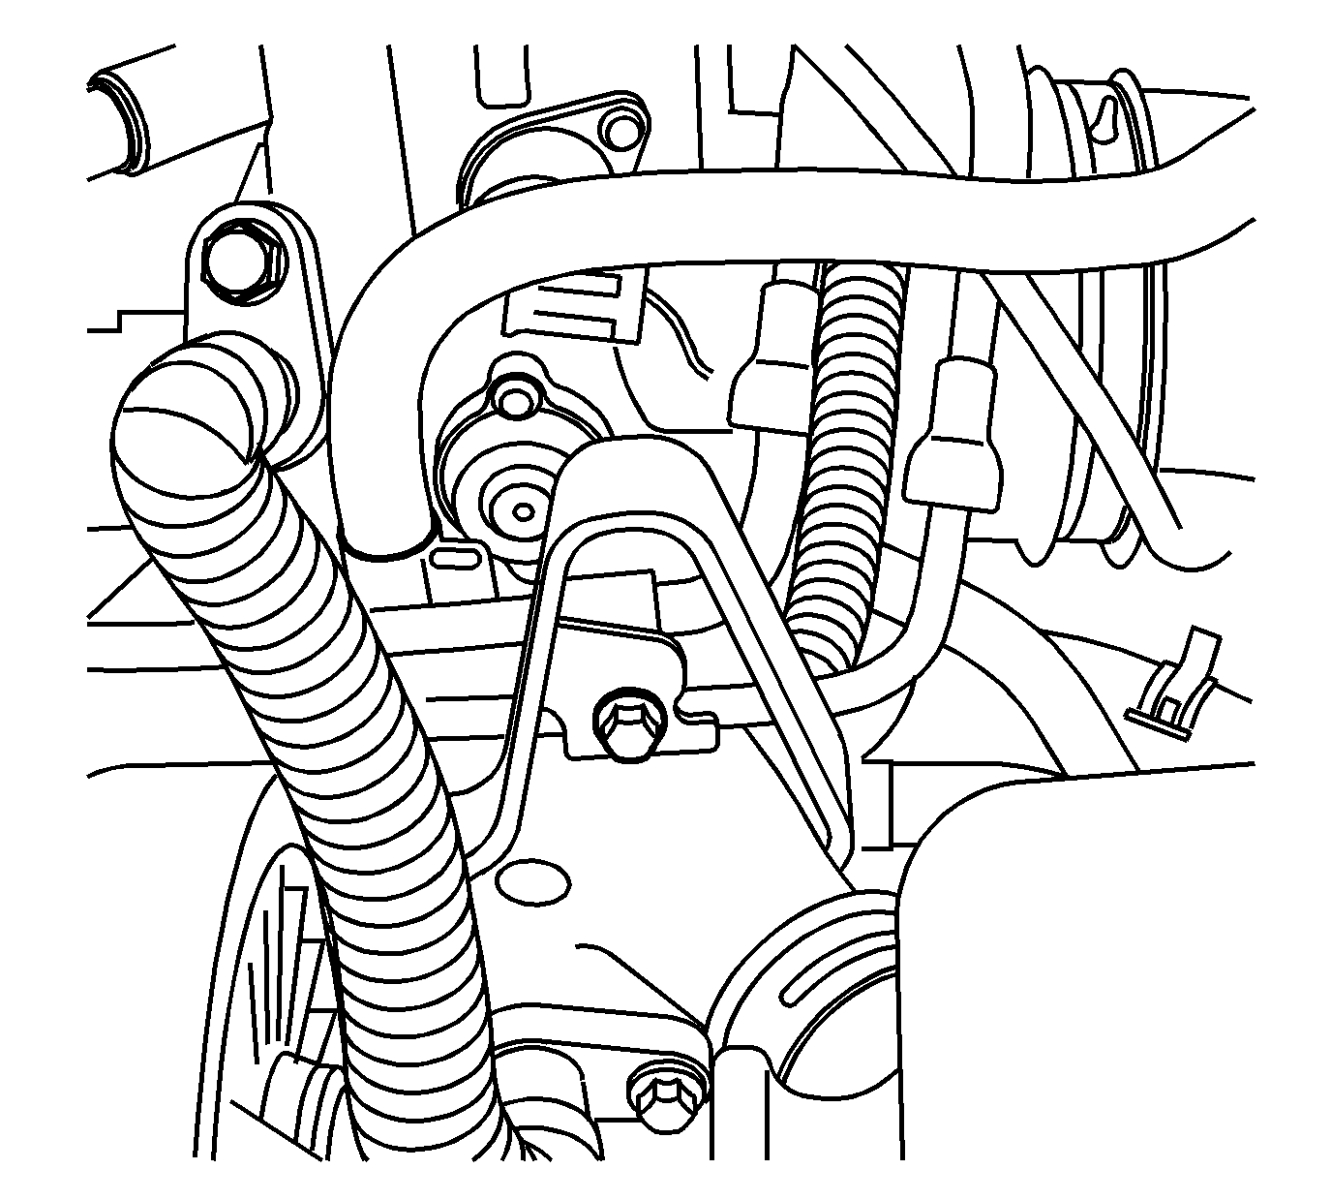
- Remove the fuel rail bracket bolt from the engine lift bracket.
- Remove the fuel injector sight shield studs and spacers.
- Disconnect the fuel injector wiring harness from the 8 fuel injectors and reposition the fuel injector wiring harness.
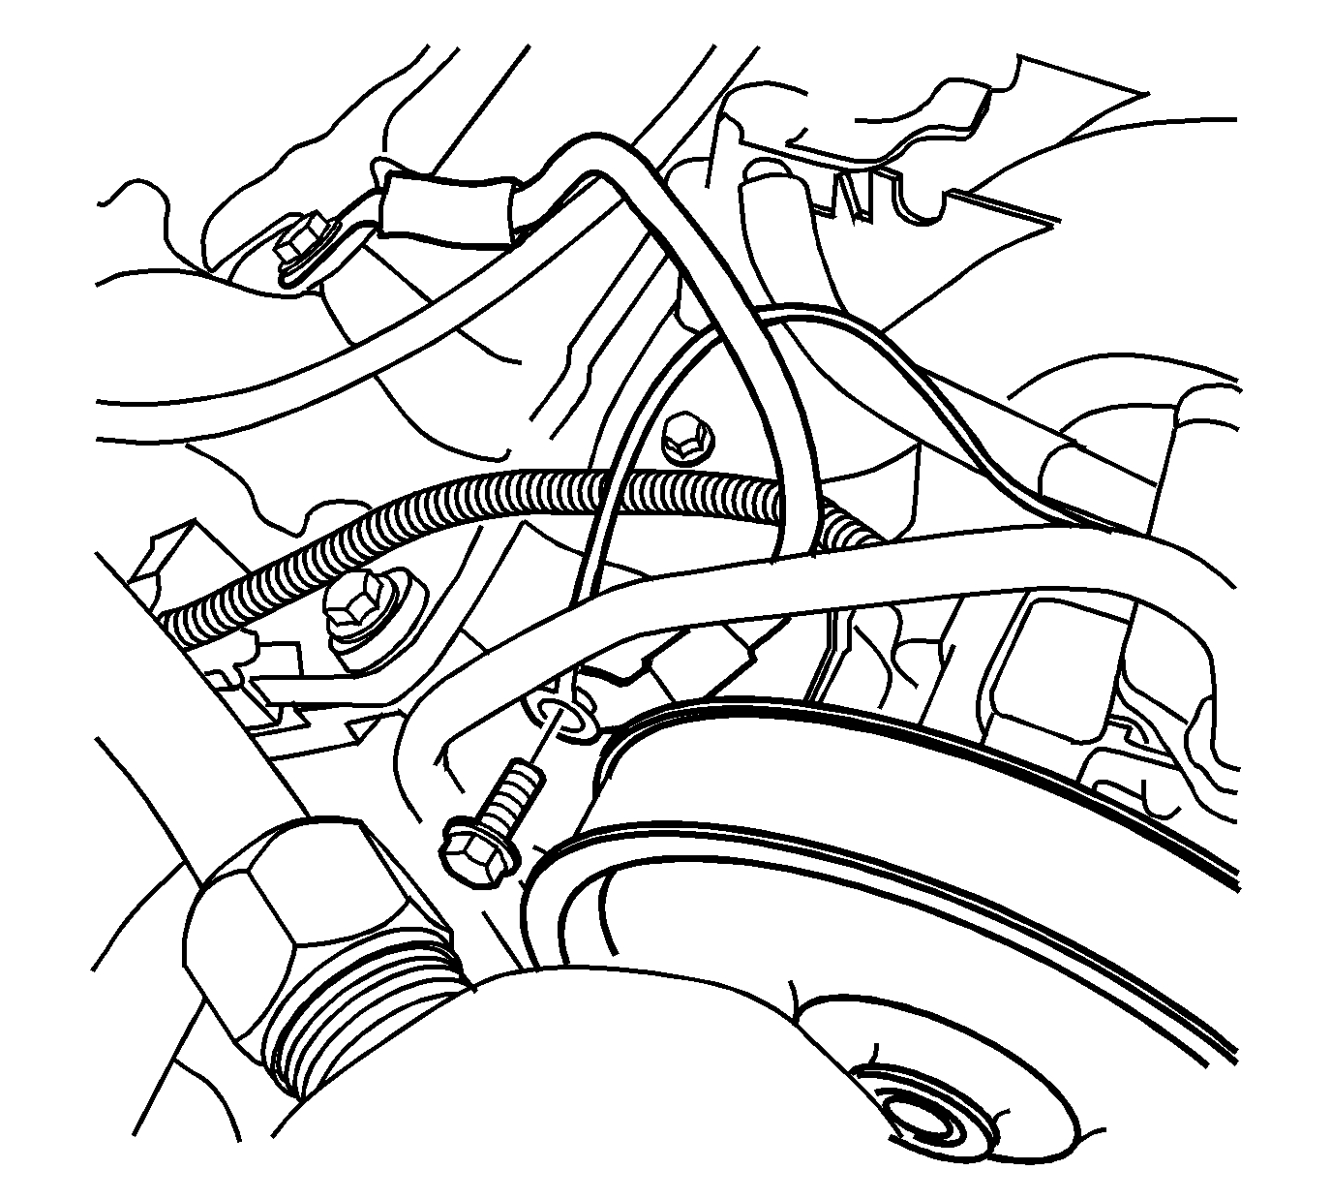
- Remove the grounding harness bolt from the front of the right (rear) cylinder head.
- Remove the fuel rail ground harness.
Notice: Use the correct fastener in the correct location. Replacement fasteners must be the correct part number for that application. Fasteners requiring replacement or fasteners requiring the use of thread locking compound or sealant are identified in the service procedure. Do not use paints, lubricants, or corrosion inhibitors on fasteners or fastener joint surfaces unless specified. These coatings affect fastener torque and joint clamping force and may damage the fastener. Use the correct tightening sequence and specifications when installing fasteners in order to avoid damage to parts and systems.
- Reinstall the grounding harness bolt with the ECM/ignition coil ground harness.
Tighten
Tighten the grounding harness to 25 Y (18 lb ft).
Aurora
Aurora
Cadillac
Cadillac
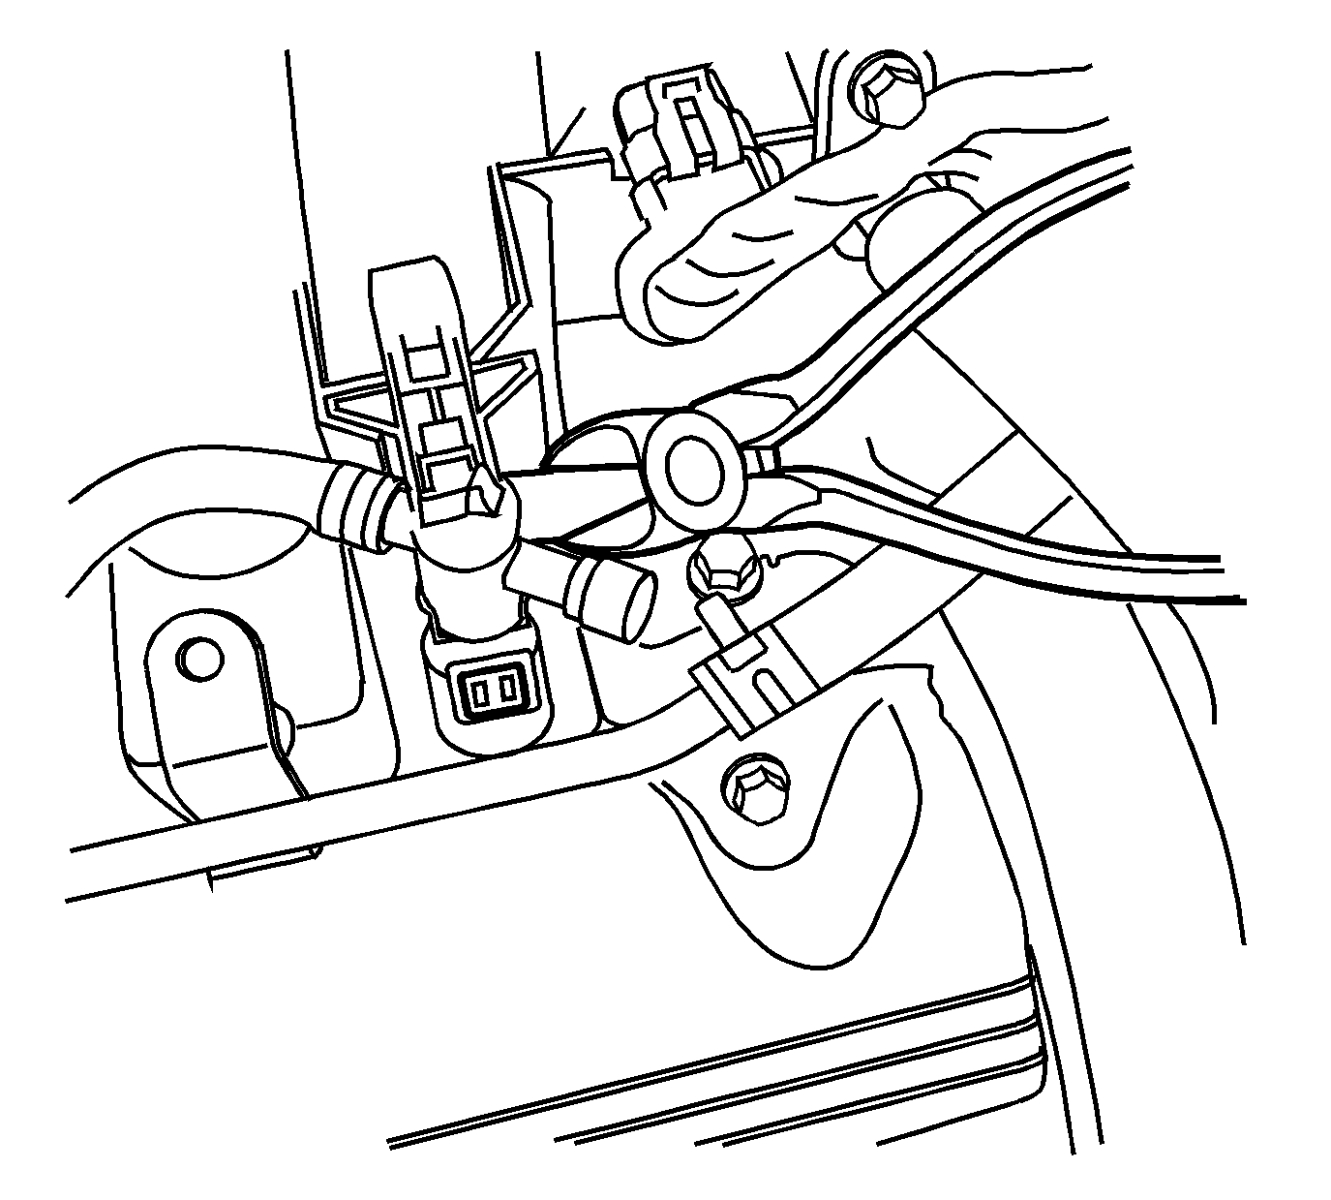
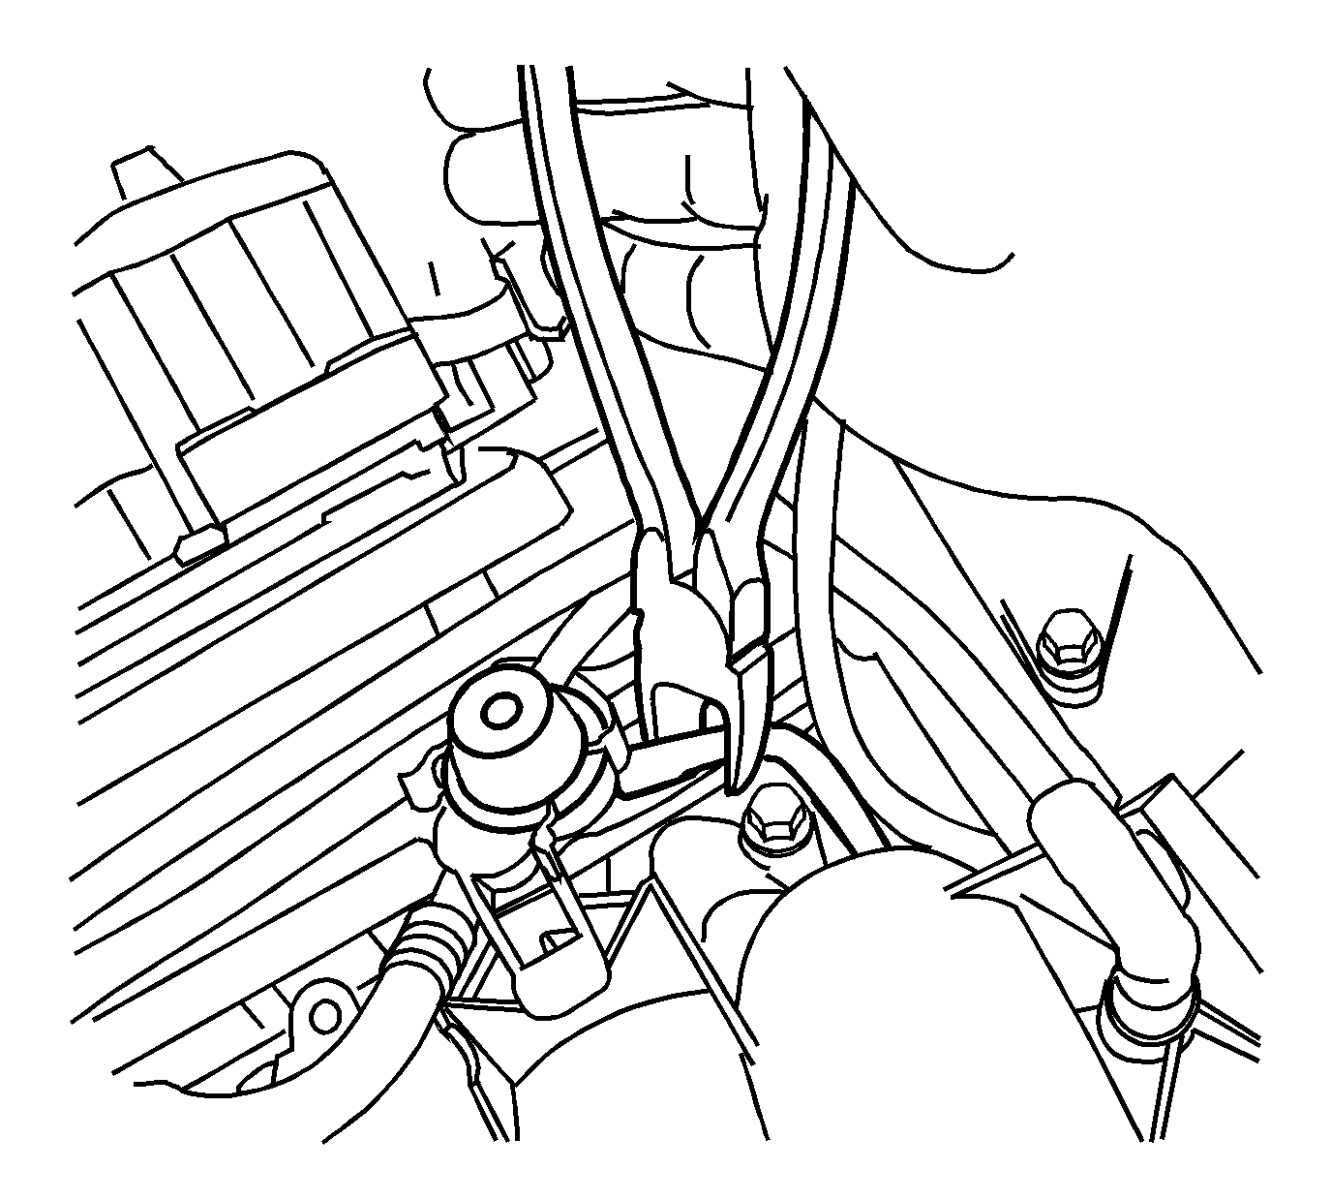
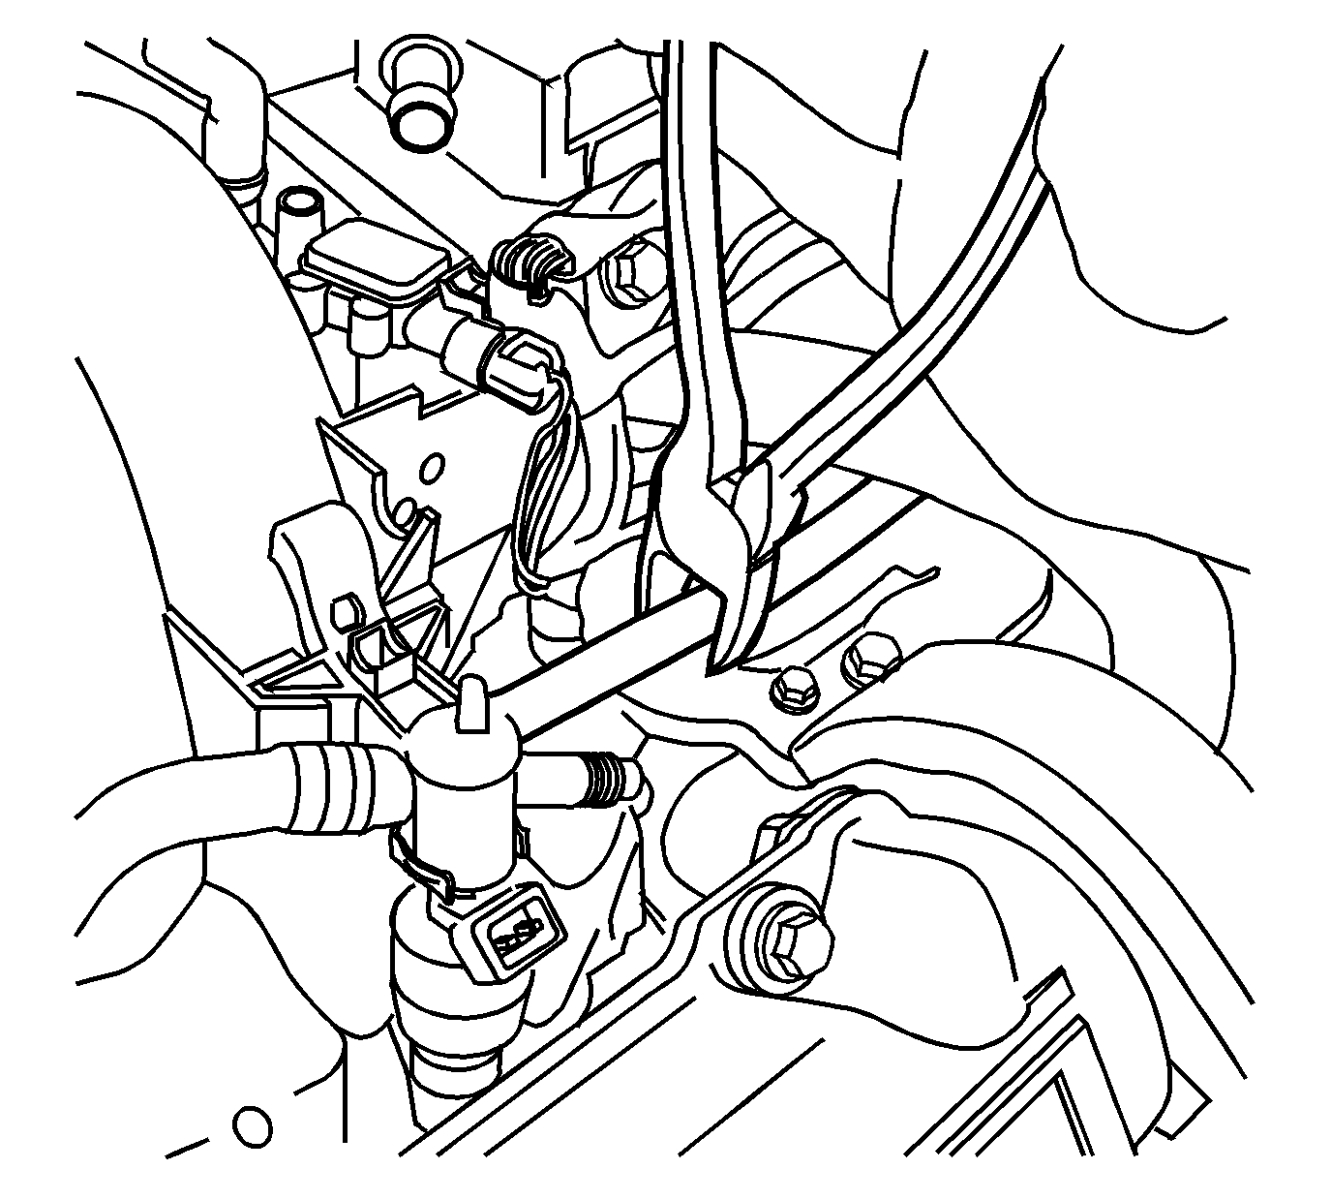
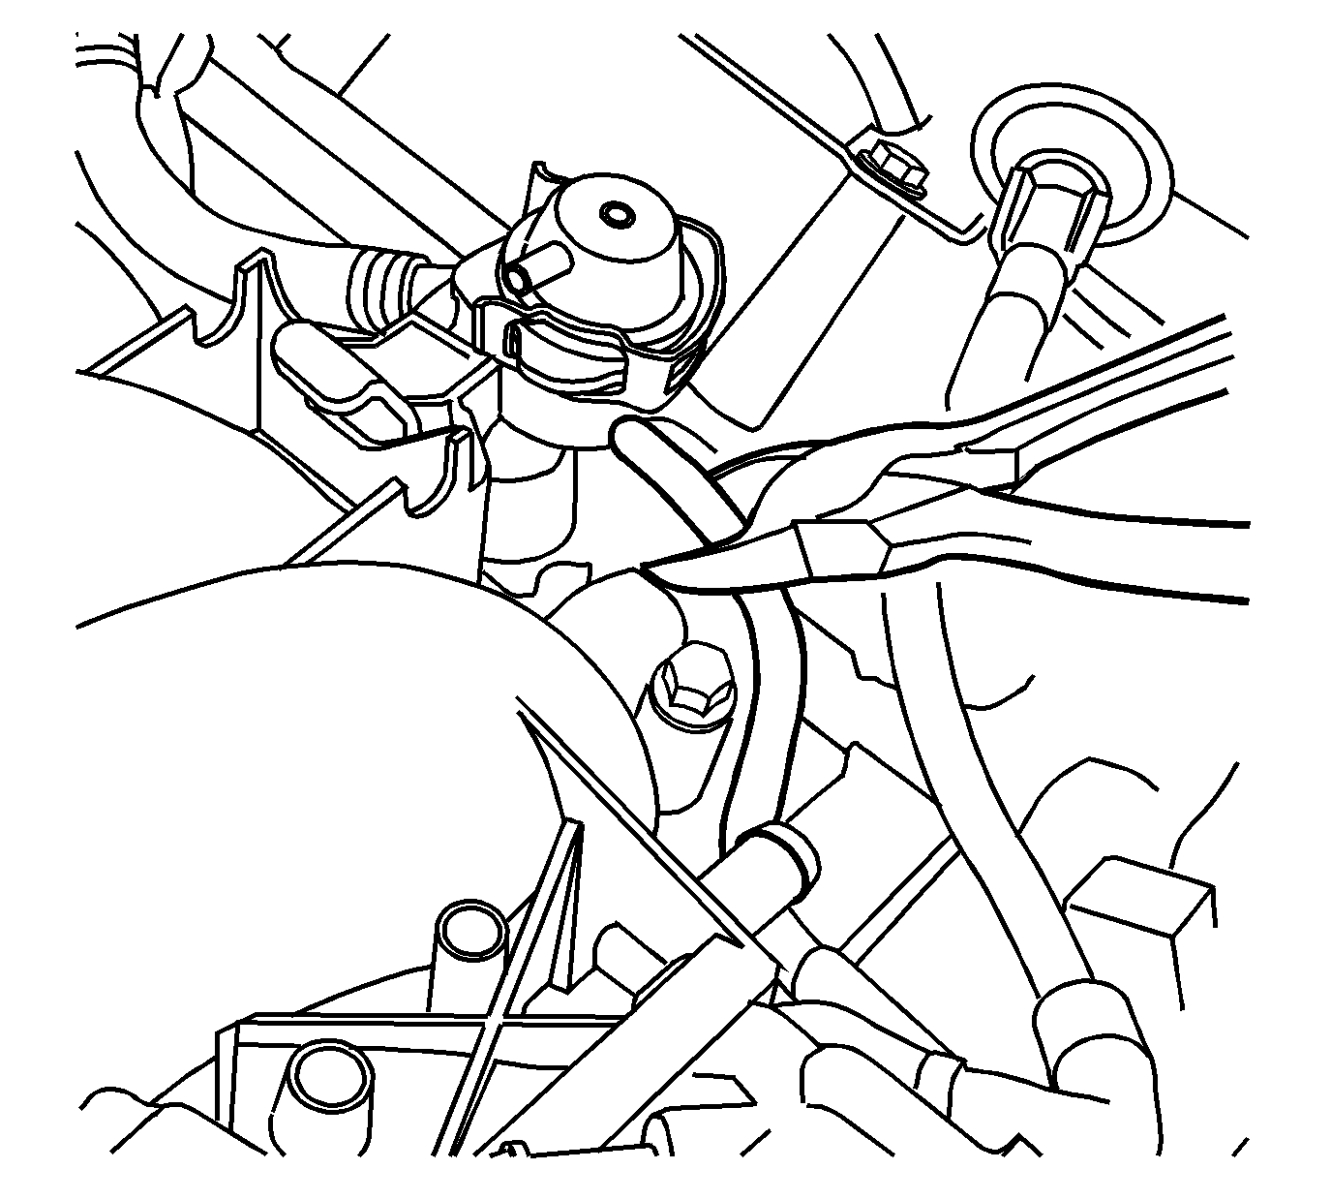
- Cut the fuel rail flexible plastic tubes with diagonal cutters.
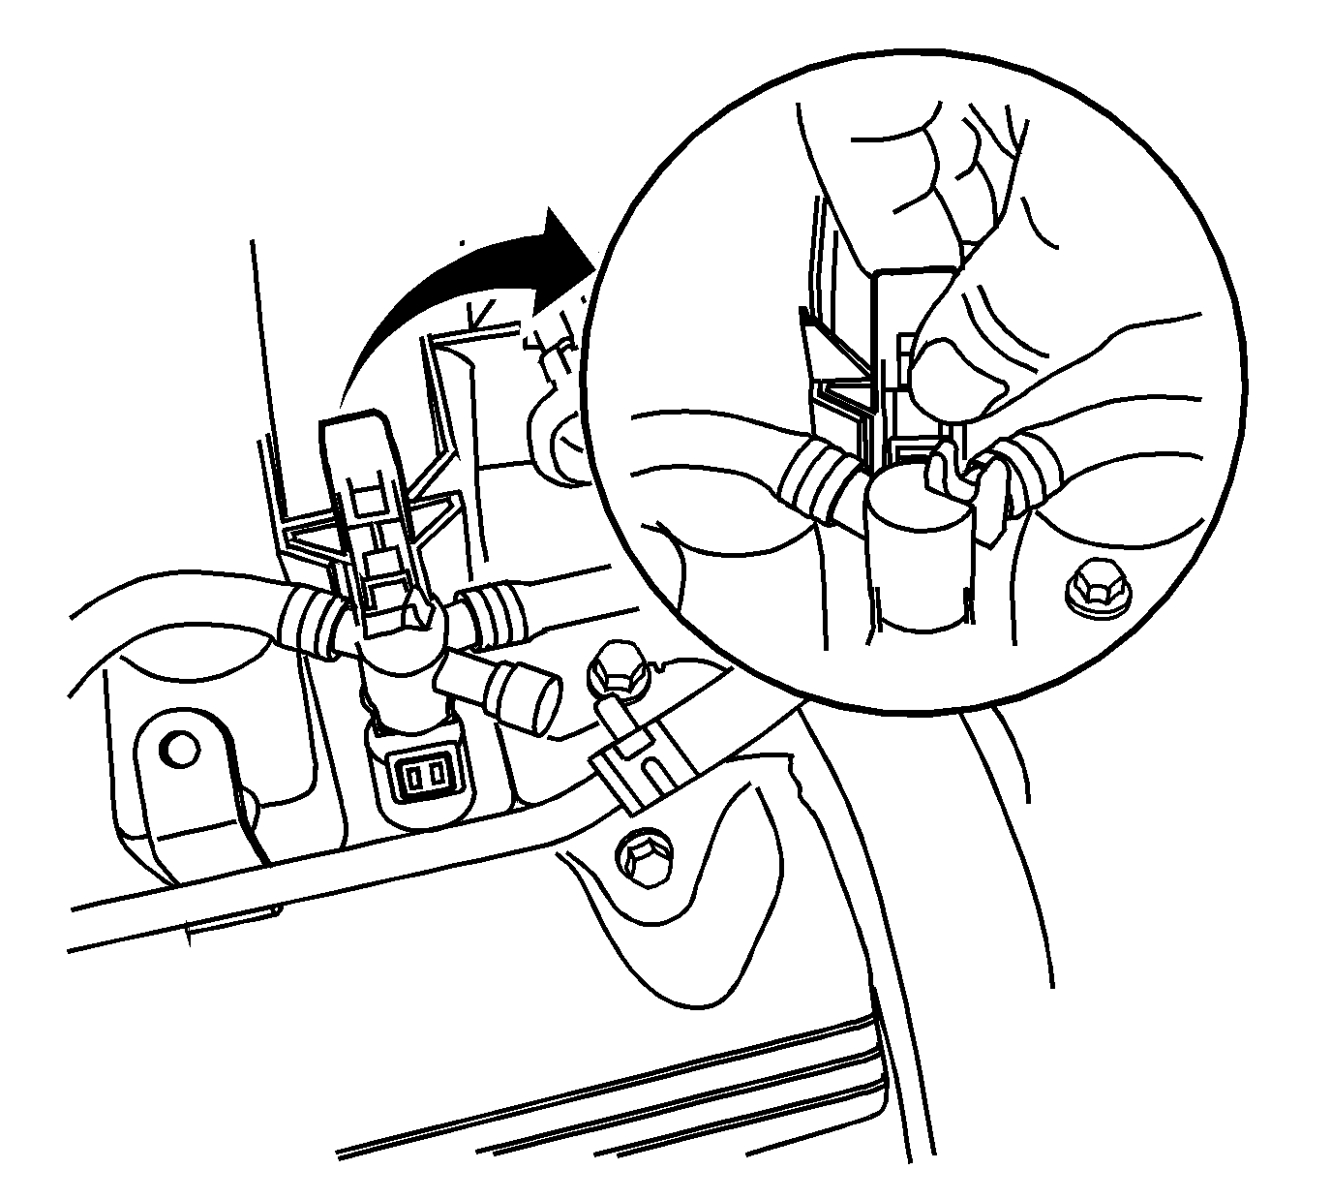
- Release the locking tabs holding the fuel rail to the intake manifold.
Notice: Remove the fuel rail assembly carefully in order to prevent damage to the injector electrical connector terminals and the injector spray tips. Support the fuel rail after the fuel rail is removed in order to avoid damaging the fuel rail components.
Cap the fittings and plug the holes when servicing the fuel system in order to prevent dirt and other contaminants from entering open pipes and passages.
- Remove the fuel rail and fuel injectors as an assembly from the intake manifold. Use the J 41801 to aid in removing any injectors stuck in the intake manifold. Place the J 41081 between the intake manifold and the bottom of the fuel injector.
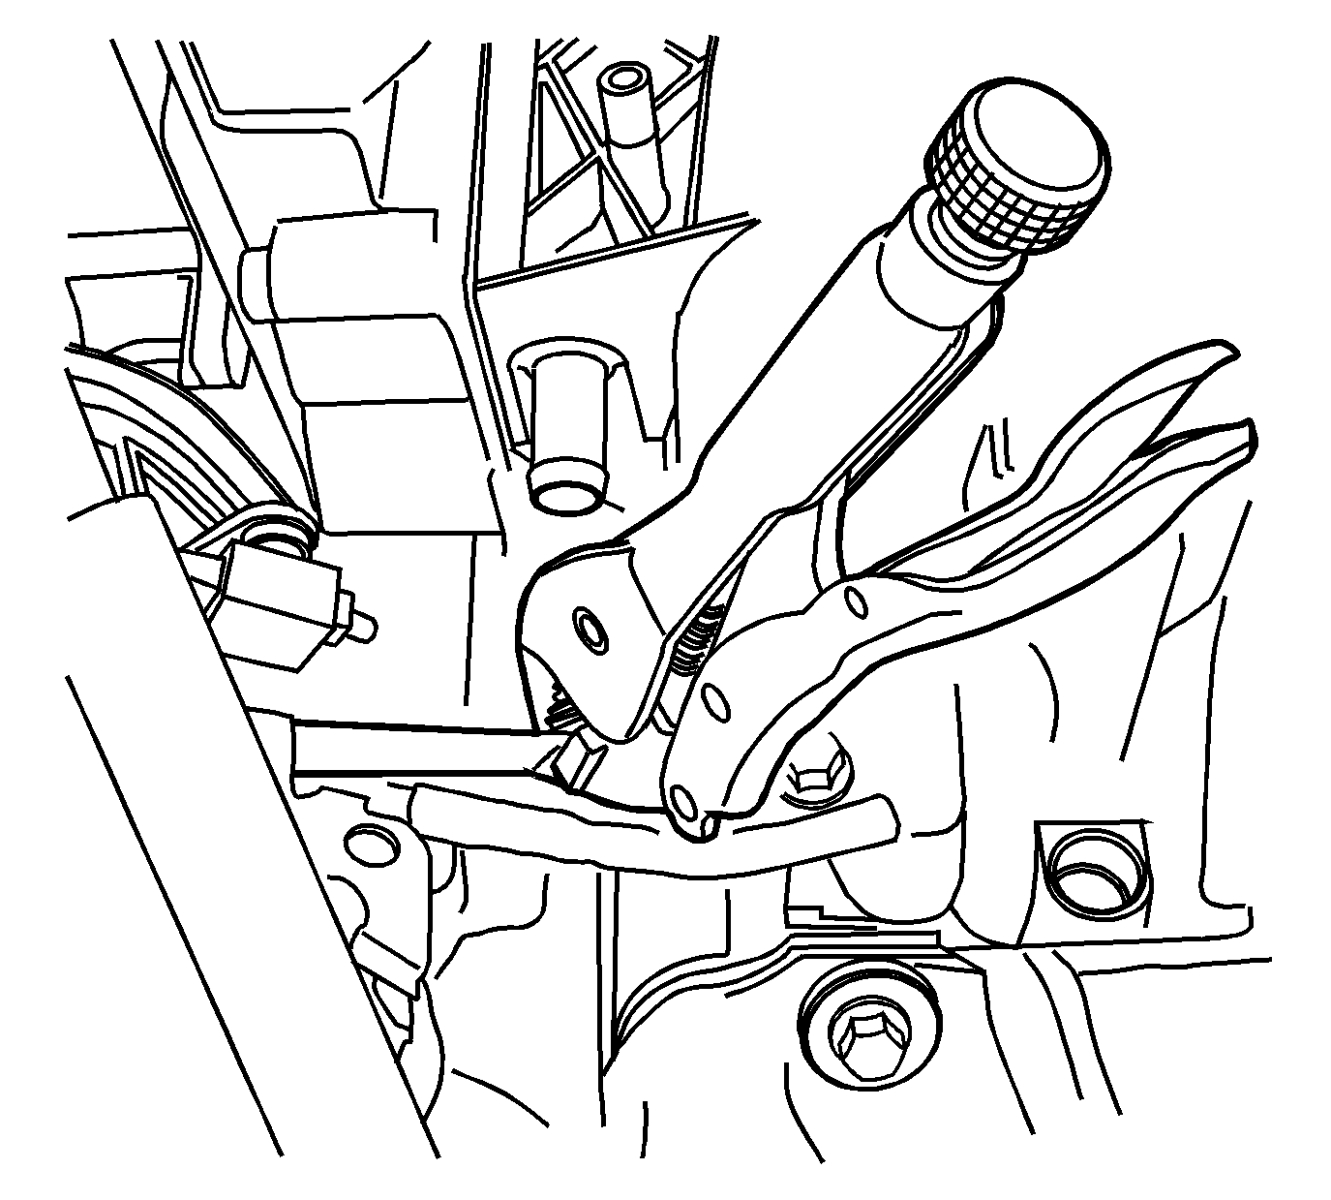
Important: Step 58 MY1995-97 Cadillac ONLY.
ONLY.
- In order to pull the metal fuel line out from under the intake manifold adapter, using pliers collapse the left (front) metal line tube at the right (rear) side of the intake manifold adapter. Weakening the tube will allow the left (front) metal line tube to be pulled out from under the intake manifold adapter on the right (rear) side of the intake manifold adapter.
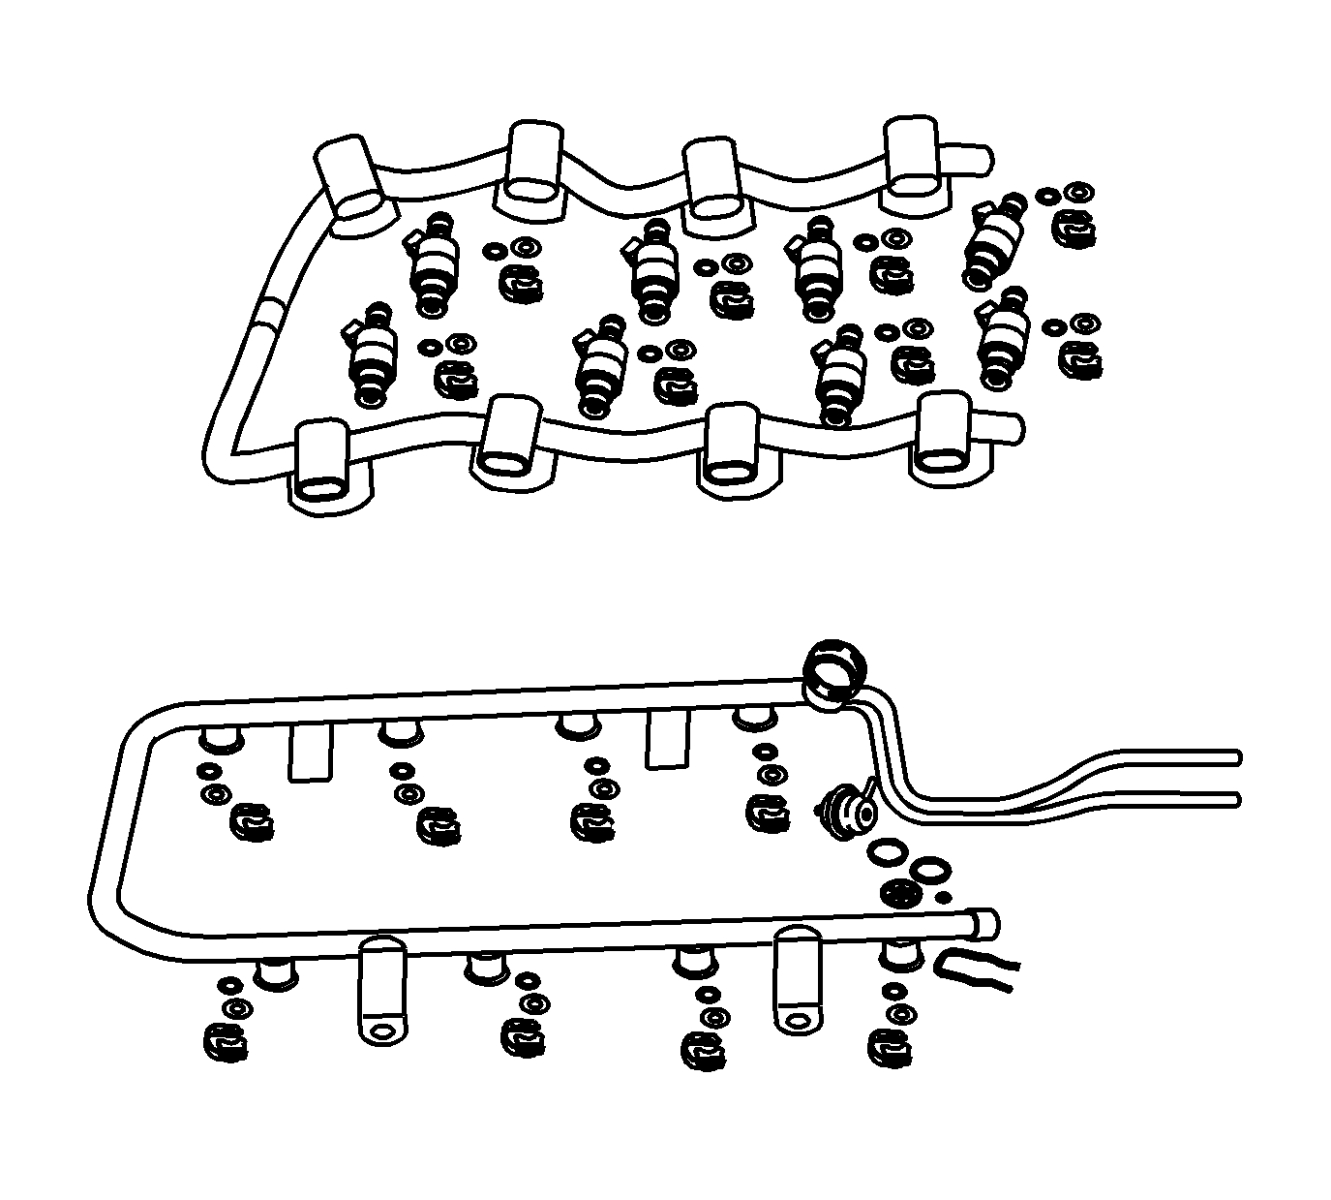
- Place the old fuel rail assembly on a clean, flat surface next to and in the same orientation as the new fuel rail assembly.
1995 Oldsmobile Aurora Fuel Chassis Line Removal and Installation
The following procedure is for replacing the fuel lines from the fuel rail on the engine back to and including the fuel filter under the vehicle. The new fuel lines come complete with all necessary retainers. It applies only to the 1995 Oldsmobile Aurora and is based on the fuel rail being replaced at the same time. Therefore the steps or procedures for relieving fuel pressure, disconnecting the lines from the fuel rail, etc., can be found in the fuel rail replacement section of this recall bulletin.
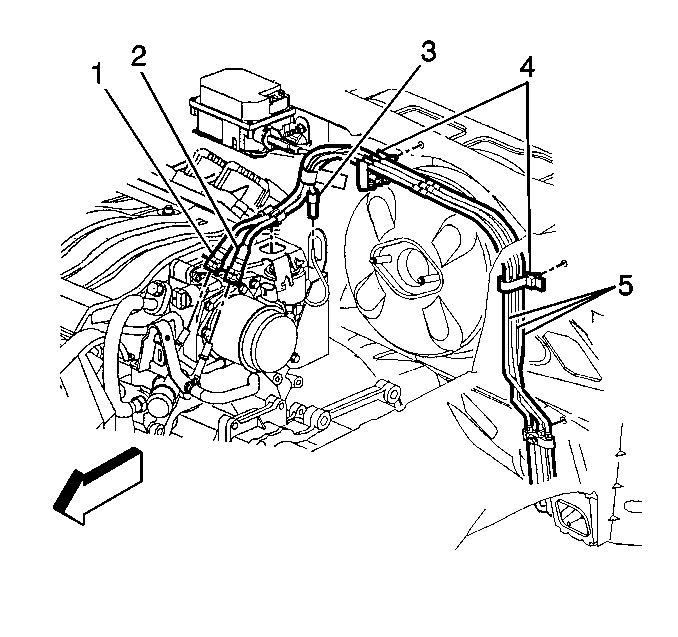
- Disconnect the fuel lines (5) from the underhood retainers on the throttle body and body sheet metal (4).
- Separate the cruise control cable from the retainer.
- Remove the retainers from the body sheet metal and throttle body and discard.
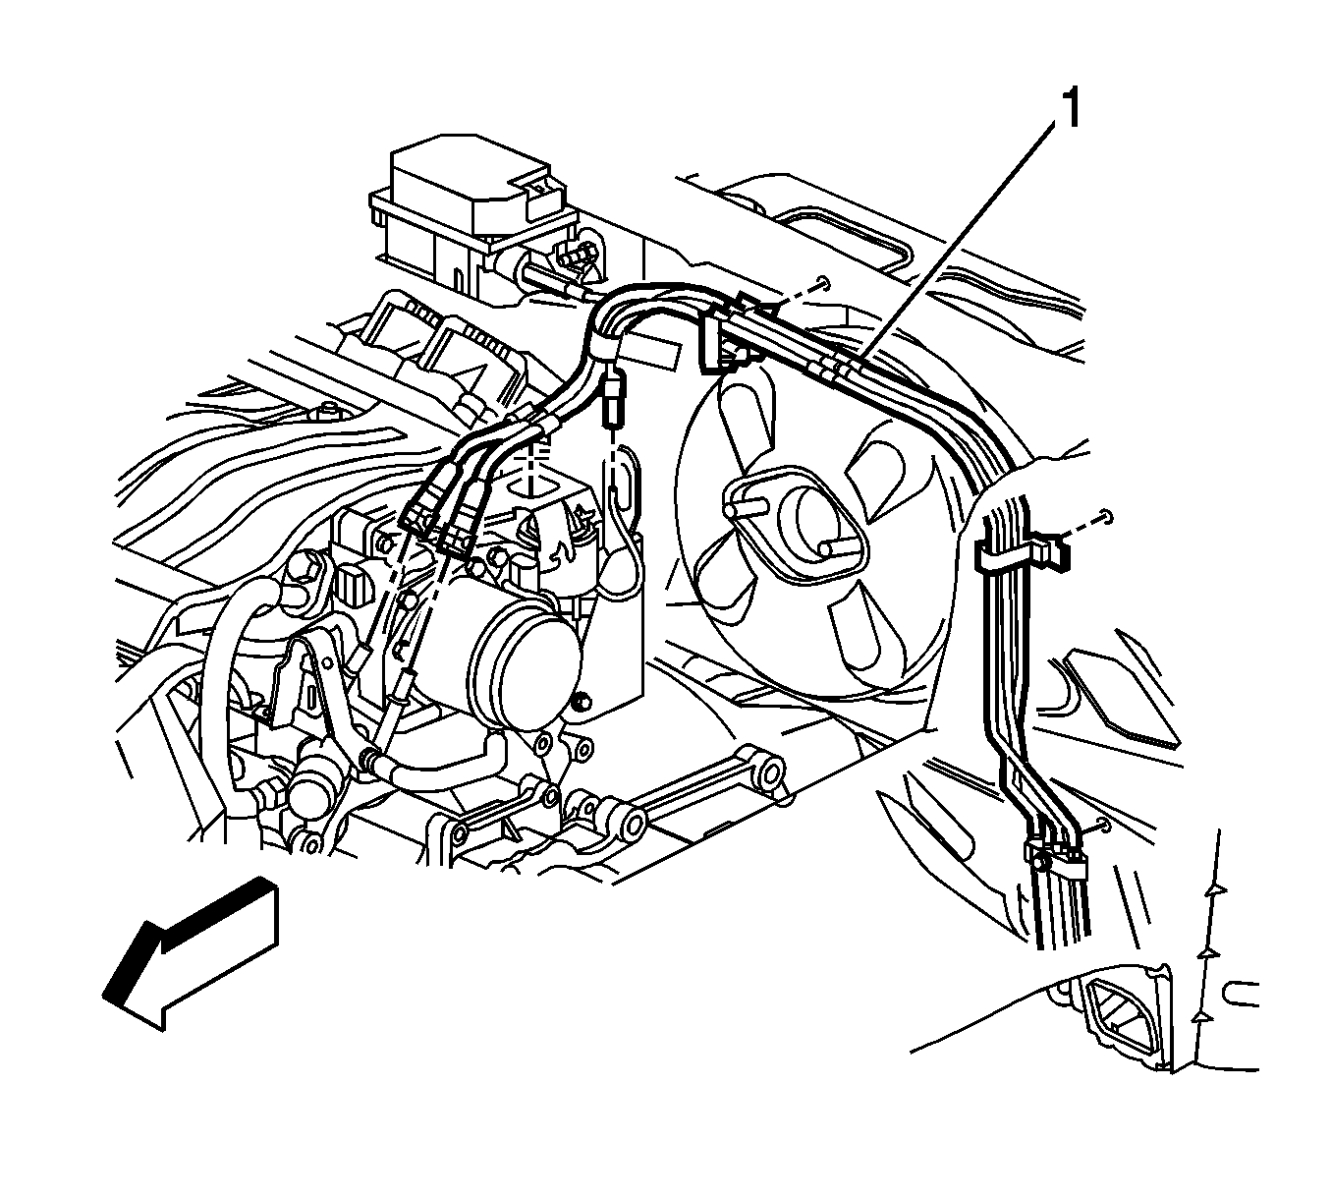
- Using a sharp utility knife, cut off the plastic fuel lines where they meet the steel fuel lines (1) near the vacuum brake booster.
- Disconnect the evaporative emission hose.
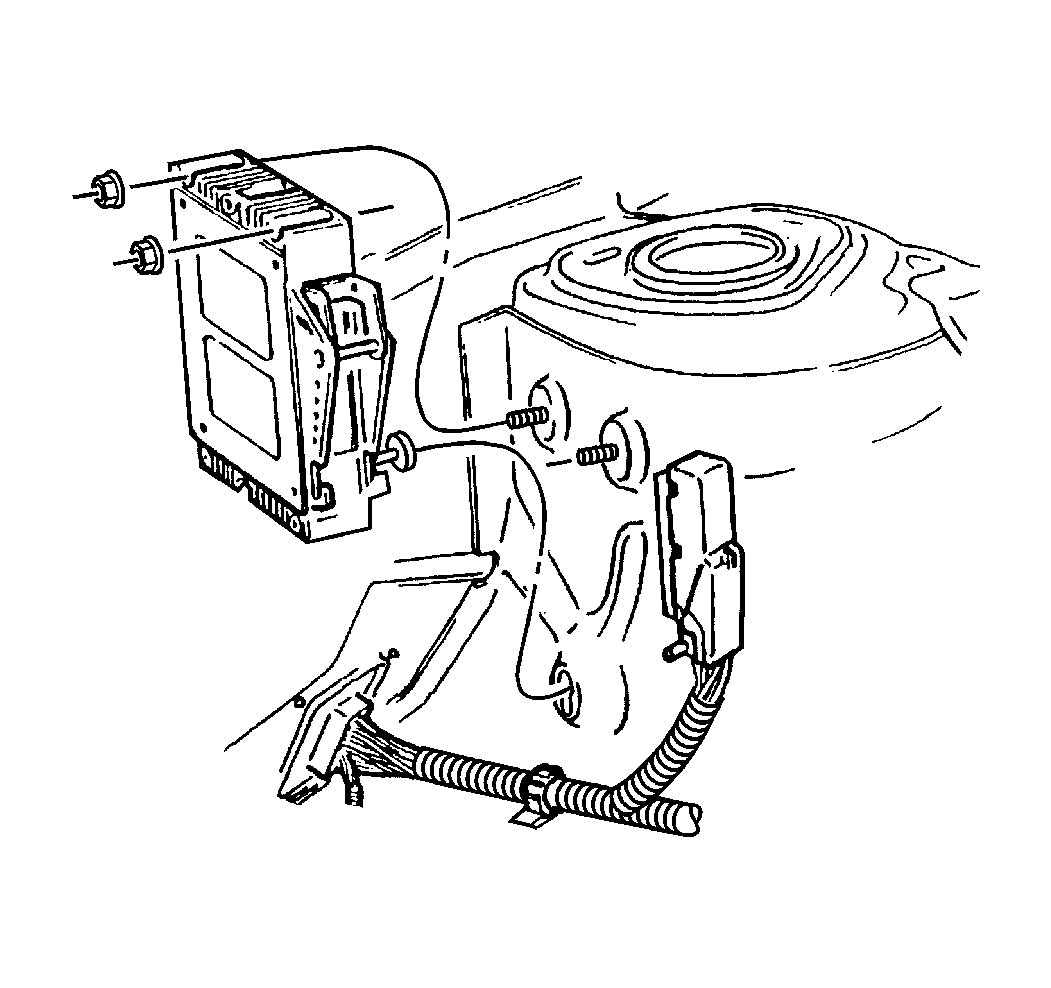
- Remove the two nuts that attach the ABS module to the left strut (shock) tower.
- Remove the ABS module and disconnect the electrical connector.
- Partially raise the vehicle on a suitable hoist and support.
- Remove the left front tire and wheel assembly.
- Remove the 7 push-in type retainers attaching the rear of the left front wheelhouse liner and reposition the liner as necessary to access the transmission mount and the brace connecting the body rail and the lower cowl.
- Raise the vehicle fully.
- Support the rear of the engine frame (cradle) as necessary.
- Remove the four rear cradle bolts.
- Remove the two nuts attaching the left side transmission bracket to the body mount.
Notice: When lowering the cradle in the next step, pay close attention to the intermediate steering shaft between the steering gear and the steering column. Do not allow the engine and cradle to be supported by the shaft.
- Lower the rear of the cradle as necessary.
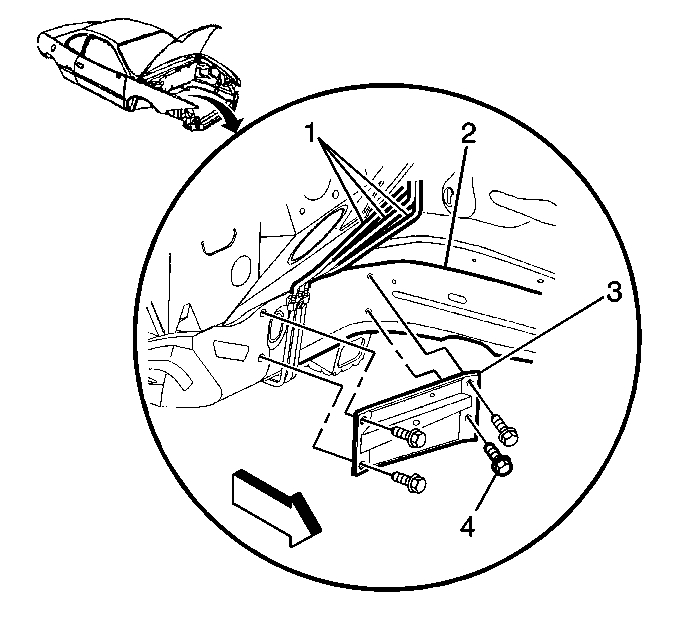
- Remove the four bolt (4) attaching the brace (3) between the body rail (2) and the lower cowl sheet metal. Remove the brace.
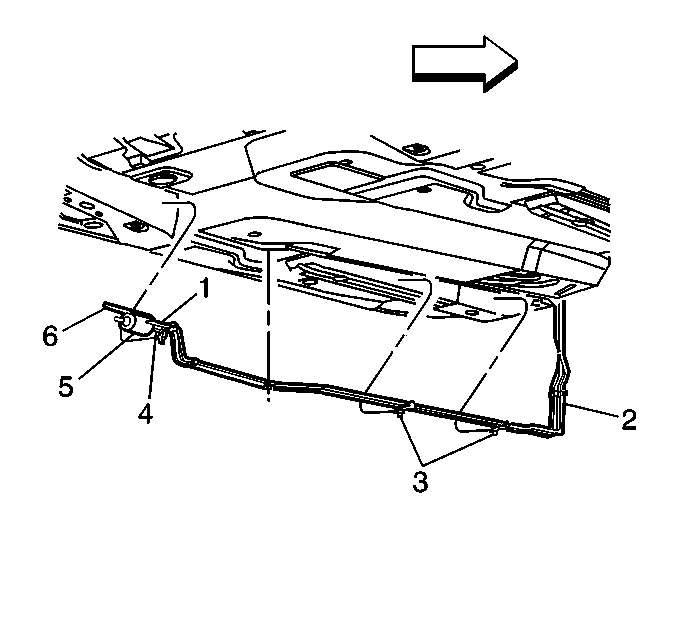
- Remove the bolt attaching the fuel line retainer (2) to the lower cowl sheet metal.
- Remove the fuel lines from that retainer.
- From underneath the vehicle, release the four fuel line retainers (3) from the underbody.
- Unclip the fuel lines from the retainers.
- Disconnect the fuel feed line at the quick connect on the rearward end of the fuel filter (5).
- Disconnect the remaining two lines at the quick connects rearward (6) of the fuel filter.
- Remove the fuel lines and all retainers from the vehicle.
Important: Do NOT bend the new fuel lines when installing in the next step.
- Position the NEW fuel lines under the vehicle and route the engine end of the lines up into the engine compartment.
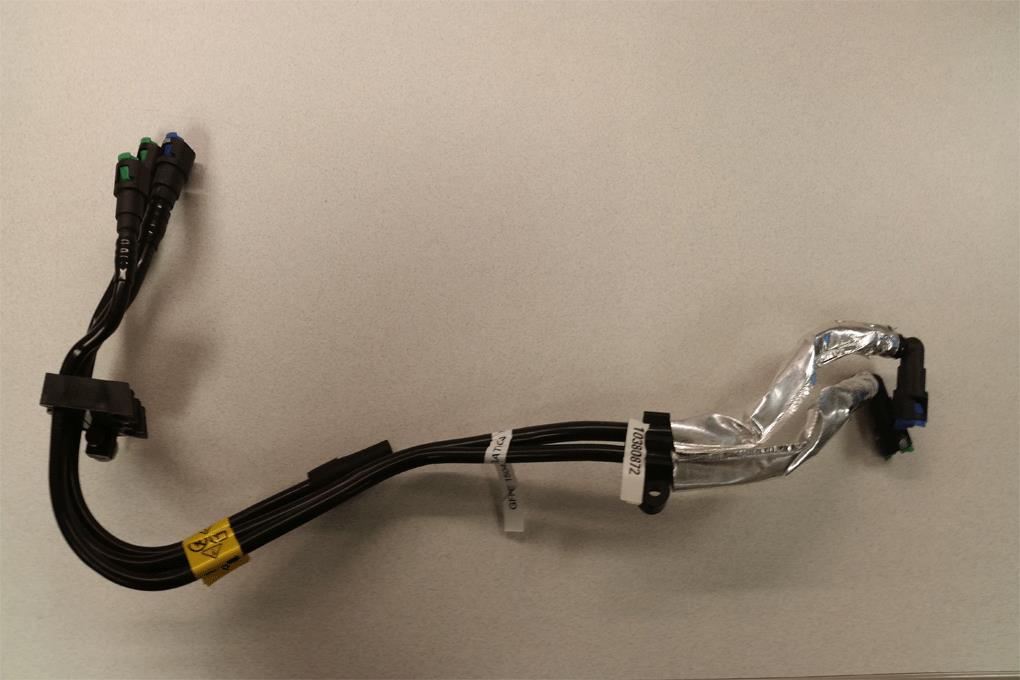
- Install the new fuel lines and retainers to the floor pan.
Caution: In order to reduce the risk of fire and personal injury, before connecting fuel pipe fittings, always apply a few drops of clean engine oil to the male pipe ends. This will ensure proper reconnection and prevent a possible fuel leak. During normal operation, the O-rings located in the female connector will swell and may prevent proper reconnection if not lubricated.
- Apply a few drops of clean engine oil to the male ends of the quick connect pipes.
- Install the NEW fuel filter to the fuel line and quick connect fitting. Push both sides of the fitting together to cause the retaining tabs/fingers to snap into place.
Tighten
Tighten the flare nut to 30 Nm (22 lb ft).
- Connect the remaining quick-connect fittings under the vehicle. Push both sides of the fittings together to cause the retaining tabs/fingers to snap into place.
- Pull on both sides of all quick-connect fittings to ensure connections are secure.
- Install the fuel lines to the retainer. Position the retainer to the lower cowl sheet metal and install the bolt.
Tighten
Tighten the bolt to 9 Nm (7 lb ft).
- Position the brace between the body rail and the lower cowl sheet metal. Install the four bolts.
Tighten
Tighten to 50 Nm (37 lb ft).
- Raise the rear of the engine cradle and install the four bolts.
Tighten
Tighten to 100 Nm (74 lb ft).
- Install the two nuts attaching the left side transmission bracket to the body mount.
Tighten
Tighten to 35-45 Nm (47-61 lb ft).
- Position the left front wheelhouse liner and install the seven push-in retainers.
- Install the left front tire and wheel.
Tighten
Tighten the nuts to 140 Nm (100 lb ft).
- Lower the vehicle.
- Connect the electrical connector to the ABS module.
- Position the ABS module to the left strut (shock) tower and install the two nuts.
Tighten
Tighten to 11 Nm (96 lb in).
Caution: In order to reduce the risk of fire and personal injury, before connecting fuel pipe fittings, always apply a few drops of clean engine oil to the male pipe ends. This will ensure proper reconnection and prevent a possible fuel leak. During normal operation, the O-rings located in the female connector will swell and may prevent proper reconnection if not lubricated.
- Apply a few drops of clean engine oil to the male ends of the quick connect pipes.
- Connect the quick-connect fittings on the plastic tubing to the fuel lines. Push both sides of the fitting together to cause the retaining tabs/fingers to snap into place.
- Pull on both sides of all quick-connect fittings on the plastic tubing to the fuel lines. Push both sides of the fitting together to cause the retaining tabs/fingers to snap into place.
- Attach the fuel line retainer to the body sheet metal and throttle body.
- Connect the cruise control cable to the retainer.
- Attach the new evaporative emissions hose.
- Refer to the fuel rail replacement procedure for connecting fuel lines to the fuel rail and the remainder of the recall procedure.
Fuel Rail Disassembly and Assembly
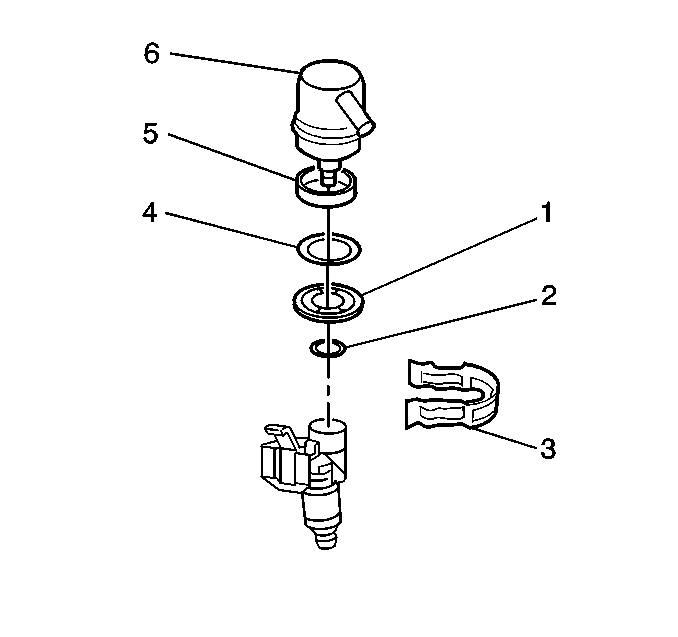
Notice:
- Do not use compressed air to test or clean a fuel pressure regulator. Excessive air pressure can damage the fuel pressure regulator.
- Do not immerse the fuel pressure regulator in a cleaning solvent in order to prevent damage to the regulator.
- Use ONLY clean engine oil to lubricate O-rings. In order to prevent damage to the fuel pressure regulator, do NOT use any other type of lubricant.
- Remove the fuel regulator from the old fuel rail assembly.
1.2 Remove the fuel pressure regulator retaining clip (3).
1.2 Lift, twist and remove the fuel rail regulator (6) from the fuel rail socket.
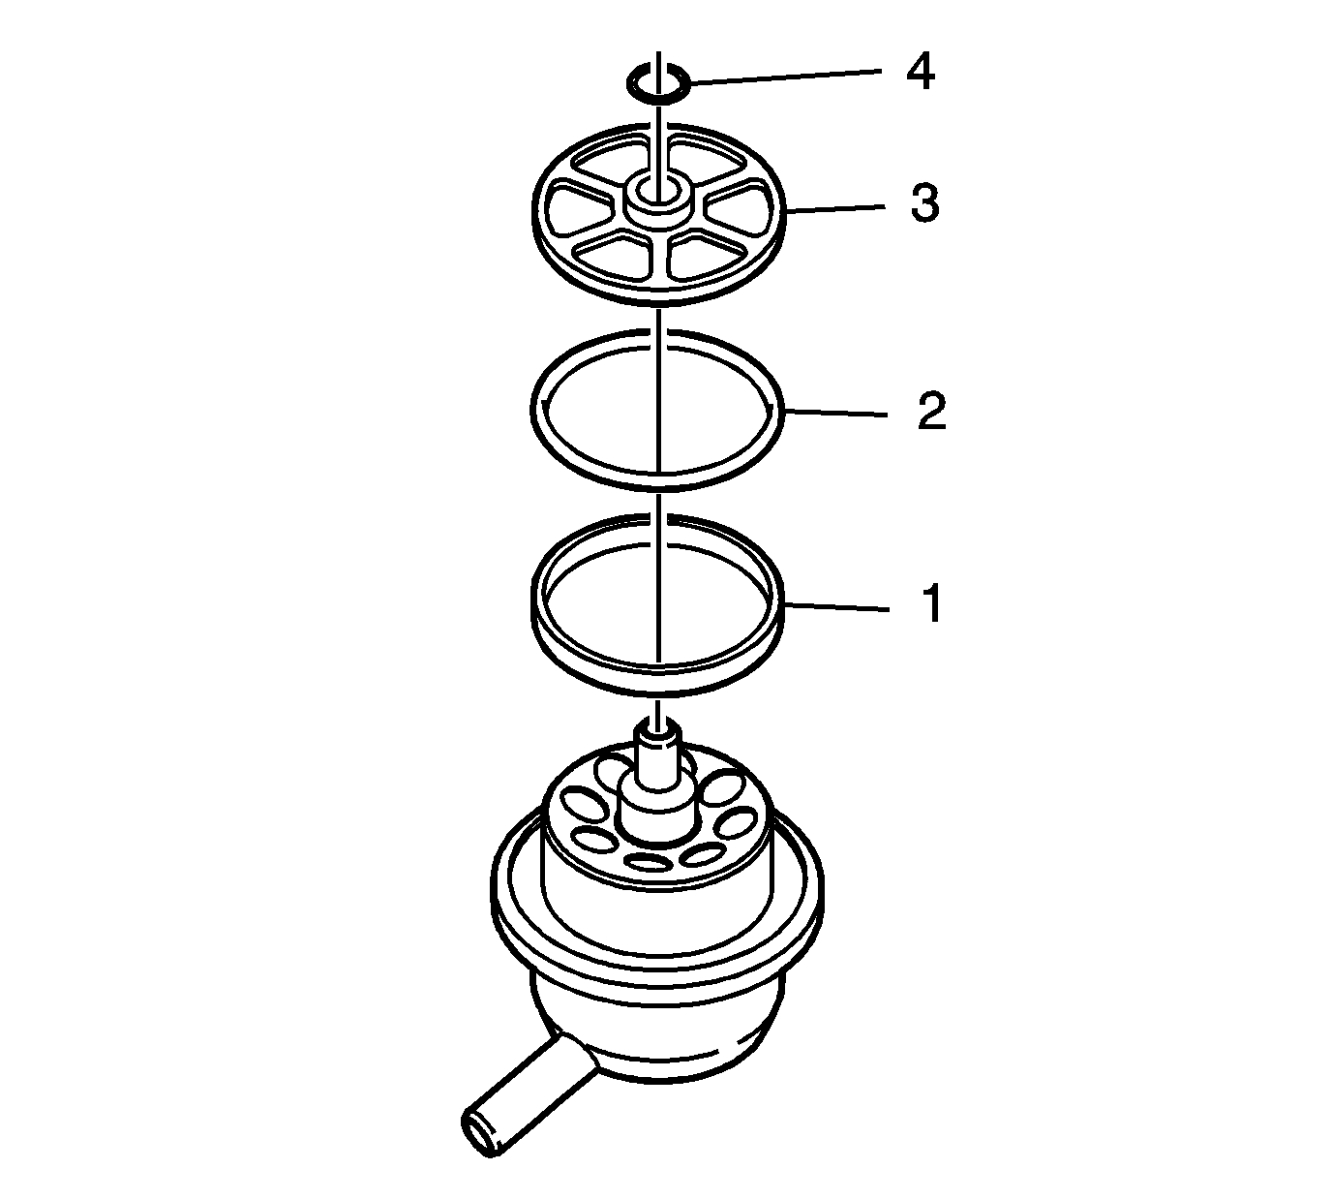
- Install the NEW fuel pressure regulator seals, back-up spacer and filter from the seal kit (P/N 17800050, 51, 52 or 53) onto the existing fuel pressure regulator in proper order.
2.1 Install the NEW O-ring back-up (1) onto the fuel pressure regulator.
2.2 Coat the NEW large O-ring (2) with clean engine oil and install onto the fuel regulator.
2.3 Install thew NEW regulator filter screen (3) onto the fuel regulator.
2.4 Coat the NEW small O-ring (4) with clean engine oil and install onto the fuel regulator.
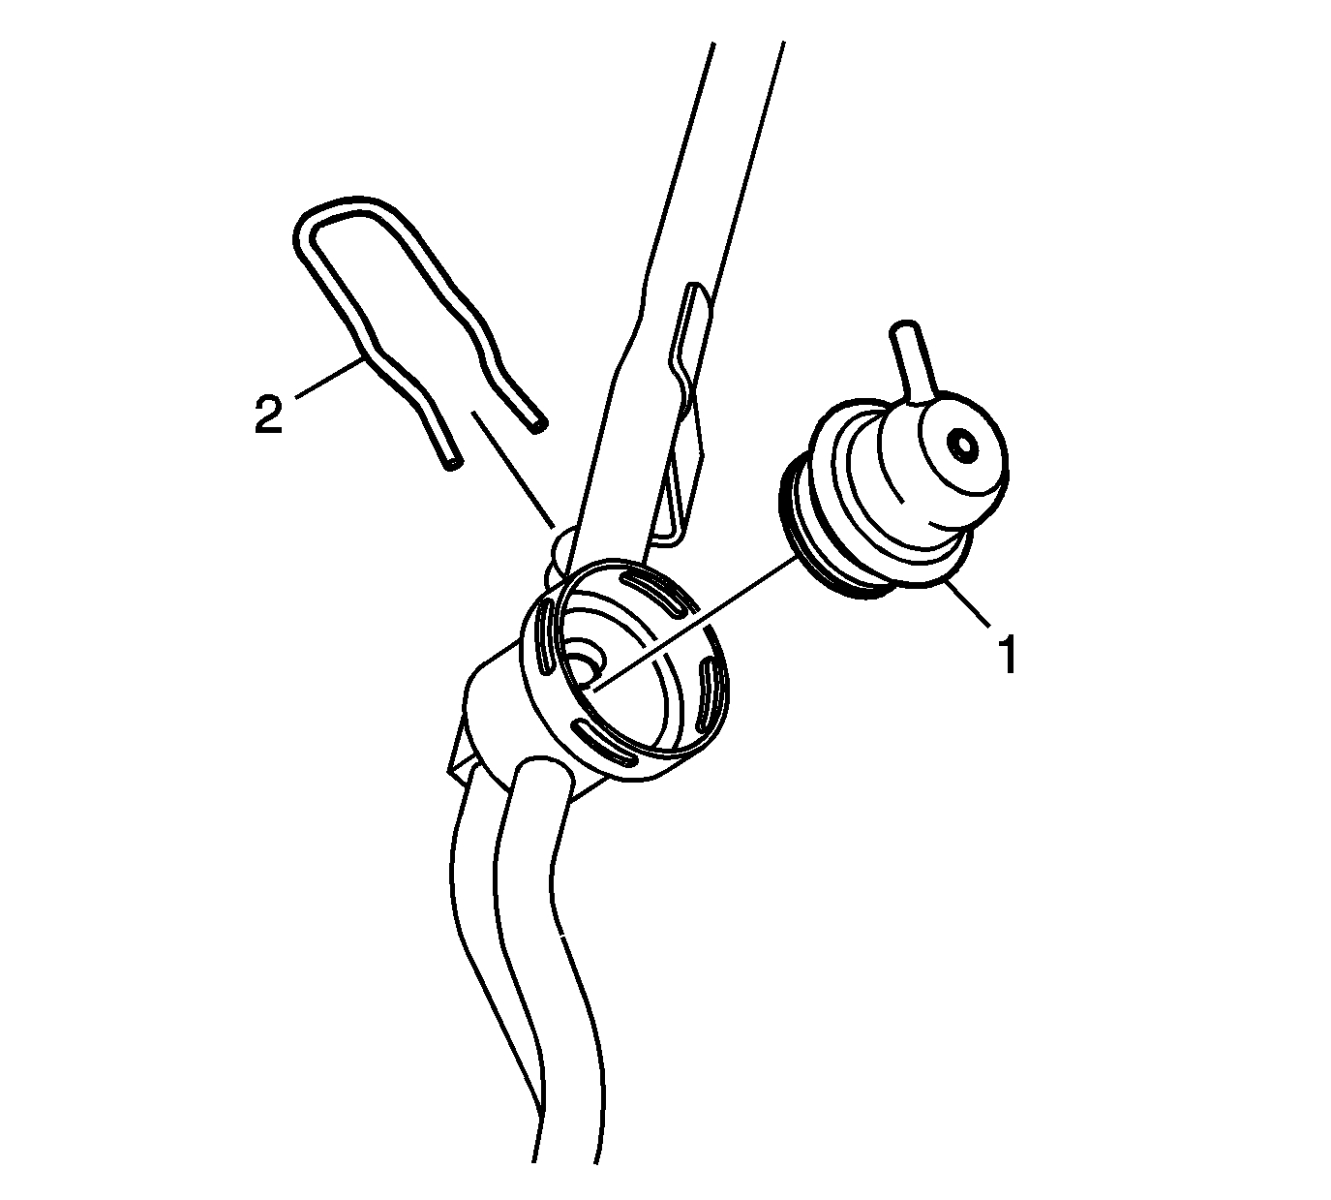
- Install the fuel pressure regulator assembly into the NEW fuel rail (P/N 12583145, 46 or 47).
3.1 Insert the assembled fuel pressure regulator (1) into the fuel rail socket using a turning motion to properly seat the O-rings.
3.2 Install the NEW fuel pressure regulator retaining clip (2).
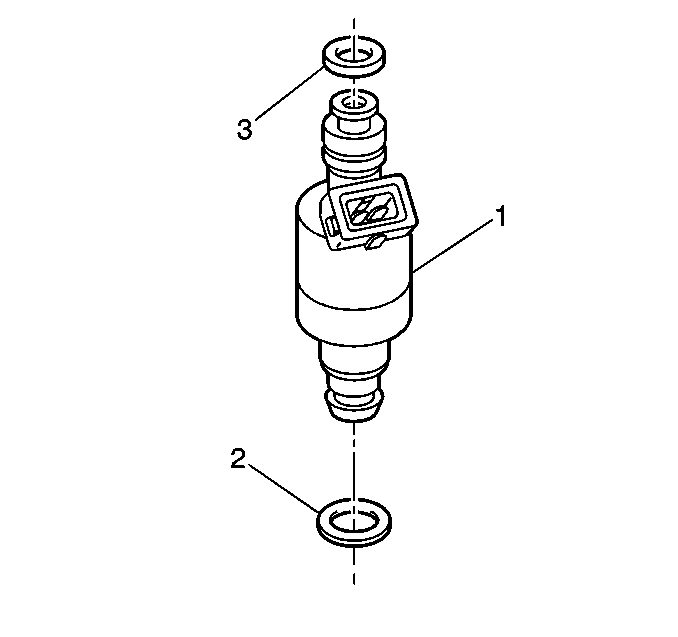
- Exchange each fuel injector from the old fuel rail assembly to the NEW fuel rail assembly one at a time in order to keep each injector in its original position.
4.1 Spread and release the fuel injector clip from the old fuel rail assembly.
4.2 Remove the fuel injector assembly (1).
4.3 Remove the upper (3) and lower (2) fuel injector O-rings.
Important: Use ONLY clean engine oil to lubricate O-rings. Do NOT use any other type of lubricant or grease.
4.4 Coat with clean engine oil the NEW O-rings and install onto the fuel injector assembly.
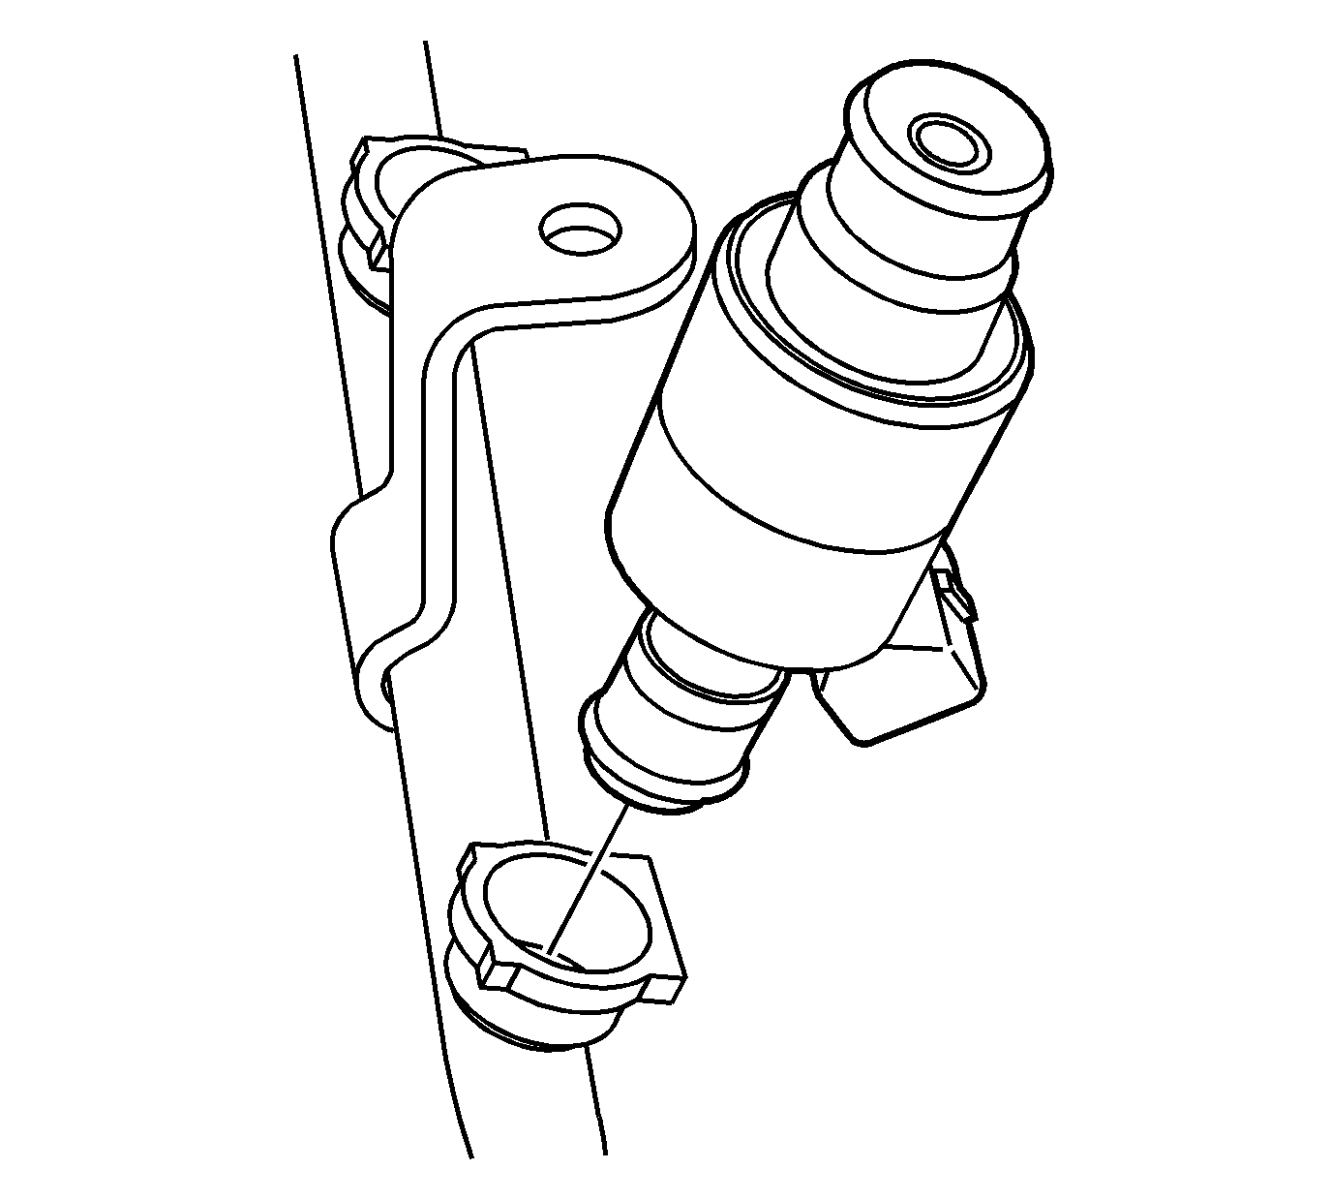
4.5 Install the fuel injector assembly into the same location on the NEW fuel rail assembly with the wiring harness connector facing outboard direction.
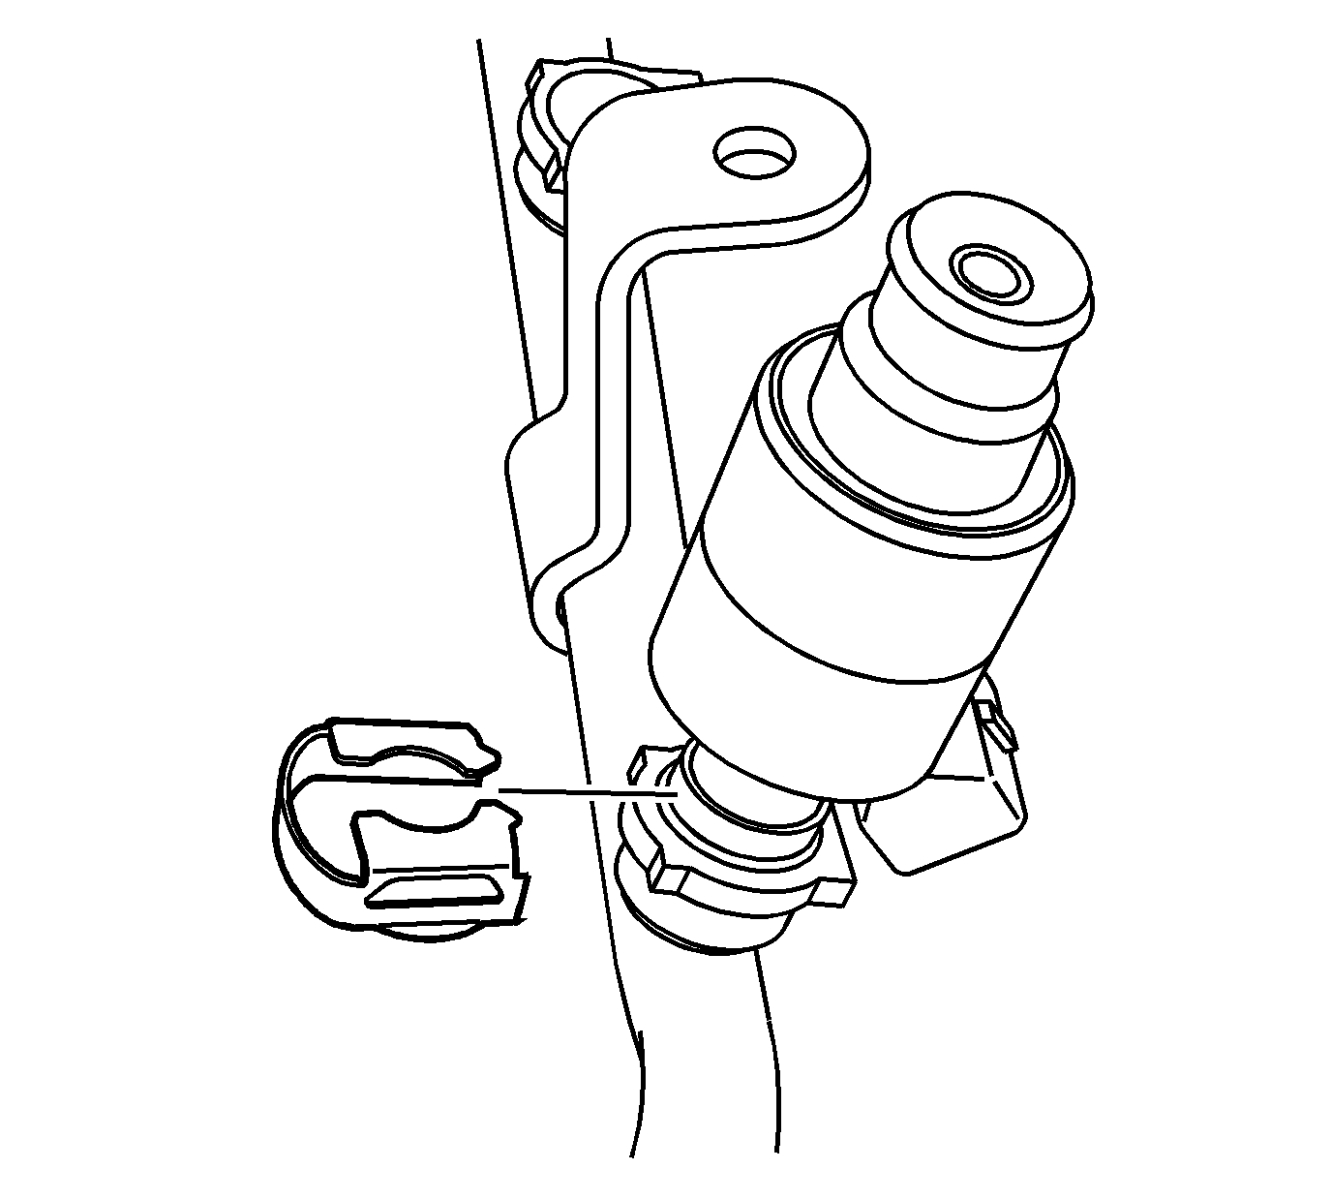
4.6 Install the NEW fuel injector clip onto the NEW fuel rail assembly.
4.7 Repeat Steps 4.1 through 4.6 on the remaining fuel injectors.
Important: Step 5 MY 1995-97 Aurora ONLY.
- Transfer the plastic fuel line retainers from the old fuel rail to the NEW fuel rail.
Fuel Rail Installation
- Place the NEW fuel rail assembly into position.
1.1 Align the fuel injectors to the fuel injector bores in the intake manifold.
1.2 Align the fuel injector assembly bracket to the engine lift bracket (Aurora); or EGR valve stud (Cadillac).
1.3 Apply pressure to fuel rail assembly to seat fuel injectors into fuel injector bores in the intake manifold.
Notice: Use the correct fastener in the correct location. Replacement fasteners must be the correct part number for that application. Fasteners requiring replacement or fasteners requiring the use of thread locking compound or sealant are identified in the service procedure. Do not use paints, lubricants, or corrosion inhibitors on fasteners or fastener joint surfaces unless specified. These coatings affect fastener torque and joint clamping force and may damage the fastener. Use the correct tightening sequence and specifications when installing fasteners in order to avoid damage to parts and systems.
Important: Steps 2-8 MY1995-97 Cadillac ONLY.

- Install the nut retaining the fuel rail assembly bracket to the EGR stud.
Tighten
Tighten the nut retaining the fuel rail assembly bracket to the EGR stud to 8 Nm (71 lb in).
- Install the fuel rail injector sight shield spacers and studs.
Tighten
Tighten the fuel injector sight shield studs to 12 Nm (106 lb in).
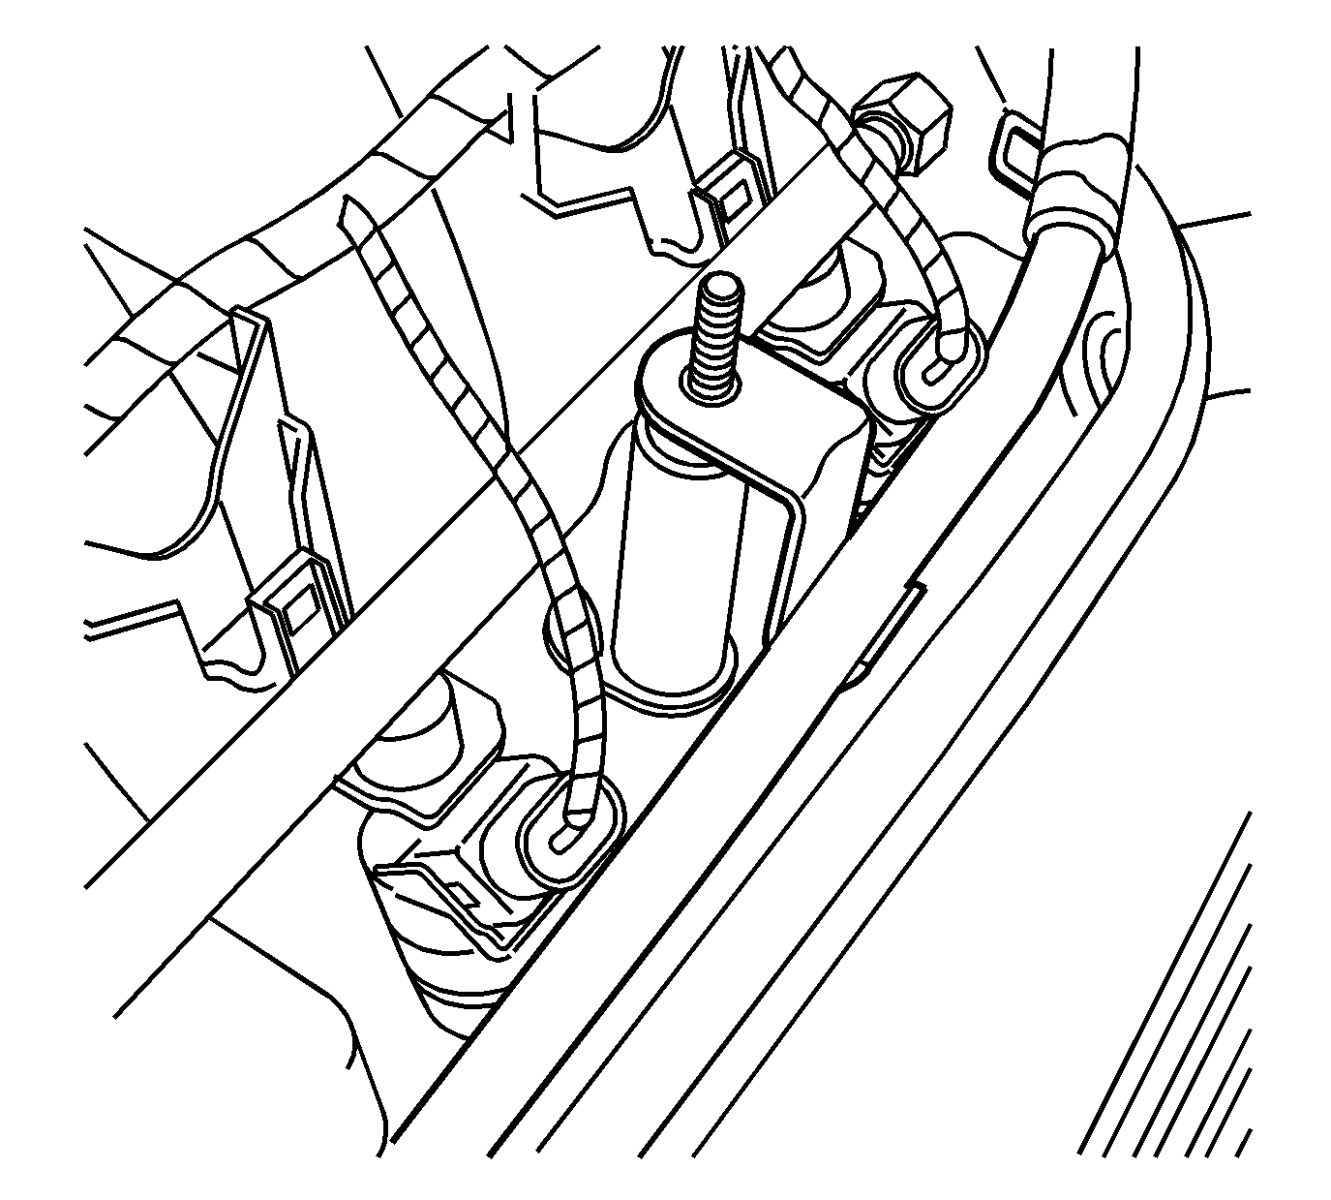
- Align the throttle body heater pipe onto the fuel injector sight shield studs and install any retainers onto the fuel injector sight shield studs.
- Connect the fuel injector wiring harness to the 8 fuel injectors and reinstall the fuel injector wiring harness.
- Install and connect the NEW fuel pressure regulator hose to the fuel regulator and the vacuum port of the intake manifold.
- Install and connect the brake booster hose.
- Install and connect the PCV rear hose.
Important: Steps 9-10 MY1997 Cadillac ONLY.
- Install and connect the PCV front hose.
- Install and connect the EVAP tube between the intake manifold adapter and the EVAP solenoid.
Important: Steps 11-15 MY1995-97 Aurora ONLY.
- Install the fuel rail injector sight shield spacers and studs.
Tighten
Tighten the fuel rail injector sight shield studs to 12 Nm (106 lb in).
95 Aurora

96-97 Aurora

- Install the bolt retaining the fuel rail assembly bracket to the engine lift bracket.
Tighten
Tighten the fuel rail assembly bracket bolt to 6 Nm (53 lb in).
- Connect the fuel injector wiring harness to the 8 fuel injectors and reinstall the fuel injector wiring harness.
- Connect the NEW fuel regulator hose to the fuel regulator and the vacuum port on the intake manifold.
- Install the PCV rear hose.
- Apply dielectric grease, GM P/N 12345579 (Canadian P/N 1974984) to each spark plug boot. Route and connect the front spark plug wires to the front spark plugs.
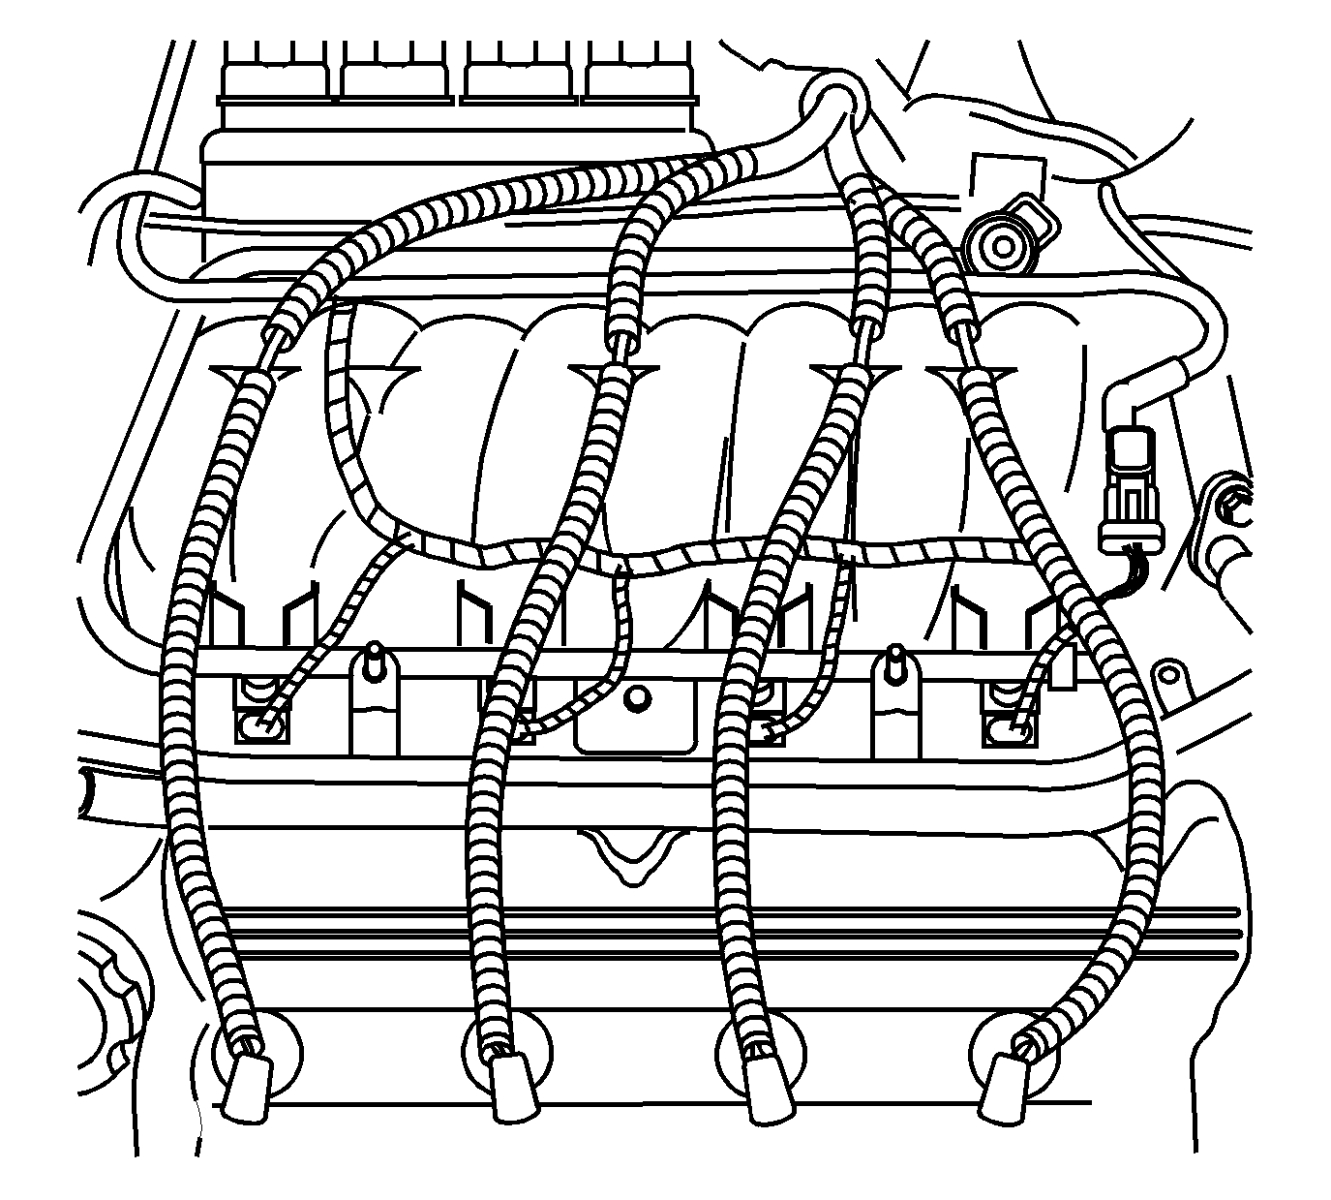
Important: Conduit installed in next step may be obtained locally if conduit ID and underhood temperature specifications are equivalent.
- Install wire conduit, GM P/N 8919354 or equivalent, over each of the front spark plug wires where the spark plug wires lay across the fuel rail on both sides (approximately 6 feet required per vehicle).
- Between the spark plug boot and the retainer in the center of the intake manifold, add a 300 mm (12 in) section of conduit on each of the left side spark plug wires.
- Between the retainer in the center of the intake manifold and the conduit already installed, add the following sections of conduit on each left side spark plug wires:
- 230 mm (9 in) on the number 2 spark plug wire
- 150 mm (6 in) on the number 4 spark plug wire
- 110 mm (4.5 in) on the number 6 and 8 spark plug wire
Important: Step 18 MY1995-97 Aurora ONLY.
- Install the fuel line connections.
Notice: If necessary, remove rust or burrs from the fuel pipes with an emery cloth. Use a radial motion with the fuel pipe end in order to prevent damage to the O-ring sealing surface. Use a clean shop towel in order to wipe off the male tube ends. Inspect all the connections for dirt and burrs. Clean or replace the components and assemblies as required.
- Clean the quick-connect fittings.
Aurora
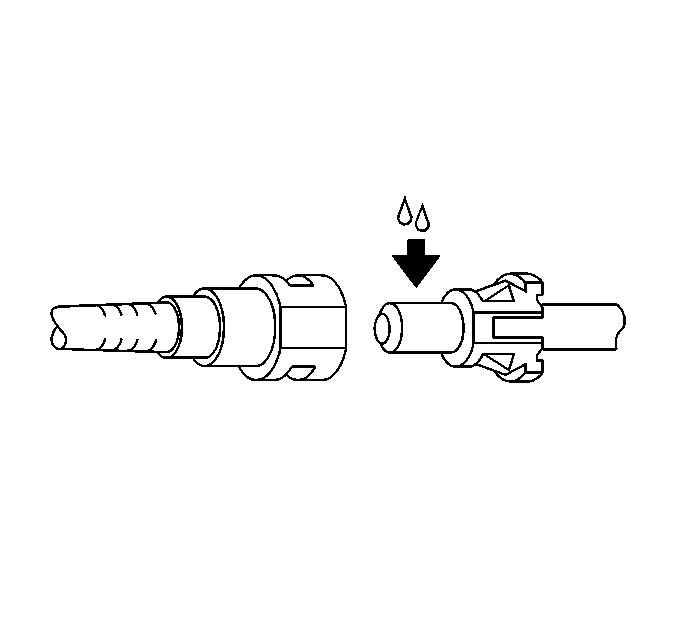
Cadillac
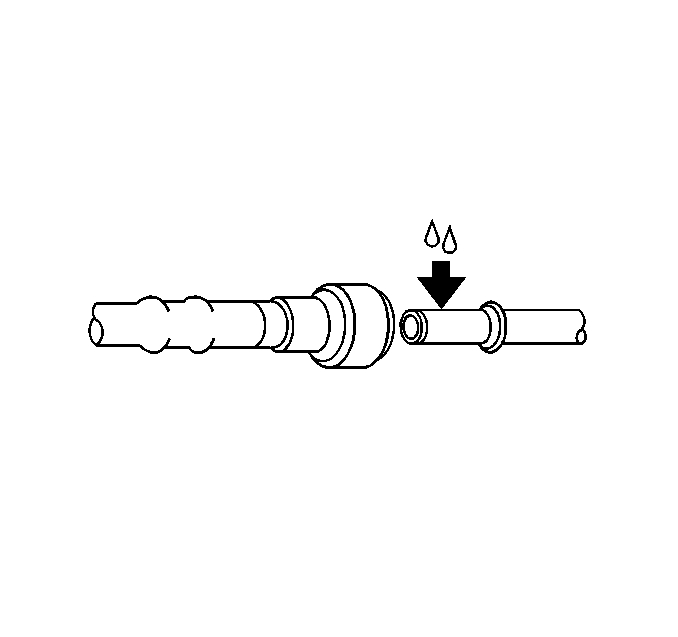
Caution: In order to reduce the risk of fire and personal injury, before connecting fuel pipe fittings, always apply a few drops of clean engine oil to the male pipe ends. This will ensure proper reconnection and prevent a possible fuel leak. During normal operation, the O-rings located in the female connector will swell and may prevent proper reconnection if not lubricated.
- Apply a few drops of clean engine oil to the male ends of the engine fuel rail inlet and outlet pipes.
Aurora
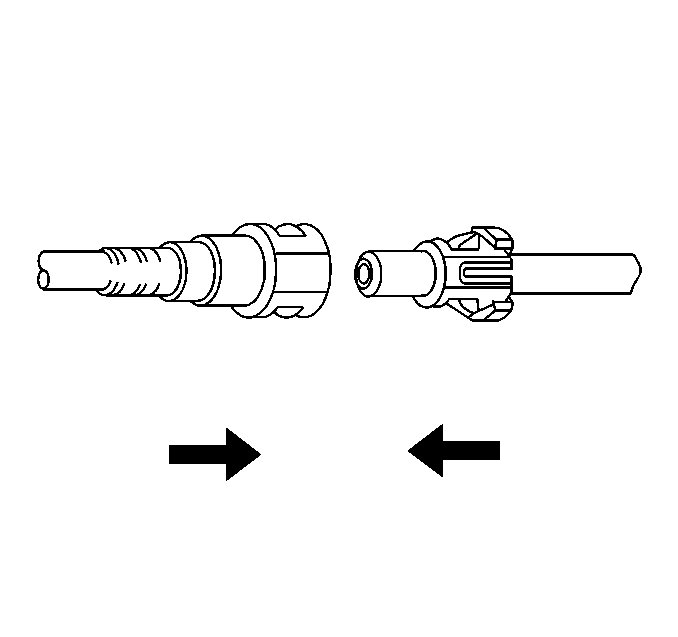
Cadillac
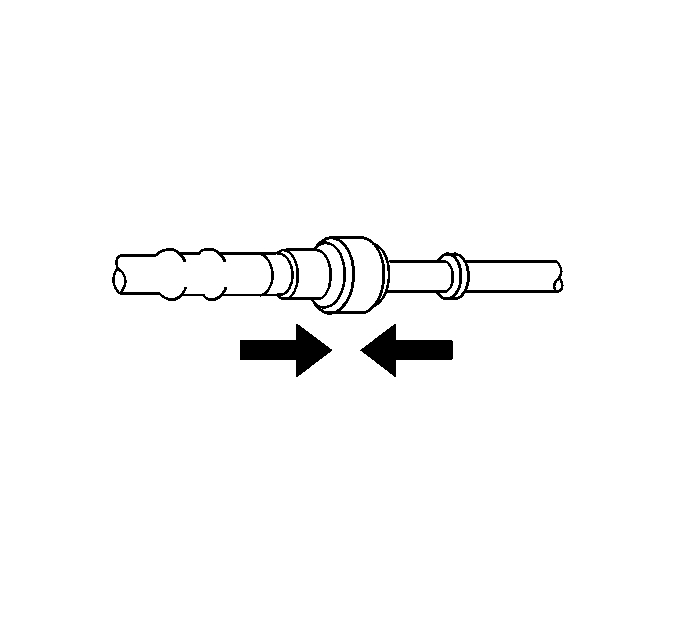
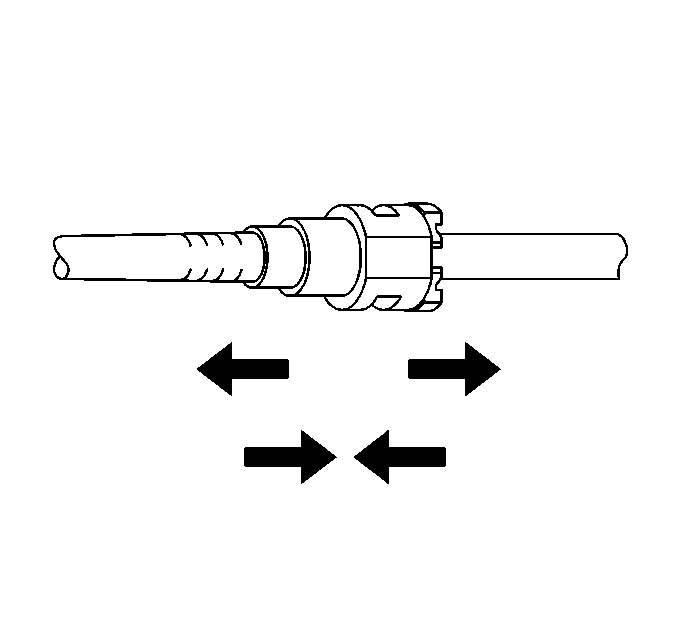
- Connect the quick-connect fittings to the fuel rail. Push both sides of the fitting together to cause the retaining tabs/fingers to snap into place.
Aurora
Cadillac
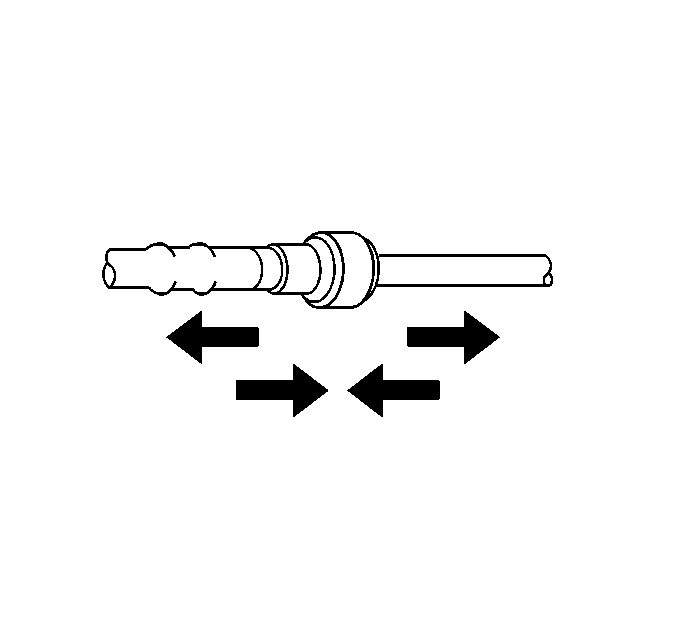
- Pull on both sides of the fitting to ensure connection is secure once installed.

Important: Steps 23-30 MY1995-97 Cadillac ONLY.
- Install the retainers (4, 5) onto the quick-connect fittings of each fuel line.
- Place the cruise control servo into position.
- Connect the cruise control servo cable to the throttle body cruise control servo cam.
- Connect the vacuum hoses to the cruise control servo.
- Install the cruise control servo bracket bolts.
Tighten
Tighten the cruise control servo bracket bolts to 12 Nm (106 lb in).
- Position the vacuum hoses into the retainer holding the vacuum hoses onto the cruise control servo bracket.
- Connect the transmission vent tube to the retainer on the cruise control servo bracket.
- Connect the vacuum manifold to the intake manifold adapter.
Aurora

Cadillac

- Connect the negative battery cable.
- Tighten the negative cable bolt at the battery.
Tighten
Tighten the negative cable bolt to 15 Y (11 lb ft).
- Check for fuel leaks.
33.1 Turn the ignition switch ON for 2 seconds.
33.2 Turn the ignition switch OFF for 10 seconds.
33.3 Turn the ignition switch ON.
33.4 Check for fuel leaks.
33.5 Start the vehicle and allow engine to reach operating temperature while observing for fuel leaks.
Aurora

Cadillac

- Install the fuel injector sight shield.
- Install the 4 fuel injector sight shield nuts.
Tighten
Tighten the fuel injector sight shield nuts to 3 Y (27 lb in).
- Close the hood and reset the customer’s radio setting.
Customer Reimbursement – For US
All customer requests for reimbursement for previous repairs for the recall condition will be handled by the Customer Assistance Center, not by dealers.
A General Motors Product Recall Customer Reimbursement Procedure Form is included with the customer letter.
Important: Refer to the GM Service Policies and Procedures Manual, section 6.1.12, for specific procedures regarding customer reimbursement and the form.
Claim Information
Submit a Product Recall Claim with the information indicated below:
| Labor Code | Description | Labor Time | Net Item |
| V1148 | Inspect engine fuel rail, no replacement required | 0.2 | N/A |
| Add: Replace 1995 Aurora fuel chassis lines (includes relieving fuel pressure, etc.) | 0.9 | ||
| V1149 | Inspect and replace engine fuel rail | 1.0 | * |
| Add: Replace 1995 Aurora fuel chassis line (relieving fuel pressure, etc. included in fuel rail replacement time) | 0.8 | ||
| V1150 | Customer Reimbursement (US CAC Only) | N/A | ** |
* The amount identified in the “Net Item” column should represent the sum total of the current GMSPO Dealer net price plus applicable Mark-Up or Landed Cost Mark-Up (for IPC) for the cost for shop supplies needed to perform the required repairs.
** The amount identified in the “Net Item” column should represent the dollar amount reimbursed directly to the customer through the Customer Assistance Center.
Note: Canadian dealers should refer to the Canadian distribution of the bulletin for detailed claim information.
Refer to the General Motors WINS Claims Processing Manual for details on Product Recall Claim Submission.
Customer Notification — For US
General Motors will notify customers of this recall on their vehicle (see copy of customer letter included with this bulletin).
Dealer Recall Responsibility
The US National Traffic and Motor Vehicle Safety Act provides that each vehicle which is subject to a recall of this type must be adequately repaired within a reasonable time after the customer has tendered it for repair.
A failure to repair within sixty days after tender of a vehicle is prima facie evidence of failure to repair within a reasonable time.
If the condition is not adequately repaired within a reasonable time, the customer may be entitled to an identical or reasonably equivalent vehicle at no charge or to a refund of the purchase price less a reasonable allowance for depreciation.
To avoid having to provide these burdensome remedies, every effort must be made to promptly schedule an appointment with each customer and to repair their vehicle as soon as possible.
In the recall notification letters, customers are told how to contact the US National Highway Traffic Safety Administration if the recall is not completed within a reasonable time.
All unsold new vehicles in dealers’ possession and subject to this recall MUST be held and inspected/repaired per the service procedure of this recall bulletin BEFORE customers take possession of these vehicles.
Dealers are to service all vehicles subject to this recall at no charge to customers, regardless of mileage, age of vehicle, or ownership, from this time forward.
Customers who have recently purchased vehicles sold from your vehicle inventory, and for which there is no customer information indicated on the dealer listing, are to be contacted by the dealer.
Arrangements are to be made to make the required correction according to the instructions contained in this bulletin.
A copy of the customer letter is provided in this bulletin for your use in contacting customers.
Recall follow-up cards should not be used for this purpose, since the customer may not as yet have received the notification letter.
In summary, whenever a vehicle subject to this recall enters your vehicle inventory, or is in your dealership for service in the future, please take the steps necessary to be sure the recall correction has been made before selling or releasing the vehicle.
October 2004
Dear General Motors Customer:
This notice is sent to you in accordance with the requirements of the National Traffic and Motor Vehicle Safety Act. Federal regulation requires that any vehicle lessor receiving this recall notice must forward a copy of this notice to the lessee within ten days.
Reason For This Recall
General Motors has decided that a defect which relates to motor vehicle safety exists in all 1995-1997 Cadillac DeVille Concours, Seville, Eldorado, 1996-97 Cadillac DeVille; and 1995-1997 Oldsmobile Aurora model vehicles. These vehicles have a condition in which the original equipment nylon tubing used in the fuel rail construction may degrade and crack. Additionally, the 1995 Oldsmobile Aurora uses a unique underhood fuel return line that may crack at unusually high rates. Cracking of the fuel rail can result in a fuel leak into the engine compartment. The operator may experience fuel odor and possibly engine stalling due to loss of fuel pressure to the engine. If this event were to occur, and if an ignition source were present, an engine compartment fire could occur.
What Will Be Done
Your dealer will inspect and, if necessary, replace the engine fuel rail with a new stainless steel fuel rail. Oldsmobile dealers will also replace the chassis fuel lines on 1995 Oldsmobile Aurora model vehicles. This service will be performed for you at no charge.
How Long Will The Repair Take?
This service correction will take approximately one hour, and the service correction for the 1995 Oldsmobile Aurora will take an additional 50 minutes. However, due to service scheduling requirements, your dealer may need your vehicle for a longer period of time.
Contacting Your Dealer
To limit any possible inconvenience, we recommend that you contact your Oldsmobile dealer as soon as possible to schedule an appointment for this repair. By scheduling an appointment, your dealer can ensure that the necessary parts will be available on your scheduled appointment date.
Should your dealer be unable to schedule a service date within a reasonable time, you should contact the appropriate Customer Assistance Center at the number listed below.
| Division | Number | Text Telephones (TTY) |
| Oldsmobile | 1-800-630-6537 | 1-800-833-6537 |
| Cadillac | 1-866-982-2339 | 1-800-833-2622 |
| Puerto Rico – English | 1-800-496-9992 | |
| Puerto Rico – Español | 1-800-496-9993 | |
| Virgin Islands | 1-800-496-9994 |
If, after contacting the appropriate customer assistance center, you are still not satisfied that we have done our best to remedy this condition without charge and within a reasonable time, you may wish to write the Administrator, National Highway Traffic Safety Administration, 400 Seventh Street SW, Washington, DC 20590 or call 1-888-327-4236.
Customer Reply Form
The enclosed customer reply form identifies your vehicle. Presentation of this form to your dealer will assist in making the necessary correction in the shortest possible time. If you no longer own this vehicle, please let us know by completing the form and mailing it back to us.
Customer Reimbursement
The enclosed form explains what reimbursement is available and how to request reimbursement if you have paid for repairs for the recall condition.
Recall Information Online
More information about this recall (including answers to frequently asked questions) is available online at the Owner Center at My GMLink. This free online service offers vehicle and ownership related information and tools tailored to your specific vehicle. To join, visit www.mygmlink.com and enter your vehicle’s 17-character vehicle identification number (VIN) shown on the enclosed form to get the most personalized information for your vehicle.
We are sorry to cause you this inconvenience; however, we have taken this action in the interest of your safety and continued satisfaction with our products.
General Motors Corporation
Enclosure
04014B
GENERAL MOTORS PRODUCT PROGRAM CUSTOMER REIMBURSEMENT PROCEDURE
If you have paid to have this recall condition corrected prior to receiving this notification, you may be eligible to receive reimbursement.
Requests for reimbursement may include parts, labor, fees and taxes. Reimbursement may be limited to the amount the repair would have cost if completed by an authorized General Motors dealer.
Your claim will be acted upon within 60 days of receipt.
If your claim is:
- Approved, you will receive a check from General Motors.
- Denied, you will receive a letter from General Motors with the reason(s) for the denial, or
- Incomplete, you will receive a letter from General Motors identifying the documentation that is needed to complete the claim and offered the opportunity to resubmit the claim when the missing documentation is available.
Please follow the instructions on the Claim Form provided on the reverse side to file a claim for reimbursement. If you have questions about this reimbursement procedure, please call the toll-free telephone number provided at the bottom of the form. If you need assistance with any other concern, please contact the appropriate Customer Assistance Center at the number listed below. The Customer Assistance Center hours of operation are from 8:00 AM – 11:00 PM eastern standard time Monday through Friday
| Division | Number | Text Telephones (TTY) |
| Oldsmobile | 1-800-630-6537 | 1-800-833-6537 |
| Cadillac | 1-866-982-2339 | 1-800-833-2622 |
| Puerto Rico – English | 1-800-496-9992 | |
| Puerto Rico – Español | 1-800-496-9993 | |
| Virgin Islands | 1-800-496-9994 |
GENERAL MOTORS PRODUCT PROGRAM CUSTOMER REIMBURSEMENT CLAIM FORM
| THIS SECTION TO BE COMPLETED BY CLAIMANT | |
|---|---|
| Date Claim Submitted:
17-Digit Vehicle Identification Number (VIN): Mileage at Time of Repair: Date of Repair: Claimant Name (please print): Street Address or PO Box Number: City, State, ZIP Code: Daytime Telephone Number (include Area Code): Evening Telephone Number (include Area Code): Amount of Reimbursement Requested: $ THE FOLLOWING DOCUMENTATION MUST ACCOMPANY THIS CLAIM FORM Original or clear copy of all receipts, invoices and/or repair orders that show:
My signature to this document attests that all attached documents are genuine and I request reimbursement for the expense I incurred for the repair covered by this special policy. Claimant’s Signature:
|
Please mail this claim form and the required documents to:
General Motors Corporation
P.O. Box 33170
Detroit, MI 48232-5170
All recall reimbursement questions should be directed to the following number: 1-800-204-0261.
SEOCONTENT-END
12 Affected Products
Vehicles
| CADILLAC | DEVILLE | 1995-1997 |
| CADILLAC | ELDORADO | 1995-1997 |
| CADILLAC | SEVILLE | 1995-1997 |
| OLDSMOBILE | AURORA | 1995-1997 |
27 Associated Documents
Owner Notification Letter(Part 577)
 Loading...
Remedy Instructions and TSB
RCRIT-04V110-5342.pdf 387.113KB
To View or Download this Document Click Here
 Loading...
Quarterly Performance Report
RCQPR-04V110-1804.pdf 13.973KB
 Loading...
Defect and Noncompliance Notice(Part 573)
RCDNN-04V110-5068.pdf 144.444KB
 Loading...
Manufacturer Notices(to Dealers,etc)
 Loading...
Supplemental Remedy Instructions and TSB for 1995 Cadillc and 1996-1997 Oldsmobile Vehicles
RCRIT-04V110-9966.pdf 313.169KB
 Loading...
Owner Notification Letter – 1995-Cadillac and 1996-1997 Oldsmobile (Part 577)
RCONL-04V110-8236.pdf 31.972KB
 Loading...
Fax Acknowledgement
 Loading...
Defect and Noncompliance Notice(Part 573)
RCDNN-04V110-9461.pdf 184.294KB
 Loading...
Fax Acknowledgement
 Loading...
Quarterly Performance Report
RCQPR-04V110-2988.PDF 30.943KB
 Loading...
Quarterly Performance Report
RCQPR-04V110-2954.PDF 31.128KB
 Loading...
Owner Notification Letter(Part 577)
RCONL-04V110-9728.PDF 83.301KB
 Loading...
Remedy Instructions and TSB
RCRIT-04V110-1815.PDF 1101.152KB
To View or Download this Document Click Here
 Loading...
Manufacturer Notices(to Dealers,etc)
RCMN-04V110-8958.PDF 204.464KB
 Loading...
Quarterly Performance Report
RCQPR-04V110-5013.PDF 35.495KB
 Loading...
Quarterly Performance Report
RCQPR-04V110-1101.PDF 15.836KB
 Loading...
Quarterly Performance Report
RCQPR-04V110-2930.PDF 36.196KB
 Loading...
Renotification Notice – 10-16-2007
 Loading...
Renotification Notice
 Loading...
Safety Bulletin
RCSB-04V110-7681.pdf 3994.777KB
To View or Download this Document Click Here
 Loading...
Safety Bulletin – Bulletin No.: 04014E Date: May 2016
RCSB-04V110-8047.pdf 3993.246KB
To View or Download this Document Click Here
 Loading...
Manufacturer Notices(to Dealers,etc) – Date: May 10, 2016 Subject: 04014E – Safety Recall Engine Fuel Rail – Replace Revised Part Information section
 Loading...
Manufacturer Notices(to Dealers,etc)
 Loading...
Owner Notification Letter – 1996-1997 Oldsmobile (Part 577)
RCONL-04V110-6382.pdf 31.023KB
 Loading...
Remedy Instructions and TSB for 1996-1997 Oldsmobile Vehicles
RCRIT-04V110-9725.pdf 241.535KB
To View or Download this Document Click Here
 Loading...
ISSUED Renotification Notice
RCRN-04V110-1190.PDF 760.442KB
 Loading...
Latest Recalls Documents
1 Associated Investigation
FUEL RAIL LEAKS
NHTSA ID: EA04003
Dated opened: February 3, 2004
ON MARCH 3, 2004, GENERAL MOTORS NOTIFIED ODI THAT IT WAS RECALLING APPROXIMATELY 94,000 MY 1995-97 OLDSMOBILE AURORA VEHICLES EQUIPPED WITH 4.0L V8 ENGINES (RPO L47 – VIN8 “C”) TO ADDRESS CONCERNS WITH UNDERHOOD FUEL LEAKAGE FROM CRACKED FUEL RAILS AND, IN SOME OF THE VEHICLES, CRACKED FUEL RETURN LINES.
ACCORDING TO GM, THE NYLON TUBING (PA12) USED IN THE FUEL RAIL CONSTRUCTION IN THESE VEHICLES MAY DEGRADE AND CRACK. GM’S SUPPLIER ATTRIBUTED THE CRACKING TO THE COMBINED EFFECTS OF HEAT, TIME, ALCOHOL FUEL, FUEL PRESSURE CYCLING, AND DESIGN STRESSES. IN ADDITION, GM STATED THAT THE MY 1995 AURORA USES A UNIQUE UNDERHOOD FUEL RETURN LINE THAT MAY ALSO CRACK AT UNUSUALLY HIGH RATES. GM DEALERS WILL INSTALL A NEW FUEL RAIL CONSTRUCTED OUT OF STAINLESS STEEL IN ALL OF THE RECALLED VEHICLES AND WILL ALSO INSTALL A REVISED CHASSIS FUEL RETURN LINE IN THE MY 1995 AURORAS.
ON APRIL 16, 2004, GENERAL MOTORS NOTIFIED ODI THAT IT WAS ADDING APPROXIMATELY 389,000 MY 1995-97 CADILLAC SEVILLE, DEVILLE AND ELDORADO VEHICLES EQUIPPED WITH 4.6L V8 ENGINES (RPO’S LD8 AND L37 – VIN8 “Y” AND “9”) TO RECALL 04V-110. THE RECALLED CADILLACS WILL RECEIVE THE NEW STAINLESS STEEL FUEL RAILS. THIS ENGINEERING ANALYSIS IS CLOSED.
| “This site contains affiliate links for which OEMDTC may be compensated” |
- The world’s #1 fuel additive for both gasoline and diesel engines
- A great tune-up in a bottle – treats gasoline, diesel fuel and increases MPG
- Cleans and lubricates the fuel system, including fuel injectors, carburetor and combustion chamber
- Improves fuel economy by burning excess exhaust emissions
- Increases power and acceleration by improving fuel flow and reducing deposit buildup
- Save gas by keeping fuel intake system clean
- Helps restore performance
- Removes deposits from entire fuel system
- Helps inhibit corrosion
- Compatible with cap-less fuel tanks
- QUALITY ASSURED
- Reduces: rough idle, engine surge, hesitation, and spark plus fouling
- 20 oz. bottle.
- Improves: cold start performance, and fuel stability for up to one year
- Specially formulated to remove carbon deposits from engines with over 75,000 miles
- Cleans fuel injectors, intake valves, and ports to restore performance and fuel economy
- Prevents future carbon build-up and reduces emissions
- Oxygen sensor safe and safe for use in turbocharged and supercharged vehicles
- Will not void OEM/manufacturer's warranty
- Eliminates starting problems, hesitation and stalling.Fit Type: Universal
- Smoother idling
- Better throttle response
- Cleaner combustion
- One 12 fl oz bottle of STP Complete Fuel System Cleaner for a variety of gasoline engines
- This car fuel treatment has 2x the amount of cleaning agents versus leading premium gasoline
- PEA and PIBA detergents get rid of deposits to keep your system clean and fuel efficient
- Fuel system cleaner helps inhibit corrosion and restores engine performance for convenient and versatile car products
- Use this complete STP fuel system cleaner at every oil change or every 4,000 miles
- 【Multi-functional Fuel Injector Cleaner Kit】The fuel injector cleaner kit features high and low-pressure cleaning function for the whole fuel system, including throttle valve, fuel nozzle, TWC, intake manifold and exhaust pipe, etc. It can quickly and completely remove carbon deposits in about 20 minutes, efficiently restoring the vehicle's power and driving performance, and greatly reducing fuel consumption and exhaust emissions.
- 【Easy Operation】The non-disassembled fuel injector cleaner kit has a special handling check valve for releasing gas and adding liquid. Adjustable pressure gauge up to 150PSI. The injector cleaning kit is made of high pressure quality stainless steel, scratch and corrosion resistant, safe and reliable. Cleaner canister capacity up to 1000ml to ensure pour enough fuel injector cleaner. NOTE:This fuel injector cleaner kit does not contain cleaning fluid. It is only suitable for gasoline injectors, not for diesel injectors.
- 【Complete Adapters for Widely Applications】The fuel injector cleaning kit includes a variety of different adapters, which can be used in almost all European Union, Asian, American cars and light trucks. Its main components and joints are made of brass, and the connecting tube is made of high quality rubber material, which has strong toughness and corrosion resistance, and the structure is more stable without oil leakage. The oil tubes are suitable for all cleaning fluid.
- 【Easy to Store and Transport】The fuel injector cleaner kit is equipped with a heavy blow molded plastic box, which can withstand high-strength extrusion without deformation and protect the product from damage. After use, all products can be neatly placed in boxes for easy storage and transportation.
- 【Three Years Warranty】For any quality problems. If C100 has any defect, we will provide new replacement or solutions for our customers until satisfaction without delay, and provides lifetime technical support. For any needs, you are warmly welcomed to contact us and we will get back to you ASAP within 24 hours.
- DESIGNED TO EXCEED EXPECTATIONS: Red Line complete SI-1 fuel system cleaner treatment for cleaning and preventing corrosion in fuel systems
- PERFORM AND PROTECT: Fuel additive cleans injectors, carburetors, valve and combustion chamber deposits with a powerful, concentrated blend of high-temp and low-temp detergents
- EFFICIENT FUEL BURN: Gas treatment that enhances gasoline stability, while reducing the build up of gum and varnish formation
- EASY TO USE: Use one bottle per tank for most effective treatment, additive cleans nearly 100% efficiency in one treatment
- One 15 Ounce Bottle
Last update on 2025-05-08 / Affiliate links / Images from Amazon Product Advertising API
This product presentation was made with AAWP plugin.
