| “This site contains affiliate links for which OEMDTC may be compensated” |
October 26, 2015 NHTSA CAMPAIGN NUMBER: 15V701000
Engine Oil Dripping On Manifold may Cause Fire
Engine oil that drips onto the hot surface of the exhaust manifold may result in a fire.
NHTSA Campaign Number: 15V701
Manufacturer General Motors LLC
LLC
Components ENGINE AND ENGINE COOLING
Potential Number of Units Affected 1,003,556
Summary
General Motors LLC (GM) is recalling certain model year 1998-1999 Chevrolet Lumina and Oldsmobile
 Intrigue, 1997-2004 Buick
 Regal and Pontiac
 Grand Prix, 2000-2004 Chevrolet Impala, and 1998-2004 Chevrolet Monte Carlo vehicles. The affected vehicles were previously repaired under recalls 08V-118, 09V-116, and 15V-201 to address the possibility that engine oil may drip onto the hot exhaust manifold.
Remedy
The remedy applied under recalls 08V-118, 09V-116, and 15V-201 did not adequately remove the safety risk. Under the improved remedy, dealers will replace the engines front valve cover and gasket. Vehicles that are covered by recalls 08V-118, 09V-116, or 15V-201 that have not yet received the original remedy will instead receive the improved remedy under the original recall number. The recall began on February 19, 2016. Owners may contact Chevrolet customer service at 1-800-222-1020, Buick customer service at 1-800-521-7300, Oldsmobile
 customer service at 1-800-442-6537 and Pontiac
 customer service at 1-800-458-8006. GM’s number for this recall is 15757. Note: Until the improved remedy has been applied, owners are advised to park their vehicle outside since the fire risk exists even when the vehicle is unattended.
Notes
Owners may also contact the National Highway Traffic Safety Administration Vehicle Safety Hotline at 1-888-327-4236 (TTY 1-800-424-9153), or go to www.safercar.gov.
Check if your Vehicle has a Recall
Parts
| Valve Cover LH (Supercharged) | 1 | 12590363 |
| Valve Cover LH (Naturally Aspirated)** | 1 | 12590366 |
| Gasket, Valve Rocker Arm Cover (Supercharged) | 1 | 24503937 |
| Gasket, Valve Rocker Arm Cover (Naturally Aspirated)** | 1 | 25532619 |
| Retainer, S Plug Wire (4-wire, 7mm) | 1 (If Required) | 88891792 |
| Retainer, S Plug Wire (2-wire, 7mm) | 1 (If Required) | 12132229 |
| Oil Fill Cap O-Ring | *1 (If Required) | |
| Sealant (1.69 oz) – (US) | 1 (Services 25 Vehicles) | 19333510 |
| Sealant (1.69 oz) – (Canada) | 10953491 | |
| Loctite 518 Sealant (1.69 oz) 1 (Services 25 | 1 (Services 25 Vehicles) | Obtain Locally |
SEOCONTENT-START
Bulletin No.: 15757D
Date: December 2016
PRODUCT SAFETY RECALL |
| Subject: | Under Hood Fire |
| Models: | 1997-2004 Buick Regal Regal |
| 2000-2004 Chevrolet Impala | |
| 1998-1999 Chevrolet Lumina | |
| 1998-2004 Chevrolet Monte Carlo | |
1998-1999 Oldsmobile Intrigue Intrigue |
|
1997-2004 Pontiac Grand Prix Grand Prix |
|
| Equipped with 3.8L V6 Engine (RPO L26, L32, L36 or L67) |
| This bulletin is being revised to add specific, required sealant as an assembly aid to the Service Procedure, provide detailed repair information for proper application of sealant, and to adjust the Warranty Transaction Information section. Please discard all copies of bulletin 15757C. |
| It is a violation of Federal law for a dealer to deliver a new motor vehicle or any new or used item of motor vehicle equipment (including a tire) covered by this notification under a sale or lease until the defect or noncompliance is remedied. |
| All involved vehicles that are in dealer inventory must be held and not delivered to customers, dealer traded, or used for demonstration purposes until the repair contained in this bulletin has been performed on the vehicle. |
Condition
General Motors has decided that a defect which relates to motor vehicle safety exists in certain of the following vehicles equipped with a 3.8L V6 engine (RPO L26, L32, L36 or L67): 1997-2004 model year (MY) Buick
 Regal, 2000-2004 MY Chevrolet Impala, 1998-1999 MY Chevrolet Lumina, 1998-2004 MY Chevrolet Monte Carlo, 1998-1999 MY Oldsmobile
 Intrigue, and 1997-2004 MY Pontiac
 Grand Prix. Certain of these vehicles have a condition in which drops of engine oil may be deposited on the exhaust manifold through hard braking. This condition could cause an engine compartment fire. Certain of these vehicles produced before June 26, 2003 were subject to General Motors
 ’ prior safety recalls 07035, 09047 and 14574. In some cases, the remedy procedure performed on these vehicles pursuant to the prior recalls may not be sufficient to prevent subsequent engine compartment fires relating to this condition in the affected vehicles. Vehicles previously repaired under the referenced recalls will receive further repairs as part of this recall.
Correction
Dealers are to replace the engine’s front valve cover and front-valve-cover gasket with new parts of an improved design. The engine’s plastic “beauty” cover and plastic oil-fill-tube extension will be removed, if they have not been already.
Vehicles Involved
All involved vehicles are identified by Vehicle Identification Number on the Investigate Vehicle History screen in GM Global Warranty Management system. Dealership service personnel should always check this site to confirm vehicle involvement prior to beginning any required inspections and/or repairs. It is important to routinely use this tool to verify eligibility because not all similar vehicles may be involved regardless of description or option content.
For dealers with involved vehicles, a listing with involved vehicles containing the complete vehicle identification number, customer name, and address information has been prepared and will be provided to US and Canadian dealers through the GM GlobalConnect Recall Reports, or sent directly to export dealers. Dealers will not have a report available if they have no involved vehicles currently assigned.
The listing may contain customer names and addresses obtained from Motor Vehicle Registration Records. The use of such motor vehicle registration data for any purpose other than follow-up necessary to complete this recall is a violation of law in several states/provinces/countries. Accordingly, you are urged to limit the use of this report to the follow-up necessary to complete this recall.
Parts Information
** Orders for Part Numbers 25532619 and 12590366 submitted after Noon Eastern Standard Time on March 3, 2016 are being held in an offline table prior to being processed for shipping. Dealerships can determine order status for these parts by submitting a request via the Supplemental Back-Order Report. (For more information see GCUS-9-1775-Part Ordering Update 25532619 and 12590366 for Safety Recall 09047). Please do not contact the Service Parts Assistance Center (SPAC) for this information. These two parts must be ordered as a CSO, DROS will cancel and cannot SPAC. All other parts for this recall are readily available.
| Description | Quantity / Vehicle |
Part Number |
| Valve Cover LH (Supercharged) | 1 | 12590363 |
| Valve Cover LH (Naturally Aspirated)** | 1 | 12590366 |
| Gasket, Valve Rocker Arm Cover (Supercharged) | 1 | 24503937 |
| Gasket, Valve Rocker Arm Cover (Naturally Aspirated)** | 1 | 25532619 |
| Retainer, S Plug Wire (4-wire, 7mm) | 1 (If Required) | 88891792 |
| Retainer, S Plug Wire (2-wire, 7mm) | 1 (If Required) | 12132229 |
| Oil Fill Cap O-Ring | *1 (If Required) | |
| Sealant (1.69 oz) – (US) | 1 (Services 25 Vehicles)** | 19333510 |
| Sealant (1.69 oz) – (Canada) | 10953491 | |
| Loctite 518 Sealant (1.69 oz) 1 (Services 25 | 1 (Services 25 Vehicles)** | Obtain Locally |
* Not all vehicles will require an oil fill cap o-ring. Use the VIN, SI and the GM Electronic Parts Catalog to determine which part to order.
** Choose one of the sealant part numbers listed above.
Service Procedure
The service procedure listed in this document varies from the procedure that is listed in SI for replacing the left or front engine valve cover. Below are a few tips to help with the procedure:
- Release the retaining tab from the evaporative emission (EVAP) canister purge mounting bracket and set the EVAP canister purge valve aside. It is not necessary to disconnect the EVAP hoses from the EVAP canister purge valve. (Naturally aspirated engine only).
- Remove the spark plug wires from the ignition coil only. It is not necessary to remove them from the spark plugs. Damage to the spark plug wires could occur if they are removed from the spark plugs.
- When removing the left engine mount strut bracket, break the upper bolts loose using a boxed end wrench. Then use a ¼” drive ratchet, extension, and swivel socket to fully remove the bolts. This allows enough clearance to remove the bolts without removing the fuel injection rail.
- Loosen the left engine lift bracket enough to allow clearance for the valve cover to be removed. It is not necessary to remove it from the engine.
General Motors ’ number one priority is our customers’ safety. The measures we are taking to remedy the potential oil leaking condition from the valve cover gasket have been validated to be reliable for the life of your vehicle. However, as an extra precaution, we want to eliminate potentially flammable items that are in close proximity to the valve covers. For this reason, do NOT install the cosmetic plastic covering over the top of the engine after the valve cover and gasket are replaced. Please retain the fuel injector sight shield (beauty cover) for the retention period published in the GM Policy and Procedure Manual. Destroy and discard these parts after the retention period to ensure they do not enter the stream of commerce.
3.8L V6 Naturally Aspirated and Supercharged Engine Preliminary Inspection
Note: Clean the area around the tube/oil fill cap before removing the tube/oil fill cap in order to prevent contaminants from falling into the valve cover opening.
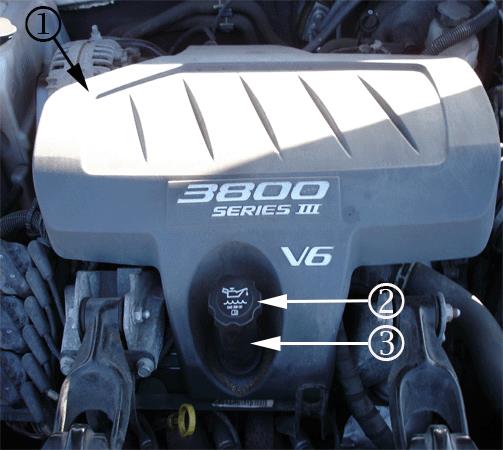
- Perform steps 1.1 through 1.4 to remove and DISCARD the fuel injector sight shield (1).
1.1 Remove the oil fill cap (2) by twisting it counterclockwise.
1.2 Remove the oil fill tube (3) by twisting it counterclockwise and DISCARD.
1.3 Lift the fuel injector sight shield up at the front and slide the tab out of the engine bracket.
1.4 DISCARD the fuel injector sight shield. Do NOT reinstall the sight shield.
1.5 Inspect the oil fill cap and O-ring for damage. If there are signs of damage, replace the O-Ring or cap as required.
1.6 Reinstall the oil fill cap in the valve cover to prevent engine oil contamination.
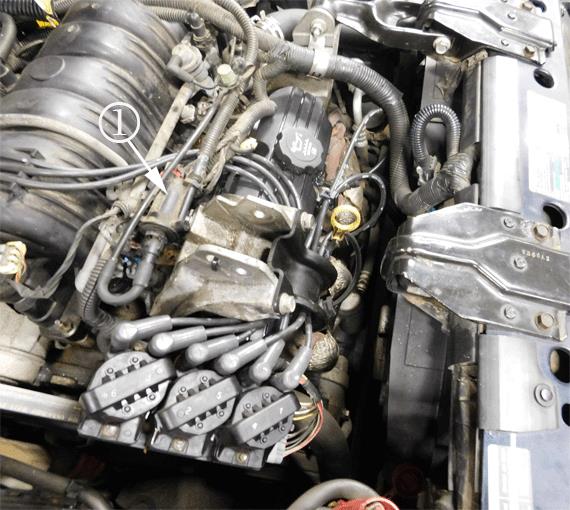
- Release the retaining tab on the evaporative emission (EVAP) canister purge mounting bracket and set the EVAP canister purge valve aside (1). Naturally aspirated engine only.
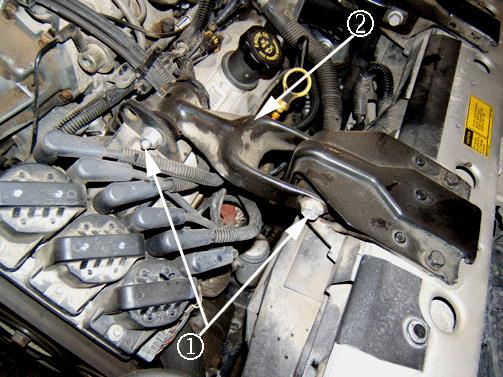
- Remove the left engine mount strut (2). Supercharged engine shown. Naturally aspirated engine is similar.
3.1 Remove the bolt and the nut from the left engine mount strut at the left engine mount strut bracket on the engine (1).
3.2 Remove the bolt and the nut from the left engine mount strut at the left engine mount strut bracket on the upper radiator support (1).
3.3 Remove the engine mount strut (2).
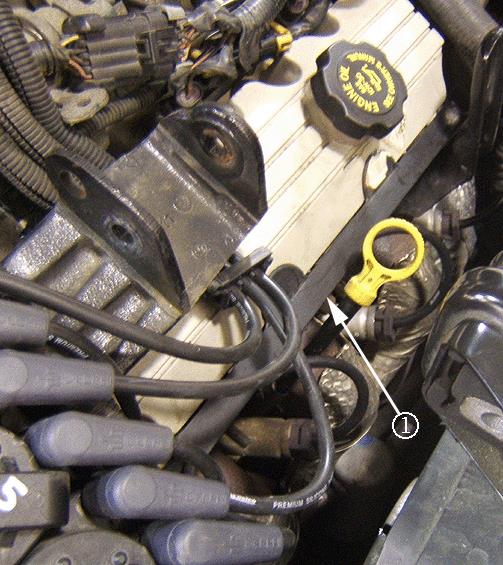
- If present, remove the 1-3-5 spark plug plastic retaining channel (cover) clip/bracket (1) from the engine and discard.
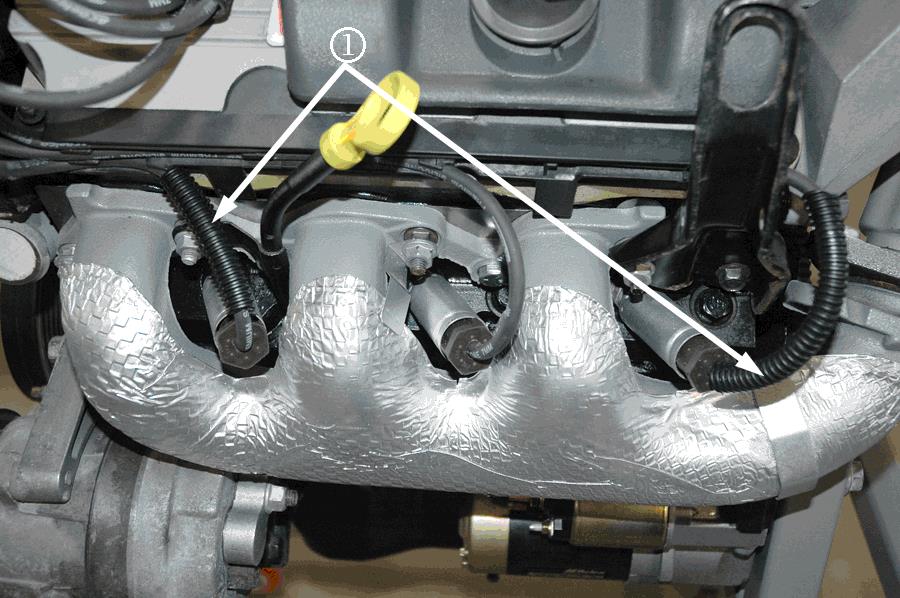
- If present, remove any plastic (polypropylene) conduit (1) from the spark plug wires at the front of the engine (should only be found on spark plug wires 1 and 5).
- Refer to steps 9 and 10 for Equipped with 3.8L V6 Supercharged Engine (RPO L32 / L67) or steps 7 and 8 for Equipped with 3.8L V6 Naturally Aspirated Engine (RPO L26 / L36) to ensure proper placement of spark plug wire retainers.
- Proceed to one of the following sections in this bulletin: Equipped with 3.8L V6 Supercharged Engine (RPO L32 / L67) or Equipped with 3.8L V6 Naturally Aspirated Engine (RPO L26 / L36).
Equipped with 3.8L V6 Supercharged Engine (RPO L32 / L67)
Note: It is not necessary to remove the spark plug wires from the spark plugs.
- Remove all six spark plug wires from the ignition coils only. Set the spark plug wires aside.
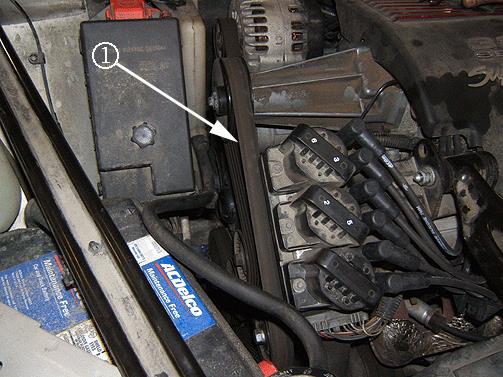
- Remove the supercharger drive belt (1). Lift or rotate the supercharger drive belt tensioner using a 15 mm box end wrench on the pulley nut and remove the belt.
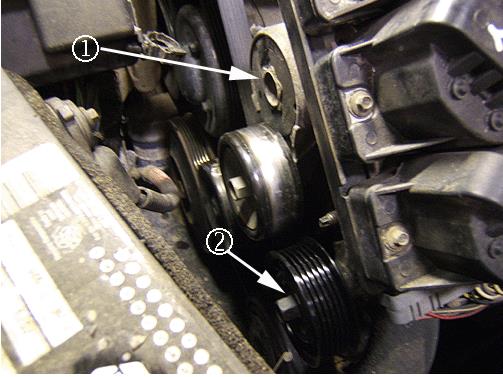
- Remove the supercharger drive belt tensioner (1) and idler pulley (2).
3.1 Remove the supercharger drive belt tensioner nut and remove belt tensioner (1) from the engine.
3.2 Remove the idler pulley bolt (2).
3.3 Remove the drive belt idler pulley (2) from the engine.
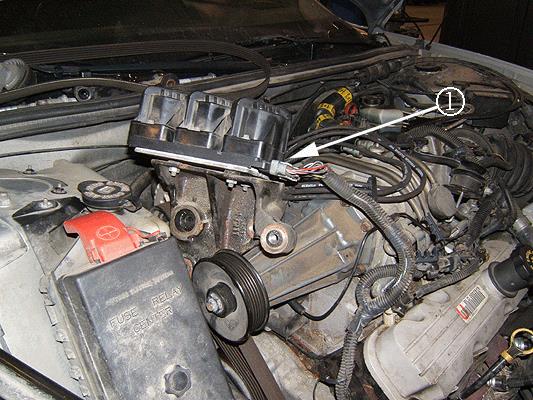
Note: It is not necessary to remove the ignition coils/module or the 14–way connector (1) from the left engine mount strut bracket.
- Remove the left engine mount strut bracket (1) as an assembly.
4.1 Remove the left engine mount strut bracket assembly nuts.
4.2 Remove the stud holding the electronic ignition control module ground and left engine mount strut bracket assembly to the cylinder head.
4.3 Remove the left engine mount strut bracket assembly (1) from the cylinder head and set aside.
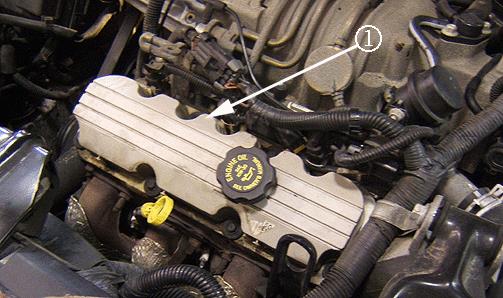
Danger: Do not use a brake cleaner, or equivalent to remove the oil residue from the exhaust manifold; doing so may cause an engine fire.
Note: Before the removal of the left or front engine valve cover, use an engine degreaser or equivalent in order to remove the oil residue from the exhaust manifold and the oil and dirt residue from the intake manifold, cylinder head, and engine block. It may be necessary to use a brush or scraper.
- Remove and DISCARD the left or front engine valve cover (1) and gasket.
5.1 Remove the valve cover bolts.
Note: If the valve rocker arm cover (1) adheres to the cylinder head, remove the valve cover by bumping the end of the valve cover with palm of hand or with a soft rubber mallet.
5.2. Remove the valve cover from the engine cylinder head and DISCARD.
5.3. Clean the sealing surface on the cylinder head and the new valve cover with an engine degreaser or equivalent.
5.4. Clean the valve cover bolts of all dirt, grime or thread locking adhesive.
5.5. Clean the rubber grommets by wiping them off with a shop towel.
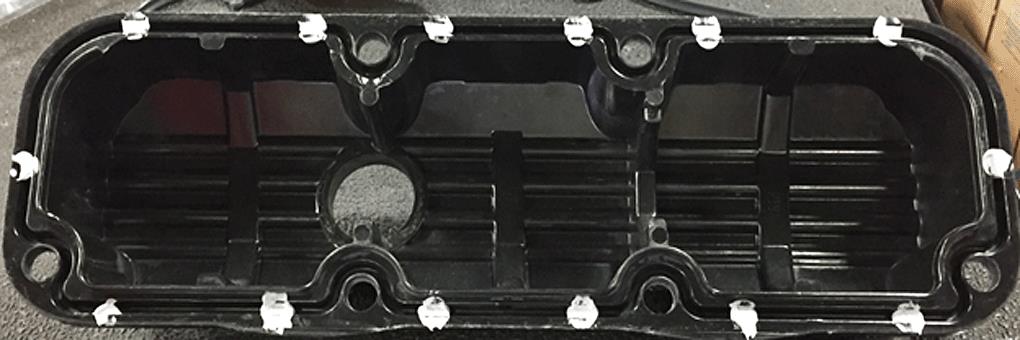
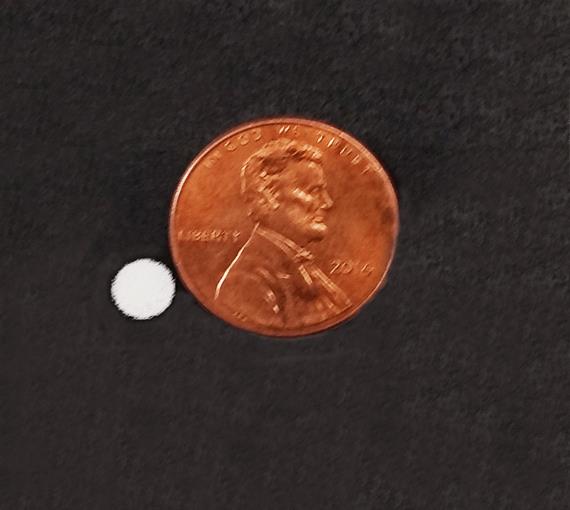
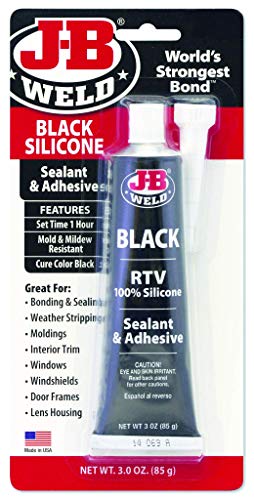
Warning: GM sealant part number 19333510 (in Canada use part number 10953491) or Loctite 518 is required when replacing the valve cover and valve cover gasket. Do NOT use any other sealant or adhesive as an equivalent for this repair to avoid a potential oil leak and/or fire. Paint is shown in the picture for contrast and illustrative purposes ONLY. Naturally aspirated engine valve cover shown. Supercharged engine valve cover pattern is similar.
- Apply a 5mm (3/16 in) bead of GM sealant part number 19333510 (in Canada use part number 10953491) or Loctite 518 in the bottom of the valve cover groove in the 14 places shown above to assist in retaining the gasket during assembly. Do NOT use any other sealants or adhesives.
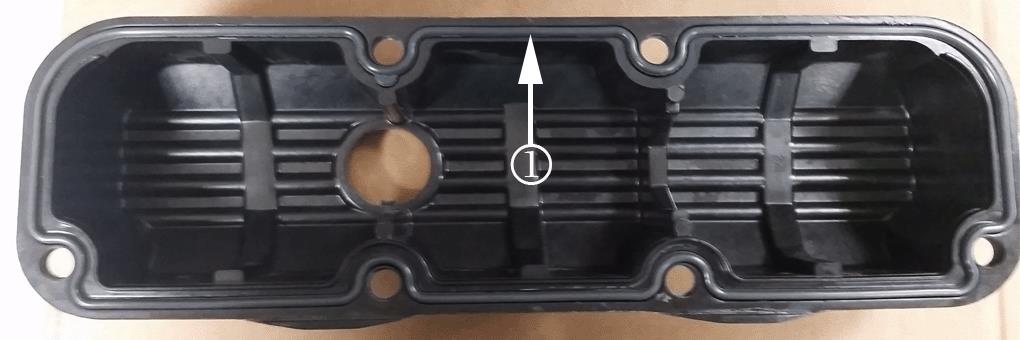
Warning: Ensure the new valve cover gasket is fully seated into the new valve cover groove. Use due care when installing the valve cover and gasket to the engine ensuring not to bump the valve cover or drag it over top of the rocker arms causing the gasket to come out of the groove. Inspect the mating surfaces of the valve cover and cylinder head to ensure the valve cover gasket is installed properly. Failure to do so may result in an oil leak and/or an engine fire.
- Install a new left or front valve cover gasket (1) into the new valve cover and make sure that the valve cover gasket is seated properly in the valve cover groove.
7.1 Install the six valve cover bolts and the six grommets into the valve cover.
7.2 Apply medium strength thread lock compound (blue) to the six valve cover bolt threads.
7.3 Install the NEW valve cover and gasket (1) to the cylinder head.
7.4 Tighten the valve cover bolts to 10 Nm (89 lb in).
7.5 Verify that the valve cover gasket is properly installed (see the warning above).

- Install the left engine mount strut bracket assembly to the cylinder head (1).
8.1 Install the left engine mount strut bracket nuts and stud.
8.2 Install the stud holding the electronic ignition control module ground and left engine mount strut bracket assembly to the cylinder head.
8.3 Tighten the left engine mount strut bracket nuts and stud to 50 Nm (37 lb ft).
- Install all six spark plug wires to the ignition coils.
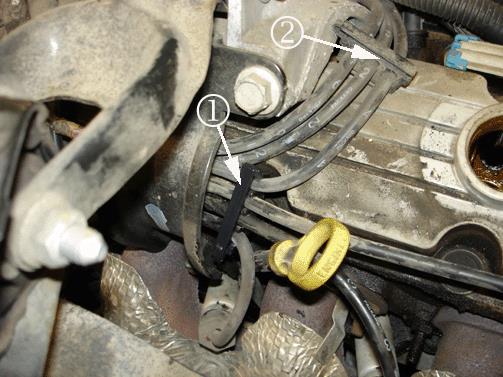
Note: Do NOT position the retainers above an exhaust runner.
- Ensure that spark plug retainer (1) is connected to spark plug wire 4 and spark plug wires 1, 3, and 5. Make sure that spark plug wires 2, 4 and 6 are secured to the original retainers and under the left engine mount strut bracket (2). Verify the spark plug retainers are secured (completely latched) and they are NOT touching or over an exhaust runner.
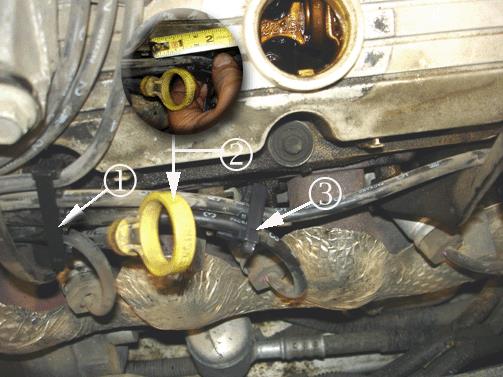
Note: Do NOT position the retainers above an exhaust runner.
- Ensure that spark plug wires 3 and 5 are routed behind the oil level indicator and lift bracket. Verify that spark plug retainers (1 and 3) are positioned above the #1 and #3 cylinder spark plug wire boots as shown above. Verify that spark plug retainer (3) is approximately 50mm (2 in) from the oil level indicator (2). Verify the spark plug retainers are secured (completely latched) and they are NOT touching or over an exhaust runner.

- First install the supercharger drive belt idler pulley and bolt (2). Then install the supercharger drive belt tensioner and nut (1).
- Tighten both the supercharger drive belt idler pulley bolt and supercharger drive belt tensioner nut to 50 Nm (37 lb ft).

- Install the supercharger drive belt (1). Lift or rotate the drive belt tensioner using a 15 mm box end wrench on the pulley nut and install the supercharger drive belt.

- Install the left engine mount strut (2).
15.1 Install the bolt and the nut to the left engine mount strut at the left engine mount strut bracket on the upper radiator support (1) and tighten to 48 Nm (35 lb ft).
Note: If equipped, the P-clip on the engine wiring harness must be vertical to the left engine mount strut bracket when installed.
15.2 Install the bolt and the nut to the left engine mount strut at the left engine mount strut bracket on the engine (1) and tighten to 48 Nm (35 lb ft).
Equipped with 3.8L V6 Naturally Aspirated Engine (RPO L26 / L36)
- Remove the 1-3-5 spark plug wires from the ignition coils.
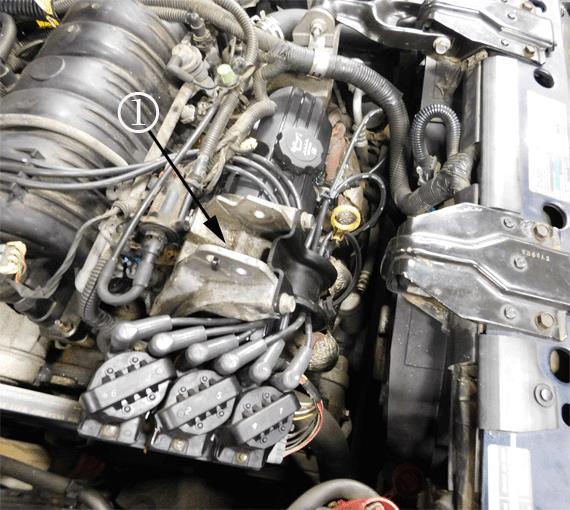
- Remove the left engine mount strut bracket (1).
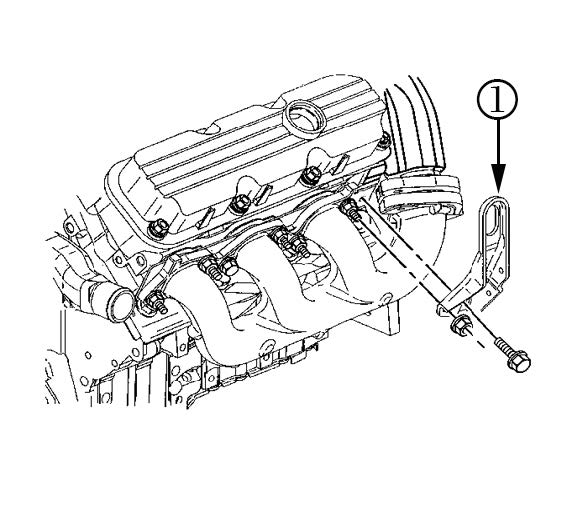
- Loosen the left engine lift bracket (1) enough to allow clearance for the valve cover to be removed. It is not necessary to remove it from the engine.

Danger: Do not use a brake cleaner, or equivalent to remove the oil residue from the exhaust manifold; doing so may cause an engine fire.
Note: Before the removal of the left or front engine valve cover, use an engine degreaser or equivalent in order to remove the oil residue from the exhaust manifold and the oil and dirt residue from the intake manifold, cylinder head, and engine block. It may be necessary to use a brush or scraper.
- Remove and DISCARD the left or front engine valve rocker arm cover (1) and gasket.
4.1 Remove the valve cover bolts.
Note: If the valve rocker arm cover (1) adheres to the cylinder head, remove the valve cover by bumping the end of the valve cover with palm of hand or with a soft rubber mallet.
4.2. Remove the valve cover and gasket from the engine cylinder head and DISCARD.
4.3. Clean the sealing surface on the cylinder head and the valve cover with an engine degreaser or equivalent.
4.4. Clean the valve cover bolts of all dirt, grime or thread locking adhesive.
4.5. Clean the rubber grommets by wiping them off with a shop towel.


Warning: GM sealant part number 19333510 (in Canada use part number 10953491) or Loctite 518 is required when replacing the valve cover and valve cover gasket. Do NOT use any other sealant or adhesive as an equivalent for this repair to avoid a potential oil leak and/or fire. Paint is shown in the picture for contrast and illustrative purposes ONLY. Naturally aspirated engine valve cover shown. Supercharged engine valve cover pattern is similar.
- Apply a 5mm (3/16 in) bead of GM sealant part number 19333510 (in Canada use part number 10953491) or Loctite 518 in the bottom of the valve cover groove in the 14 places shown above to assist in retaining the gasket during assembly. Do NOT use any other sealants or adhesives.

Warning: Ensure the new valve cover gasket is fully seated into the new valve cover groove. Use due care when installing the valve cover and gasket to the engine ensuring not to bump the valve cover or drag it over top of the rocker arms causing the gasket to come out of the groove. Inspect the mating surfaces of the valve cover and cylinder head to ensure the valve cover gasket is installed properly. Failure to do so may result in an oil leak and/or an engine fire.
- Install a new left or front valve cover gasket (1) into the new valve cover and make sure that the valve cover gasket is seated properly in the valve cover groove.
6.1 Install the six valve cover bolts and the six grommets into the valve cover.
6.2 Apply medium strength thread lock compound (blue) to the six valve cover bolt threads.
6.3 Install the valve cover and gasket (1) to the cylinder head.
6.4 Tighten the valve cover bolts to 10 Nm (89 lb in).
6.5 Verify that the valve cover gasket is properly installed (see the warning above).
- Install the 1-3-5 spark plug wires to the ignition coils.

Note: Do NOT position the retainers above an exhaust runner.
- Ensure that spark plug retainer (1) is connected to spark plug wire 4 and spark plug wires 1, 3, and 5. Make sure that spark plug wires 2, 4 and 6 are secured to the original retainers and under the left engine mount strut bracket (2). Verify the spark plug retainers are secured (completely latched) and they are NOT touching or over an exhaust runner.

Note: Do NOT position the retainers above an exhaust runner.
- Ensure that spark plug wires 3 and 5 are routed behind the oil level indicator and lift bracket. Verify that spark plug retainers (1 and 3) are positioned above the #1 and #3 cylinder spark plug wire boots as shown above. Verify that spark plug retainer (3) is approximately 50mm (2 in) from the oil level indicator (2). Verify the spark plug retainers are secured (completely latched) and they are NOT touching or over an exhaust runner.
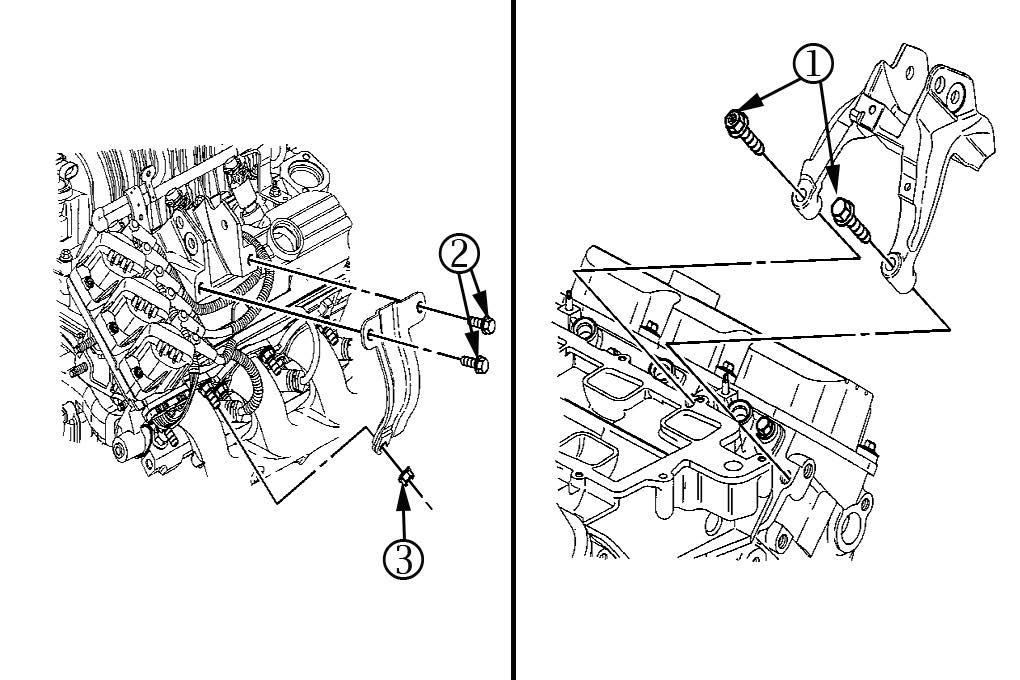
- Install the left engine mount strut bracket.
10.1 Tighten the upper engine mount strut bracket bolts (1) to 50 Nm (37 lb ft).
10.2 Tighten the lower engine mount strut bracket bolts (2) to 50 Nm (37 lb ft).
10.3 Tighten the lower engine mount strut bracket nut (3) to 30 Nm (22 lb ft).

- Install the left engine lift bracket (1) and tighten the nut and bolt to 30 Nm (22 lb ft).
- Install the left engine mount strut and tighten the bolts to 48 Nm (35 lb ft).
- Inspect for the proper oil level.
- Inspect for any oil leaks.
Customer Reimbursement — For US
Customer requests for reimbursement of previously paid repairs for the recall condition that have not previously submitted, are to be submitted to the dealer by April 30, 2017, unless otherwise specified by state law. If this is not convenient for the customer, the customer may mail the completed Customer Reimbursement Request Form and all required documents to the GM Customer Assistance Center.
All reasonable and customary costs to correct the condition described in this bulletin should be considered for reimbursement. Any questions or concerns should be reviewed with your GM representative prior to processing the request.
When a customer requests reimbursement, they must provide the following:
- A completed Customer Reimbursement Request Form. This form is mailed to the customer or can be obtained through GM GlobalConnect.
- The name and address of the person who paid for the repair.
- Paid receipt confirming the amount of the repair expense, a description of the repair, and the person or entity performing the repair.
Important: GM requires dealers to approve or deny a reimbursement request within 30 days of receipt. If a reimbursement request is approved, the dealer should immediately issue a check to the customer and submit an appropriate warranty transaction for the incurred expense. If a reimbursement request is denied, the dealer MUST provide the customer with a clear and concise explanation, in writing, as to why the request was denied. The bottom portion of the Customer Reimbursement Request Form may be used for this purpose. If the denial was due to missing documents, the customer can resubmit the request when the missing documents are obtained, as long as it is still within the allowed reimbursement period.
Warranty transactions for customer reimbursement of previously paid repairs are to be submitted as required by GM Global Warranty Management. Additional information can also be found in Warranty Administration Bulletin 11-00-89-004.
Customer Reimbursement – For Canada and Export
Customer requests for reimbursement of previously paid repairs to correct the condition described in this bulletin and that have not previously been submitted, are to be submitted to the dealer prior to or by April 30, 2017.
When a customer requests reimbursement, they must provide the following:
- Proof of ownership at time of repair.
- Original paid receipt confirming the amount of unreimbursed repair expense(s) (including Service Contract deductibles), a description of the repair, and the person or entity performing the repair.
All reasonable and customary costs to correct the condition described in this bulletin should be considered for reimbursement. Any questions or concerns should be reviewed with your GM representative prior to processing the request.
Warranty Transaction Information
Submit a transaction using the table below. All transactions should be submitted as a ZFAT transaction type, unless noted otherwise.
| Labor Code | Description | Labor Time | Net Item |
| 9100840 | Replace Valve Rocker Arm Cover and GasketSupercharged EngineNaturally Aspirated Engine | 0.9 0.9 |
** |
| 9101979 | Customer Reimbursement Approved – For USA and Canada dealers only – For Export dealers only |
N/A 0.2 |
* |
| 9101980 | Customer Reimbursement Denied – For US dealers only | 0.1 | *** |
Note: To avoid having to “H” route the customer reimbursement transaction for approval, it must be submitted prior to the repair transaction.
Note: Customer reimbursement will not close this recall. The service procedure must also be performed on the vehicle.
* For USA and Canada: Submit the dollar amount reimbursed to the customer in Net/Reimbursement. Submit $20.00 administrative allowance in Net/Admin Allowance. For Export: Submit the dollar amount reimbursed to the customer in Net/Reimbursement.
** The amount identified in “Net Item” should represent the actual sum total of the current GMCC&A Dealer net price for sealant needed to perform the required repairs, not to exceed $0.67 USD, $0.49 CAD, plus applicable Mark-Up or Landed Cost (for Export).
*** Submit $10.00 administrative allowance in Net/Admin Allowance.
Customer Notification — For US and Canada
General Motors will notify customers of this recall on their vehicle (see copy of customer letter included with this bulletin).
Customer Notification — For Export
Letters will be sent to known owners of record located within areas covered by the US National Traffic and Motor Vehicle Safety Act. For owners outside these areas, dealers should notify customers using the attached sample letter.
Dealer Recall Responsibility – For US and Export (US States, Territories, and Possessions)
It is a violation of Federal law for a dealer to deliver a new motor vehicle or any new or used item of motor vehicle equipment (including a tire) covered by this notification under a sale or lease until the defect or noncompliance is remedied.
The US National Traffic and Motor Vehicle Safety Act provides that each vehicle that is subject to a recall of this type must be adequately repaired within a reasonable time after the customer has tendered it for repair. A failure to repair within sixty days after tender of a vehicle is prima facie evidence of failure to repair within a reasonable time. If the condition is not adequately repaired within a reasonable time, the customer may be entitled to an identical or reasonably equivalent vehicle at no charge or to a refund of the purchase price less a reasonable allowance for depreciation. To avoid having to provide these burdensome remedies, every effort must be made to promptly schedule an appointment with each customer and to repair their vehicle as soon as possible. In the recall notification letters, customers are told how to contact the US National Highway Traffic Safety Administration if the recall is not completed within a reasonable time.
Dealer Recall Responsibility – All
All new, used, GM Certified Used, courtesy transportation vehicles, dealer shuttle vehicles, etc. in dealers’ possession and subject to this recall must be held and inspected/repaired per the service procedure of this bulletin before customers take possession of these vehicles. Involved vehicles must be held and not delivered to customers, dealer-traded, released to auction, used for demonstration, or any other purpose.
All GM Certified Used vehicles currently in the dealers’ inventory within the Certified Pre-Owned Inventory System (CPOIS) will be de-certified and must be held and remedied per the service procedure in this bulletin. Upon submitting an accepted/paid warranty transaction in the Global Warranty Management (GWM) system, the vehicle can be re-certified for sale within the CPOIS system, or once again be used in the CTP program.
Dealers are to service all vehicles subject to this recall at no charge to customers, regardless of mileage, age of vehicle, or ownership, from this time forward.
Customers who have recently purchased vehicles sold from your vehicle inventory, and for which there is no customer information indicated on the dealer listing, are to be contacted by the dealer. Arrangements are to be made to make the required correction according to the instructions contained in this bulletin. A copy of the customer letter is provided in this bulletin for your use in contacting customers. Recall follow-up cards should not be used for this purpose, since the customer may not as yet have received the notification letter.
In summary, whenever a vehicle subject to this recall enters your vehicle inventory, or is in your dealership for service in the future, you must take the steps necessary to be sure the recall correction has been made before selling or releasing the vehicle.
IMPORTANT SAFETY RECALL
April 2016
Dear General Motors Customer:
This notice applies to your vehicle, VIN: _____________________________________
This notice is sent to you in accordance with the National Traffic and Motor Vehicle Safety Act.
General Motors has decided that a defect, which relates to motor vehicle safety, exists in certain of the following vehicles equipped with a 3.8L V6 engine: 1997-2004 model year (MY) Buick Regal, 2000-2004 MY Chevrolet Impala, 1998-1999 MY Chevrolet Lumina, 1998-2004 MY Chevrolet Monte Carlo, 1998-1999 MY Oldsmobile Intrigue, and 1997-2004 MY Pontiac Grand Prix vehicles equipped with a 3.8L V6 engine. As a result, GM is conducting a safety recall. We apologize for this inconvenience. However, we are concerned about your safety and continued satisfaction with our products.
IMPORTANT
|
| Why is your vehicle being recalled? | Drops of engine oil may be deposited on the exhaust manifold through hard braking. This condition could cause an engine compartment fire. |
| What will we do? | Your GM dealer will replace your engine’s front cover valve cover and front-valve-cover gasket with new parts of an improved design. Your engine’s plastic “beauty” cover and plastic oil-fill-tube extension will be removed, if they haven’t been already. This service will be performed for you at no charge. Because of service scheduling requirements, it is likely that your dealer will need your vehicle longer than the actual service correction time of approximately 35 to 55 minutes, depending on your vehicle’s engine configuration. |
| What should you do? | You should contact your GM dealer to arrange a service appointment as soon as possible.
This condition does not affect the safe operation of the vehicle, but it is recommended that the vehicle be parked outside and not in a garage or other structure until it is repaired. |
| Did you already pay for this repair? | Even though you may have already had repairs for this condition, you will still need to take your vehicle to your dealer for additional repairs. If you have paid for repairs for the recall condition, and have not previously submitted, please complete the enclosed reimbursement form and present it to your dealer with all required documents. Working with your dealer will expedite your request, however, if this is not convenient, you may mail the completed reimbursement form and all required documents to Reimbursement Department, PO Box 33170, Detroit, MI 48232-5170. The completed form and required documents must be presented to your dealer or received by the Reimbursement Department by February 28, 2017, unless state law specifies a longer reimbursement period. |
| Do you have questions? | If you have questions or concerns that your dealer is unable to resolve, please contact the appropriate Customer Assistance Center at the number listed below. |
| Division | Number | Text Telephones (TTY) |
| Buick | 1-800-521-7300 | 1-800-832-8425 |
| Chevrolet | 1-800-222-1020 | 1-800-833-2438 |
| Oldsmobile | 1-800-442-6537 | 1-800-833-6537 |
| Pontiac | 1-800-762-2737 | 1-800-833-7668 |
| Puerto Rico – English | 1-800-496-9992 | |
| Puerto Rico – Español | 1-800-496-9993 | |
| Virgin Islands | 1-800-496-9994 |
If after contacting your dealer and the Customer Assistance Center, you are still not satisfied we have done our best to remedy this condition without charge and within a reasonable time, you may wish to write the Administrator, National Highway Traffic Safety Administration, 1200 New Jersey Avenue, SE, Washington, DC 20590, or call the toll-free Vehicle Safety Hotline at 1.888.327.4236 (TTY 1.800.424.9153), or go to https://www.safercar.gov. The National Highway Traffic Safety Administration Campaign ID Number for this recall is 15V701.
Federal regulation requires that any vehicle lessor receiving this recall notice must forward a copy of this notice to the lessee within ten days.
Jeffrey M. Boyer
Vice President
Global Vehicle Safety
Enclosure
GM Recall #15757
Question and Answers
Q1. Which vehicles are involved?
A1. All 1997-2004 Pontiac Grand Prix, 2000-2004 Chevrolet Impala, 1998-1999 Chevrolet Lumina and 1998-2004 Chevrolet Monte Carlo, 1998-1999 Oldsmobile Intrigue and 1997-2004 Buick Regal equipped with a 3.8-liter V6 3800 engine. Including Canada, Mexico and exports, the total global population is 1,411,332
Q2. What is the condition that allows the oil leaks?
A2. Aging and wear to the valve cover and valve cover gasket can allow oil seepage.
Q3. Why such a large recall?
A3. Fires are occurring in some vehicles fixed using repair procedures from earlier recalls. Also, we determined that some 2004 models not previously recalled may have a similar condition.
Q4. How many fires have been reported?
A4. Approximately 1,345 fires in vehicles repaired in earlier recalls for the issue.
Q5. Are these vehicle safe to drive?
A5. This condition does not affect the safe operation of the vehicle. When the condition occurred while the car was in operation, drivers have reported seeing smoke from the engine compartment. (Approximately 85 percent of the fires in this recall occurred when no one was in the vehicle.)
Q6. Is GM recommending that the vehicle be parked outside and not in a garage or other structure until it is repaired?
A6. Yes.
Q7. GM built these vehicles for several years after 2004. Why are later models not being recalled?
A7. A material change was made to the valve cover after the 2004 model year, which reduces the risk of this condition occurring in those vehicles.
Q8. What about other models with similar engines?
A8. We investigated other models from this era and found no defect trend.
Q9. How much did the NHTSA have to do in persuading GM to conduct this recall?
A9. We have been in regular communication with the agency regarding this issue, but NHTSA did not order or request that GM conduct the recall.
Q10. What about vehicles previously recalled that have not been repaired?
A10. When available, the service procedure for earlier recalls will be altered to provide the same remedy as for this recall. And GM will issue new customer letters for unrepaired vehicles involved in earlier recalls.
Q11. When can I expect to be able to get my vehicle repaired?
A11. GM is finalizing a remedy for this condition and is making every effort to resolve this situation as quickly as possible. Customers will be notified when to bring their vehicle to a GM dealer for this repair.
Q12. Will GM provide a free rental vehicle until the required repair is completed?
A12. No. This condition does not affect the safe operation of the vehicle. However, GM recommends that the vehicle be parked outside and not in a garage or other structure until it is repaired.
32 Affected Products
Vehicles
| MAKE | MODEL | YEAR |
| BUICK | REGAL | 1997-2004 |
| CHEVROLET | IMPALA | 2000-2004 |
| CHEVROLET | LUMINA | 1998-1999 |
| CHEVROLET | MONTE CARLO | 1998-2004 |
| OLDSMOBILE | INTRIGUE | 1998-1999 |
| PONTIAC | GRAND PRIX | 1997-2004 |
36 Associated Documents
Manufacturer Notices(to Dealers,etc) – Date: April 11, 2016 Subject: Safety Recall 15757B – Update Under Hood Fire Population Expansion and Customer Letter Mailing
 Loading...
ISSUED Owner Notification Letter(Part 577)
RCONL-15V701-2293.pdf 177.388KB
 Loading...
Manufacturer Notices(to Dealers,etc)
 Loading...
Safety Bulletin
RCSB-15V701-1922.pdf 1454.905KB
 Loading...
Manufacturer Notices(to Dealers,etc) – GM CUSTOMER CARE AND AFTERSALES DCS3862 Date: December 2, 2015 Subject: Upcoming Safety Recall 15757 Under Hood Fire Customer Advisory Letter Mailing
 Loading...
Defect Notice 573 Report
RCLRPT-15V701-7991.PDF 30.893KB
 Loading...
Manufacturer Notices(to Dealers,etc)
 Loading...
Recall 573 Report – Amendment 2
RCLRPT-15V701-6281.PDF 30.924KB
 Loading...
Recall Acknowledgement
 Loading...
Recall Quarterly Report #2, 2016-2
RCLQRT-15V701-9260.PDF 214.635KB
 Loading...
GM Quarterly Report Assessment for 2016-2
RMISC-15V701-0388.pdf 82.391KB
 Loading...
April 28, 2016 Subject: Clarification on Quarterly Report Figures Recall 15V701 (GM15757)
RMISC-15V701-6941.pdf 82.165KB
 Loading...
Manufacturer Notices(to Dealers,etc) – Date: April 1, 2016 Subject: 15757B – Safety Recall Under Hood Fire Revised Part Information section
 Loading...
Safety Bulletin – Bulletin No.: 15757B Date: April 2016
RCSB-15V701-3178.pdf 1458.965KB
 Loading...
ISSUED Owner Notification Letter(Part 577) – Owner Letter to Expanded Population
RCONL-15V701-0931.pdf 177.388KB
 Loading...
Manufacturer Notices(to Dealers,etc) – GLOBAL SAFETY FIELD INVESTIGATIONS DCS3957 Date: March 11, 2016 Subject: 15757A – Safety Recall Under Hood Fire Revised Service Procedure section
 Loading...
ISSUED Interim Owner Notification Letter(Part 577)
RIONL-15V701-3190.pdf 165.815KB
 Loading...
Recall Quarterly Report – 2016-Q1
RCLQRT-15V701-8308.PDF 214.533KB
 Loading...
Safety Bulletin – Bulletin No.: 15757A Date: March 2016
RCSB-15V701-1426.pdf 1459.836KB
 Loading...
Manufacturer Notices(to Dealers,etc) – Date: September 1, 2016 Subject: 15757C – Safety Recall Under Hood Fire Revised Service Procedure section
 Loading...
Safety Bulletin – Bulletin No.: 15757C Date: September 2016
RCSB-15V701-9839.pdf 1475.735KB
 Loading...
Recall 573 Report-Amendment 3
RCLRPT-15V701-4219.PDF 30.987KB
 Loading...
Manufacturer Notices(to Dealers,etc)
 Loading...
SEOCONTENT-START
[gview file=”” ]
October 26, 2016 Subject: Clarification on Quarterly Report Figures
RMISC-15V701-0192.pdf 82.478KB
 Loading...
SEOCONTENT-START
[gview file=”” ]
Recall Quarterly Report #3, 2016-3
RCLQRT-15V701-9514.PDF 214.743KB
 Loading...
Safety Bulletin – Bulletin No.: 15757D Date: December 2016
RCSB-15V701-4927.pdf 1688.464KB
 Loading...
October 30, 2017 Subject: Clarification on Quarterly Report Figures Recall 15V701 (GM 15757)
RMISC-15V701-0818.pdf 82.738KB
 Loading...
Manufacturer Notices(to Dealers,etc) – Date: December 13, 2016 Subject: 15757D – Safety Recall Under Hood Fire Revised Part Information, Service Procedure, and Warranty Transaction Information sections
 Loading...
Recall Quarterly Report #6, 2017-2
RCLQRT-15V701-0986.PDF 215.054KB
 Loading...
July 31, 2017 Subject: Clarification on Quarterly Report Figures Recall 15V701 (GM 15757)
RMISC-15V701-7186.pdf 82.442KB
 Loading...
May 4, 2017 Subject: Clarification on Quarterly Report Figures Recall 15V701 (GM 15757)
RMISC-15V701-7339.pdf 82.171KB
 Loading...
Manufacturer Notices(to Dealers,etc) – Date: December 13, 2016 Subject: 15757D – Safety Recall Under Hood Fire Revised Part Information, Service Procedure, and Warranty Transaction Information sections
 Loading...
Recall Quarterly Report #7, 2017-3
RCLQRT-15V701-2471.PDF 215.139KB
 Loading...
Recall Quarterly Report #4, 2016-4
RCLQRT-15V701-8599.PDF 214.852KB
 Loading...
January 27, 2016 Subject: Clarification on Quarterly Report Figures
RMISC-15V701-9314.pdf 82.465KB
 Loading...
Recall Quarterly Report #5, 2017-1
RCLQRT-15V701-7330.PDF 214.961KB
 Loading...
Latest Recalls Documents
| “This site contains affiliate links for which OEMDTC may be compensated” |
- Non-Corrosive Formula - Ultra Black Maximum Oil Resistance Silicone Gasket Maker Is Sensor-safe; With A Non-Corrosive Formula Designed For Superior Adhesion To Oily Surfaces And Long Term Durability
- Superior Resistance - Powertrain Fluids Including Engine Oil, Transmission Fluid, Gear Lube And Coolants To Keep Your Application Locked In Place To Create A Strong Long Lasting Seal
- High Flexibility - Ultra Black Silicone Gasket Maker Retains High Flexibility And Oil Resistant Properties And Can Be Used To Replace Pre Cut Gaskets Or Be Used As A Gasket Maker Or Gasket Sealant
- Long-lasting And Durable - Ultra Black Resists Aging, Weathering And Thermal Cycling Without Hardening, Shrinking Or Cracking. With A Temperature Range Of -65°f To 500°f (-54°c To 260°c) Intermittent
- Suggested Applications: Valve Covers And Valve Guides, Oil Pans, Transmission Pans, Intake Manifold End Seals, Timing Gear Covers, And Differential Covers
- Professional Formula - This Clear Silicone Adhesive Sealant is a Sensor-Safe, General Purpose Clear RTV Sealant that can be used inside or outside for all your jobs
- Do It All- Seal, Bond, Repair, Mend And Secure Glass, Metal, Plastics, Fabric, Vinyl, Weather Stripping, Vinyl Tops, And More With This Clear Rtv Silicone Sealant
- Resist The Elements- Permatex Clear Silicone Adhesive Sealant Is Waterproof And Flexible, Resists Water, Weather, And Vibration On All Your Applications
- Multipurpose Formula- With A Temperature Range From : -75°f To 400°f (-59°c To 204°c) Clear RTV Silicone Can Be Used All Around And Can Be Used To Protect And Repair Electrical Wiring
- Suggested Applications- Door Frames, Seams And Roofs, Vinyl Tops, Windshields, Housings And Coverings, (Not Recommended For Engine Gasket Applications)
- High flexibility and oil resistance
- Sensor-safe, non-corrosive formula
- Resist to powertrain fluids
- Eliminates the need for pre-formed, pre-cut gaskets
- OEM specified and approved for dealership warranty requirements
- High Performance Formula - Ultra Grey Silicone Gasket Maker is Sensor-Safe, With a Non-Corrosive Formula Designed to Provide Reliable “Formed-in-Place” Gaskets for Mechanical Assemblies
- Vibration Resistant - Permatex Ultra Grey Offers Maximum Vibration Resistance, Withstanding High Torque Loads While Creating a Tough, Flexible, Silicone Rubber Gasket
- Long-Lasting Durable Silicone Gasket - Resists Aging, Weathering, and Thermal Cycling Without Hardening, Shrinking, or Cracking with Temperature Resistance from -65°F to 500°F (-54°C to 260°C).
- Multi-Purpose Gasket Material - Ultra Grey Silicone Gasket Maker Retains High Torque and Vibration Resistance and Can Be Used to Replace Pre Cut Gaskets or Be Used as a Gasket Maker or Gasket Sealant
- Suggested Applications: Valve Covers, Water Pump Housings, Intake Manifold End Seals, Thermostat Housings, Timing Gear Covers, Transmission Pans, and Oil Pans
- Professional Formula - This Black Silicone Adhesive Sealant Is A Sensor-safe, General Purpose Black RTV Sealant That Can Be Used Inside Or Outside For All Your Jobs
- Do It All- Seal, Bond, Repair, Mend And Secure Glass, Metal, Plastics, Fabric, Vinyl, Weather Stripping, Vinyl Tops, And More With This Black RTV Silicone Sealant
- Resist The Elements- Permatex Black Silicone Adhesive Sealant Is Waterproof And Flexible; Resists Water, Weather, And Vibration On All Your Applications
- Multipurpose Formula- With A Temperature Range From -75°f To 450°f (-59°c To 232°c) Black RTV Silicone Can Be Used All Around And Can Be Used To Protect And Repair Electrical Wiring
- Suggested Applications- Door Frames, Electrical Connections, Seams And Roofs, Vinyl Tops, Weather Stripping, Housings And Coverings, (not Recommended For Engine Gasket Applications)
- 100% WATERPROOF: This 100% silicone formula offers ultimate protection from water damage, providing a reliable seal in areas prone to consistent water exposure
- UV Protection and 50 Years Durability Guarantee: No Yellow No Color Change
- No Odor = No Smell
- 30-MINUTE WATER-READY: Ready for water exposure in as little as 30 minutes
- SHRINK & CRACK-PROOF: Withstands extreme expansion or contraction associated with temperature fluctuations
- Formulated For Hi-Temp Applications, Or Heavy-Duty Use
- Replaces Almost Any Cut Gasket, And Coats Pre-Cut Gaskets To Increase Reliability
- Makes Reliable 'Formed-In-Place' Gaskets That Resist Cracking, Shrinking And Migrating
- Temperature Range Of -65F To 650F Intermittent
- Adhesives & Sealants
- Country of manufacture: United States
- Manufacturer: Pro-Seal
- Package Weight: 0.11 kilograms
- J-B Weld Clear Sealant and Adhesive is a general purpose sealant adhesive designed for use in household or mechanical applications.
- Upon curing, which occurs when the product is exposed to the moisture in air, the silicone forms a tough, waterproof seal on most surfaces.
- J-B Weld Clear Silicone will not shrink or crack
- Great For: Great for tubs, showers, windshields, windows, lens housings, and more
Last update on 2025-05-08 / Affiliate links / Images from Amazon Product Advertising API
This product presentation was made with AAWP plugin.
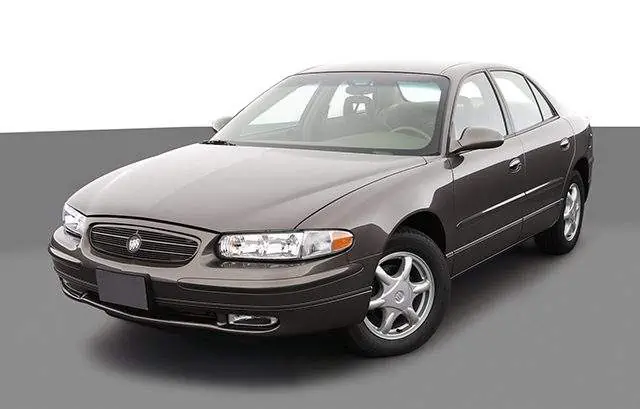



Why did I not get the engine ‘beauty’ cover back after the recall work was completed? The repair dealership kept the part. Is this normal and if so why?
If you read in the post it States “Perform steps 1.1 through 1.4 to remove and discard the fuel injector sight shield (1).”