
NHTSA ID Number: 10112820
Manufacturer Communication Number: PI1250D
Summary
This preliminat informational bulletin provides information on the proactive alert advanced diagnostics. Proactive Alert monitors the Engine Cranking system and the Fuel Delivery system and if either one of these monitored systems triggers certain performance issues, specific Customer and Dealer Communication are sent.
14 Affected Products
Vehicles
| CADILLAC | ESCALADE | 2016 |
| CADILLAC | ESCALADE ESV | 2016 |
| CHEVROLET | CORVETTE | 2016 |
| CHEVROLET | EQUINOX | 2015-2016 |
| CHEVROLET | SILVERADO 2500 | 2016 |
| CHEVROLET | SUBURBAN | 2016 |
| CHEVROLET | TAHOE | 2016 |
| GMC | SIERRA 2500 | 2016 |
| GMC | SIERRA DENALI | 2016 |
| GMC | TERRAIN | 2015-2016 |
| GMC | YUKON | 2016 |
| GMC | YUKON XL | 2016 |
SEOCONTENT-START
#PI1250E: Advanced Diagnostics – Proactive Alert – (Apr 25, 2016)
| Subject: | Advanced Diagnostics — Proactive Alert |
| Models: | 2016 Cadillac Escalade, Escalade ESV Equipped with RPO — L86 |
|---|---|
| 2015-2016 Chevrolet Equinox Equipped with RPO — LFX | |
| 2016 Chevrolet Corvette Equipped with RPO — LT1 or LT4 | |
| 2016 Chevrolet Silverado LD Equipped with RPO — LV3, L83, L86 or L8B | |
| 2016 Chevrolet Suburban, Tahoe Equipped with RPO — L83 | |
| 2015-2016 GMC Terrain Equipped with RPO — LFX | |
| 2016 GMC Sierra LD Equipped with RPO — LV3, L83, L86 or L8B | |
| 2016 GMC Yukon, Yukon XL Equipped with RPO — L83 | |
| Vehicles Enrolled in OnStar Vehicle Diagnostics — United States and Canada Only | |
| Excluding Fleet Vehicles | |
| Excluding 2016 eAssist Silverado and Sierra Pickups | |
| Excluding Vehicles Equipped with Bi-Fuel, LPG or CNG | |
| Excluding Vehicles Equipped with Auxiliary Battery RPO — K4B or Dual Battery RPO — K4D | |
| Attention: | Advanced Diagnostics — Proactive Alert was developed using Genuine GM Parts. Due to the wide variation and the availability of non-GM components, it is possible that using non-GM components may set false Proactive Alert Service Messages. To maintain proper system performance, always use ACDelco™ or Genuine GM Parts. |
This PI has been revised to Exclude 2016 eAssist Silverado and Sierra Pickups and add “ The Customer Experience Manager (U.S.) or Service Manager (Canada) will be the recipient at GM Dealers”, to the section titled: Communication Process for Customer and Dealer for Model Year 2015-2016 Vehicles. Please discard PI1250D.
OnStar Diagnostic Alerts Feature
Advanced Diagnostics – Proactive Alerts are only one of the OnStar Services that are available on many models. Recently OnStar® launched a new service called Diagnostic Alerts and has made them available on many vehicles. Diagnostic Alerts are driven by on vehicle information, such as Diagnostic Trouble Codes (DTCs) with an illuminated Malfunction Indicator Lamp (MIL), Tire Pressure Monitor (TPM) conditions such as low tire and flat tire, bulb outage detection, GM Oil Life System messages, etc. Customers may also select to receive these Diagnostic Alerts real time via email and Short Message Service (SMS) text. Follow normal Service Information procedures for OnStar® Diagnostic Alerts.
Advanced Diagnostics — Proactive Alert
System Overview
Customers that purchase any of the vehicles identified above and are enrolled in OnStar Vehicle Diagnostics, will be able to enroll in Advanced Diagnostics — Proactive Alert. Proactive Alert monitors the Engine Cranking system and the Fuel Delivery system and if either one of these monitored systems triggers certain performance issues, specific Customer and Dealer Communication are sent. The communication process is now the same for both 2015-2016 Model Year vehicles.
Important: It is important to understand that some Advanced Diagnostics – Proactive Alert Service Messages may be generated without any apparent symptoms being noticed by the Customer.
Monitored Systems
The Engine Cranking system and the Fuel Delivery system components that are monitored are explained as follows:
- Engine Cranking System: Consisting of the Battery and Starter and their performance.
- Fuel Delivery System: Consisting of the Fuel Tank Fuel Pump Module and the Fuel Pressure Sensor, located in the fuel pipe/fuel feed pipe and their performance.
Service Message Identifier
Currently, there are nine different repair actions covered under Proactive Alert. Each individual repair is distinguished by its own Service Message Identifier. They are constructed by using the involved service manual section, to create a three letter acronym that is combined with three numerals for a total length of 6 characters. For example: 12 volt battery is covered under the “Starting and Charging” section, resulting in SAC for the first three positions with three numerals for the last three positions. The first “Starting and Charging” Service Message Identifier is called out as SAC001.
Important: Proactive Alert Service Messages are not stored On-Vehicle and cannot be retrieved from the vehicle using a scan tool. Although some other on board system DTCs may also be set, the Service Technician must use the Service Message Identifier when diagnosing. Refer to the Section titled: Service Message Identifiers and Diagnostic Procedures
Warranty
Due to the unique nature of the Advanced Diagnostics — Proactive Alert system, special Bulletin Only Labor Operations have been set up to be used in conjunction with the repair of the identified Service Messages. The Service Personnel and Warranty Administration Personnel must use these Bulletin Only Labor Operations for any repair related to these Service Messages. Refer to the applicable Bulletin Only Labor Operation identified in the last Step of each Service Message Identifier and also in the Section titled: Warranty Information, at the end of this Bulletin.
Notice: All parts replaced under this program will be requested back by the Warranty Parts Center (WPC). Ensure that all components are appropriately marked and tracked for return.
Communication Process for Customer and Dealer for Model Year 2015-2016 Vehicles
When an Advanced Diagnostics – Proactive Alert Service Message is triggered, a Proactive Alert Service Message is generated and it will play through the vehicle’s audio system and display in the vehicle radio one time shortly after the vehicle is started. The message can be dismissed by pressing OK. In addition, a text message (if selected by the Customer in the OnStar account settings) and email will be sent to the customer using the phone number and email address provided when they opted into the service.
An email will also be sent to the selected Preferred Service Provider, which was also identified by the customer, when they opted into the service. The Customer Experience Manager (U.S.) or Service Manager (Canada) will be the recipient at GM Dealers.
Notice: If the Customer has not identified a Preferred Service Provider, then CAC/CCC will contact them and help set up a service appointment. If the issues are still detected as “active” then a Follow Up Communication consisting of a reminder text and an email will be sent at an interval of 7 and 14 days after the initial alert.
Method to Obtain the Details of an Unclear Proactive Alert Service Message
To obtain the details of a Proactive Alert Service Message, perform one of the following actions: Ask the customer for a copy of the email they received or if the customer has a paid OnStar plan, press the blue OnStar button in the subject vehicle. The OnStar advisor will be able to provide the Proactive Alert Service Message information.
Service Message Identifiers and Diagnostic Procedures
Proactive Alert Starting & Charging Service Message Identifier SAC001
- This Service Message DOES NOT require any diagnosis.
- Replace the battery. DO NOT use the EL-50313 Midtronics GR8 Battery Tester/Charger. Refer to Battery Replacement in SI.
- No other action is required as the Service Message will automatically clear once the battery is replaced and the vehicle is operated over a number of ignition cycles. Other on board DTCs may have set if the vehicle experienced a low voltage condition.
Use the scan tool to clear ALL DTCs prior to releasing the vehicle to the Customer.
Notice: The battery warranty code is not required when using this Bulletin Only Labor Operation.
- Submit the correct Bulletin Only Labor Operation for this repair: 4080568*.
Proactive Alert Starting & Charging Service Message Identifier SAC002
Notice: The Service Technician MUST complete every Step of this diagnostic.
- Verify the battery cable connections are clean and tight. Refer to Battery Inspection/Test in SI.
- Ignition OFF, measure the battery voltage at the battery terminals. The voltage should be between 12.0–15.0 V
- If not within the specified range, refer to Battery Charging in SI.
- If within the specified range, Go to Step 3, for Corvette Go to Step 4.
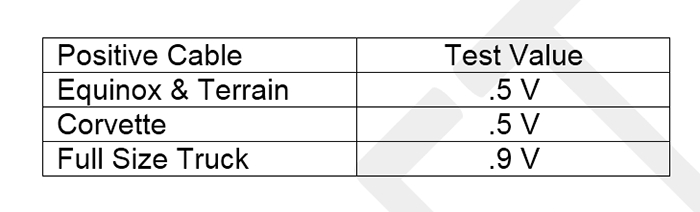
Notice: For Corvette testing, Go to Step 4.
- Test for less than the specified value between the positive battery cable at the battery and the positive battery cable at the M64 starter motor as the ignition is placed in the CRANK/START position. Refer to Measuring Voltage Drop in SI.
- If greater than the specified value, replace the positive battery cable. Refer to Battery Positive Cable Replacement in SI.
- If less than the specified value, Go to Step 6.
- Test for less than 0.5 V between terminal A X6 at the X50D Fuse Block – Battery and terminal A X6 at the X50A Fuse Block – Underhood as the ignition is placed in the CRANK/START position. Refer to Measuring Voltage Drop in SI.
- If greater than the specified value, replace the positive battery cable. Refer to Battery Positive Cable Replacement in SI.
- If less than the specified value, Go to Step 5.
- Test for less than 0.5 V between terminal A X6 at the X50A Fuse Block – Underhood and terminal A X2 at the M64 Starter Motor as the ignition is placed in the CRANK/START position. Refer to Measuring Voltage Drop in SI.
- If greater than the specified value, replace the starter solenoid cable. Refer to Starter Solenoid Cable Replacement in SI.
- If less than the specified value, Go to Step 6.
- Test for less than 0.5 V between the negative battery cable and the M64 starter motor case as the ignition switch is placed in the CRANK/START position. Refer to Measuring Voltage Drop in SI.
- If greater than the specified value, replace the negative battery cable. Refer to Battery Negative Cable Replacement in SI.
- If less than the specified value, replace the battery. DO NOT use the EL-50313 Midtronics GR8 Battery Tester/Charger. Refer to Battery Replacement in SI.
- No other action is required as the Service Message will automatically clear once the battery is serviced properly and the vehicle is operated over a number of ignition cycles. Other on board DTCs may have set if the vehicle experienced a low voltage condition.
Use the scan tool to clear ALL DTCs prior to releasing the vehicle to the Customer.
Notice: The battery warranty code is not required when using this Bulletin Only Labor Operation.
- Submit the correct Bulletin Only Labor Operation for this repair: 4080578*.
Proactive Alert Starting & Charging Service Message Identifier SAC003
Notice: Normal operation of the vehicle MAY have recharged the battery.
- Follow the instructions in SI for Battery Inspection/Test and Battery Charging using the EL-50313 Midtronics GR8 Battery Tester/Charger.
- Perform the Battery Electrical Drain/Parasitic Load Test in order to verify the cause of the low battery, such as aftermarket equipment, Customer driving habits, etc. Refer to SI.
- No other action is required as the Service Message will automatically clear once the battery is charged properly and the vehicle is operated over a number of ignition cycles. Other on board DTCs may have set if the vehicle experienced a low voltage condition.
Use the scan tool to clear ALL DTCs prior to releasing the vehicle to the Customer. - Submit the correct Bulletin Only Labor Operation for this repair: 4080588*.
Proactive Alert Starting & Charging Service Message Identifier SAC004
Notice: The Service Technician MUST complete every Step of this diagnostic.
- Verify the battery cable connections are clean and tight. Refer to Battery Inspection/Test in SI.
- Turn OFF the ignition. Measure the battery voltage at the battery terminals. The voltage should be between 12.0–15.0 V
- If not within the specified range, refer to Battery Charging in SI.
- If within the specified range, Go to Step 3, for Corvette Go to Step 4.
Notice: For Corvette testing, Go to Step 4.
- Test for less than the specified value between the positive battery cable at the battery and the positive battery cable at the M64 starter motor as the ignition is placed in the CRANK/START position. Refer to Measuring Voltage Drop in SI.
- If greater than the specified value, replace the positive battery cable. Refer to Battery Positive Cable Replacement in SI.
- If less than the specified value, Go to Step 6.
- Test for less than 0.5 V between terminal A X6 at the X50D Fuse Block – Battery and terminal A X6 at the X50A Fuse Block – Underhood as the ignition is placed in the CRANK/START position.
- If greater than the specified value, replace the positive battery cable. Refer to Battery Positive Cable Replacement in SI.
- If less than the specified value, Go to Step 5.
- Test for less than 0.5 V between terminal A X6 at the X50A Fuse Block – Underhood and terminal A X2 at the M64 Starter Motor as the ignition is placed in the CRANK/START position.
- If greater than the specified value, replace the starter solenoid cable. Refer to Starter Solenoid Cable Replacement in SI.
- If less than the specified value, Go to Step 6.
- Test for less than 0.5 V between the negative battery cable and the M64 starter motor case as the ignition switch is placed to the CRANK/START position. Refer to Measuring Voltage Drop in SI.
- If greater than the specified value, replace the negative battery cable. Refer to Battery Negative Cable Replacement in SI.
- If less than specified value replace the Starter. Refer to Starter Replacement in SI.
- No other action is required as the Service Message will automatically clear once the starting system is serviced properly and the vehicle is operated over a number of ignition cycles. Other on board DTCs may have set if the vehicle experienced a low voltage condition.
Use the scan tool to clear ALL DTCs prior to releasing the vehicle to the Customer. - Submit the correct Bulletin Only Labor Operation for this repair: 4080598*.
Proactive Alert Starting & Charging Service Message Identifier SAC005
Notice: The Service Technician MUST complete every Step of this diagnostic.
- Verify the battery cable connections are clean and tight. Refer to Battery Inspection/Test in SI.
- Turn OFF the ignition. Measure the battery voltage at the battery terminals. The voltage should be between 12.0–15.0 V.
- If not within the specified range, refer to Battery Charging in SI.
- If within the specified range, Go to Step 3, for Corvette testing Go to Step 4.
Notice: For Corvette testing, Go to Step 4.
- Test for less than the specified value between the positive battery cable at the battery and the positive battery cable at the M64 starter motor as the ignition is placed in the CRANK/START position. Refer to Measuring Voltage Drop in SI.
- If greater than the specified value, replace the positive battery cable. Refer to Battery Positive Cable Replacement in SI.
- If less than the specified value, Go to Step 6.
- Test for less than 0.5 V between terminal A X6 at the X50D Fuse Block – Battery and terminal A X6 at the X50A Fuse Block – Underhood as the ignition is placed in the CRANK/START position.
- If greater than the specified value, replace the positive battery cable. Refer to Battery Positive Cable Replacement in SI.
- If less than the specified value, Go to Step 5.
- Test for less than 0.5 V between terminal A X6 at the X50A Fuse Block – Underhood and terminal A X2 at the M64 Starter Motor as the ignition is placed in the CRANK/START position.
- If greater than the specified value, replace the starter solenoid cable. Refer to Starter Solenoid Cable Replacement in SI.
- If less than the specified value, Go to Step 6.
- Test for less than 0.5 V between the negative battery cable and the M64 starter motor case as the ignition switch is placed to the CRANK/START position. Refer to Measuring Voltage Drop in SI.
- If greater than the specified value, replace the negative battery cable. Refer to Battery Negative Cable Replacement in SI.
- If less than specified value, Go to Step 7.
- Perform a battery inspection/test using the EL-50313 Midtronics GR8 Battery Tester/Charger.
- No other action is required as the Service Message will automatically clear once the battery and/or starting system is serviced properly and the vehicle is operated over a number of ignition cycles. Other on board DTCs may have set if the vehicle experienced a low voltage condition.
Use the scan tool to clear ALL DTCs prior to releasing the vehicle to the Customer. - Submit the correct Bulletin Only Labor Operation for this repair: 4080608*.
Proactive Alert Engine Controls & Fuel Service Message Identifier ECF001
- Remove the fuel tank (on the Corvette, the left fuel tank). Refer to Fuel Tank Replacement in SI.
- Replace the Fuel Tank Fuel Pump Module. Refer to Fuel Tank Fuel Pump Module Replacement in SI.
- Install the fuel tank.
- No other action is required as the Service Message will automatically clear once the fuel tank fuel pump module is replaced and the vehicle is operated over a number of ignition cycles. Other on board DTCs may have set.
Use the scan tool to clear ALL DTCs prior to releasing the vehicle to the Customer. - Submit the correct Bulletin Only Labor Operation for this repair: 4080618*.
Proactive Alert Engine Controls & Fuel Service Message Identifier ECF002
- Test the wiring, terminals and connectors of the Body Harness to Fuel Tank Harness (on the Corvette the Rear Chassis Harness to Fuel Tank Primary Harness), and the K111 Fuel Pump Driver Control Module and the ground circuit that it uses for good continuity and for intermittent conditions and poor connections. Refer to Testing for Continuity, Testing for Electrical Intermittents, Testing for Intermittent Conditions and Poor Connections and Ground Distribution Schematics in SI.
- Remove the fuel tank (on the Corvette, the left fuel tank). Refer to Fuel Tank Replacement in SI.
Notice: This Step MUST be performed.
- Test the wiring, terminals and connector running to the fuel tank fuel pump module for good continuity and intermittent conditions and poor connections. Refer to Testing for Continuity, Testing for Electrical Intermittents and Testing for Intermittent Conditions and Poor Connections in SI.
- Replace the fuel tank fuel pump module. Refer to Fuel Tank Fuel Pump Module Replacement in SI.
- Install the fuel tank.
- No other action is required as the Service Message will automatically clear once the fuel system is serviced properly and the vehicle is operated over a number of ignition cycles. Other on board DTCs may have set.
Use the scan tool to clear ALL DTCs prior to releasing the vehicle to the Customer. - Submit the correct Bulletin Only Labor Operation for this repair: 4080628*.
Proactive Alert Engine Controls & Fuel Service Message Identifier ECF003
- Turn OFF the ignition.
Notice: If the engine coolant temperature is above 140°F (60°C), high fuel pressure readings may result due to hot soak fuel boiling. With the engine OFF, the fuel pressure may increase beyond the pressure relief regulator valve’s setting point of 100 psi (690 kPa) ± 5 percent.
- Install the CH-37287-1A Fuel Pressure Gauge Adapter and the CH-48027 Digital Fuel Pressure Gauge. Refer to Fuel Pressure Gauge Installation and Removal in SI.
- Turn ON the ignition, with the engine OFF.
- Command the Fuel Pump Enable ON several times, in order to obtain the highest possible fuel pressure.
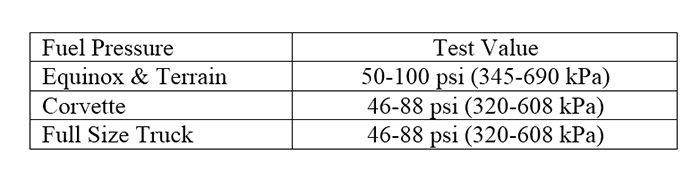
- Verify that the CH-48027 fuel pressure is within the specified range with the fuel pump running.
- If the CH-48027 fuel pressure is within the specified range, Go to Step 6.
- If the CH-48027 fuel pressure is not within the specified range, refer to Fuel System Diagnosis in SI.
- Verify that the CH-48027 fuel pressure and the Fuel Pressure Sensor parameter agree or are within a range of +/− 5 psi (34 kPa).
- If the CH-48027 fuel pressure and the Fuel Pressure Sensor parameter are not within the specified range, perform the following:
- Inspect the fuel system pipes and hoses for damage, such as kinks or pinches.
- Test the wiring, terminals and connectors of the Body Harness to Fuel Tank Harness (on the Corvette the Rear Chassis Harness to Fuel Tank Primary Harness), the B47 Fuel Pressure Sensor and the K111 Fuel Pump Driver Control Module and the ground circuit that it uses for good continuity and intermittent conditions and poor connections. Refer to Testing for Continuity, Testing for Electrical Intermittents and Testing for Intermittent Conditions and Poor Connections and Ground Distribution Schematics in SI.
- If any fuel system pipes or hoses exhibit damage, repair as necessary.
- If poor continuity or intermittent conditions and poor connections are found, repair as necessary. Refer to Wiring Repairs, Repairing Connector Terminals and Connector Repairs in SI.
- If fuel system pipe or hose damage is not observed and poor continuity and intermittent conditions and poor connections are not found, replace the B47 Fuel Pressure Sensor. Refer to Fuel Pressure Sensor Replacement in SI.
- No other action is required as the Service Message will automatically clear once the fuel system is serviced properly and the vehicle is operated over a number of ignition cycles. Other on board DTCs may have set.
Use the scan tool to clear ALL DTCs prior to releasing the vehicle to the Customer. - Submit the correct Bulletin Only Labor Operation for this repair: 4080638*.
Proactive Alert Engine Controls & Fuel Service Message Identifier ECF004
- Turn OFF the ignition.
Notice: If the engine coolant temperature is above 140°F (60°C), high fuel pressure readings may result due to hot soak fuel boiling. With the engine OFF, the fuel pressure may increase beyond the pressure relief regulator valve’s setting point of 690 kPa (100 PSI) ± 5 percent.
- Install the CH-37287-1A Fuel Pressure Gauge Adapter and the CH-48027 Digital Fuel Pressure Gauge. Refer to Fuel Pressure Gauge Installation and Removal in SI.
- Turn ON the ignition, with the engine OFF.
- Command the Fuel Pump Enable ON several times, in order to obtain the highest possible fuel pressure.
- Verify that the CH-48027 fuel pressure and the Fuel Pressure Sensor parameter agree or are within a range of +/− 5 psi (34 kPa). If the CH-48027 fuel pressure and the Fuel Pressure Sensor parameter are not within the specified range, inspect the wiring, terminals and connector of the B47 Fuel Pressure Sensor for poor continuity and intermittent conditions and poor connections. Refer to Testing for Continuity and Testing for Intermittent Conditions and Poor Connections in SI.
- No other action is required as the Service Message will automatically clear once the fuel pressure sensor system is serviced properly and the vehicle is operated over a number of ignition cycles. Other on board DTCs may have set.
Use the scan tool to clear ALL DTCs prior to releasing the vehicle to the Customer. - Submit the correct Bulletin Only Labor Operation for this repair: 4080648*.
Warranty Information
For vehicles repaired under warranty, use:
| Labor Operation | Description | Labor Time
2015-2016 Equinox, Terrain |
Labor Time
2016 Corvette |
Labor Time
2016 Escalade, Escalade ESV, Silverado LD, Suburban, Tahoe, Sierra LD, Yukon, Yukon XL |
| 4080568* | Proactive Alert Starting & Charging Service Message Identifier SAC001 | 0.3 hr | 0.4 hr | Escalade, Escalade ESV, Suburban, Tahoe 0.5 hr
— Silverado, Sierra 0.4 hr |
| 4080578* | Proactive Alert Starting & Charging Service Message Identifier SAC002 | 0.3 hr
Diagnostic Add Time: 0-.5 hr |
Battery Replacement 0.4 hr
Diagnostic Add Time: 0-.5 hr OR Battery Cable Positive Replacement 3.3 hrs Diagnostic Add Time: 0-.5 hr OR Starter Solenoid Cable Replacement 1.5 hrs Diagnostic Add Time: 0-.5 hr OR Battery Cable Negative Replacement 0.3 hr Diagnostic Add Time: 0-.5 hr |
Escalade, Escalade ESV, Suburban, Tahoe 0.5 hr
Diagnostic Add Time: 0-.5 hr — Silverado, Sierra 0.4 hr Diagnostic Add Time: 0-.5 hr |
| 4080588* | Proactive Alert Starting & Charging Service Message Identifier SAC003 | 0.3 hr
Diagnostic Add Time: 0-.5 hr |
0.3 hr
Diagnostic Add Time: 0-.5 hr |
0.3 hr Diagnostic Add Time: 0-.5 hr |
| 4080598* | Proactive Alert Starting & Charging Service Message Identifier SAC004 | 0.6 hr
Diagnostic Add Time: 0-.5 hr |
Starter Replacement 0.7 hr
Diagnostic Add Time: 0-.5 hr OR Battery Cable Positive Replacement 3.3 hrs Diagnostic Add Time: 0-.5 hr OR Starter Solenoid Cable Replacement 1.5 hrs Diagnostic Add Time: 0-.5 hr OR Battery Cable Negative Replacement 0.3 hr Diagnostic Add Time: 0-.5 hr |
Escalade, Escalade ESV, Suburban, Tahoe 0.5 hr Diagnostic Add Time: 0-.5 hr — Silverado, Sierra 0.8 hr Diagnostic Add Time: 0-.5 hr |
| 4080608* | Proactive Alert Starting & Charging Service Message Identifier SAC005 | 0.6 hr
Diagnostic Add Time: 0-.5 hr |
Battery Replacement 0.4 hr
Diagnostic Add Time: 0-.5 hr OR Starter Replacement 0.7 hr Diagnostic Add Time: 0-.5 hr OR Battery Cable Positive Replacement 3.3 hrs Diagnostic Add Time: 0-.5 hr OR Starter Solenoid Cable Replacement 1.5 hrs Diagnostic Add Time: 0-.5 hr OR Battery Cable Negative Replacement 0.3 hr Diagnostic Add Time: 0-.5 hr |
Escalade, Escalade ESV, Suburban, Tahoe 0.5 hr
Diagnostic Add Time: 0-.5 hr — Silverado, Sierra 0.8 hr Diagnostic Add Time: 0-.5 hr |
| 4080618* | Proactive Alert Engine Controls & Fuel Service Message Identifier ECF001 | FWD 1.7 hrs
AWD 2.5 hrs |
11.9 hrs | 1.8 hrs |
| 4080628* | Proactive Alert Engine Controls & Fuel Service Message Identifier ECF002 | FWD 1.7 hrs
Diagnostic Add Time: 0-.5 hr AWD 2.5 hrs Diagnostic Add Time: 0-.5 hr |
11.9 hrs
Diagnostic Add Time: 0-.5 hr |
1.8 hrs
Diagnostic Add Time: 0-.5 hr |
| 4080638* | Proactive Alert Engine Controls & Fuel Service Message Identifier ECF003 | Fuel Tank Fuel Pump Module Replacement
FWD 1.7 hrs Diagnostic Add Time: 0-.5 hr AWD 2.5 hrs Diagnostic Add Time: 0-.5 hr OR Fuel Pressure Sensor Replacement 0.3 hr Diagnostic Add Time: 0-.5 hr |
Fuel Tank Fuel Pump Module Replacement 11.9 hrs Diagnostic Add Time: 0-.5 hr OR Fuel Pressure Sensor Replacement 1.7 hrs Diagnostic Add Time: 0-.5 hr |
Fuel Tank Fuel Pump Module Replacement
1.8 hrs Diagnostic Add Time: 0-.5 hr OR Fuel Pressure Sensor Replacement 0.3 hr Diagnostic Add Time: 0-.5 hr |
| 4080648* | Proactive Alert Engine Controls & Fuel Service Message Identifier ECF004 | 0.5 hr
Diagnostic Add Time: 0-.5 hr |
1.7 hrs
Diagnostic Add Time: 0-.5 hr |
0.3 hr
Diagnostic Add Time: 0-.5 hr |
| *This is a unique Labor Operation for Bulletin use only. It will not be published in the Labor Time Guide. | ||||
SEOCONTENT-END
Bulletin No.: PI1250E
Date: 25-Apr-2016
To View or Download this Document Click Here
Bulletin No.: PI1250D
Date: Mar-2016
To View or Download this Document Click Here
Bulletin No.: PI1250C
Date: Jan-2016
To View or Download this Document Click Here
Bulletin No.: PI1250B
Date: Jul-2015
To View or Download this Document Click Here
Bulletin No.: PI1250A
Date: November, 2014
To View or Download this Document Click Here
Bulletin No.: PI1250A
Date: November, 2014
To View or Download this Document Click Here
Bulletin No.: PI1250
Date: October, 2014
To View or Download this Document Click Here

- 【You can always trust Thinkcar】Not happy with the product? If you experience any issues with the product after purchase(functions doesn't work or receive a used product), not sure about the compatibility with your car, please directly message to support @ mythinkcar. com, we also offer online technical support and consultation services to help you quickly get started, even if it's your first time. For select functions, we provide step-by-step guides, video tutorials, and direct support to ensure a smooth experience.
- 【Engineered for Excellence】Favored by A Tremendous Loves of Users, from DIYers and technicians to top automotive influencers. The new intelligent AI-powered THINKSCAN 689BT PRO diagnostic tool provides comprehensive workshop solutions and diagnostic capabilities, topology mapping, J2534 pass-thru solution, new developed Tyler AI Agent, full bidirectional control, 35+ services, PMI, CANFD, DoIP, FCA gateway. While excellent software innovation requires stable hardware support. The THINKSCAN 689BT PRO is driven by Android 10, 4-core high-speed CPU, 4GB RAM, 64GB ROM, ensure 5X faster performance and empowers technicians to repair cars more efficiently, and deliver results with confidence.
- 【J2534 Pass-Thru Support】Featuring an innovative factory-level VCI with the latest J2534 protocol standards, the THINKSCAN 689BT PRO scanner can function as a pass-thru device to achieve direct connectivity seamlessly with mainstream OEM softwares, including GDS2, Forscan, Witech2.0, ODIS, Techstream, ect. This means that with just one device, you can easily access factory level diagnostic, pr0gramming and maintenance functions on multiple brand models, greatly helping technicians get from scan to solution faster than ever.
- 【Pro-Level Topology Mapping for Full System Insight】The THINKSCAN 689BT PRO now features newly integrated topology mapping. It provides a complete and intuitive overview of complex system interconnections for the vehicle, displaying each accessible control module in different colors at a glance, as well as system counts, scanned systems, and diagnostic results. No need for endless scrolling menus, this smart zoom, pan, and highlight specific modules allows for pinpoint module selection. With the support of AI, you can also easily identify the cause of faults and obtain step-by-step repair assistance - empowering you with dealer-level intelligence and excellent efficiency at workshop speed.
- 【Revolutionary Tyler AI Intelligent Scan Tool】Stop wasting cycles on manual code lookups and repetitive cross-referencing. The THINKSCAN 689BT PRO's Tyler AI intelligent system works as a full-time AI expert— it automatically retrieve fault codes, generate reports, capture data for post-scan review, and analyze underlying vehicle issues in real time. But that's just the baseline. The built-in THINKAI chatbot takes it further: ask it any question you wanna know, it delivers instant, context-aware troubleshooting guidance and technical resources without forcing you to flip through service manuals, Tyler AI Agent gives you the confidence of a pro, right from your driver's seat.

- CEL Doctor: The ANCEL AD310 is one of the best-selling OBD II scanners on the market and is recommended by Scotty Kilmer, a YouTuber and auto mechanic. It can easily determine the cause of the check engine light coming on. After repairing the vehicle's problems, it can quickly read and clear diagnostic trouble codes of emission system, read live data & hard memory data, view freeze frame, I/M monitor readiness and collect vehicle information
- Sturdy and Compact: Equipped with a 2.5 foot cable made of very thick, flexible insulation. It is important to have a sturdy scanner as it can easily fall to the ground when working in a car. The AD310 OBD2 scanner is a well-constructed mechanic tool with a sleek design. It weighs 12 ounces and measures 8.9 x 6.9 x 1.4 inches. Thanks to its compact design and light weight, transporting the device is not a problem. The buttons are clearly labelled and the screen is large and displays results clearly
- Accurate Fast and Easy to Use: The AD310 scanner can help you or your mechanic understand if your car is in good condition, provides exceptionally accurate and fast results, reads and clears engine trouble emission codes in seconds after you fixed the problem. This device will let you know immediately and fix the problem right away without any car knowledge. No need for batteries or a charger, get power directly from the OBDII Data Link Connector in your vehicle
- OBDII Protocols and Car Compatibility: Many cheap scan tools do not really support all OBD2 protocols. AD310 scanner as it can support all OBDII protocols such as KWP2000, J1850 VPW, ISO9141, J1850 PWM and CAN. This device also has extensive vehicle compatibility with 1996 US-based, 2000 EU-based and Asian cars, light trucks, SUVs, as well as newer OBD2 and CAN vehicles both domestic and foreign. Pls confirm with our customer service whether it is compatible with your vehicle before purchasing
- Home Necessity and Worthy to Own: This is an excellent code reader to travel or home with as it weighs less and it is compact in design. You can easily slide it in your backpack as you head to the garage, or put it on the dashboard, this will be a great fit for you. The AD310 is not only portable, but also accurate and fast in performance. Moreover, it covers various car brands and is suitable for people who just need a code reader to check their car


- 2026 Advanced ECU Coding Scan Tool: Maximize the capabilities of your vehicles with the ArtiDiag Pro. This scan tool, seamlessly compatible with renowned models such as VW, A-U-D-I, SKODA, SEAT, BENZ, and more, empowers you to uncover hidden features, deactivate annoying functions, and code retrofitted components for peak performance. Ensure a backup before coding and steer clear of problems on low battery levels.
- Efficient Diagnostics with Bidirectional Control: Say goodbye to uncertainty, streamline diagnostics, and reclaim valuable time with ArtiDiag Pro scan tool. This bidirectional scan tool exceeds expectations, enabling targeted tests on individual actuators to swiftly identify and resolve issues. Covering lights, door locks, fuel and coolant systems, windows, wipers, EVAP, and more in vehicle components.
- 35+ Services Resolve 90% of Repair Challenges: Unleash maximum productivity with the ArtiDiag Pro, a scan tool that tackles 90% of maintenance issues through its 35 special functions. Effortlessly clear oil maintenance indicators with oil reset. Engage the EPB Reset for brake system management and establish precise alignment with the Steering Angle Reset to define the straight-line reference position for your vehicle.
- FCA Autoauth : This diagnostic tool supports Autoauth for FCA SGW/Renault, Chrysler, Jeep, Dodge, Fiat etc. 2017 and later. NOTE: Due to Product Upgrade, there is no Chrysler 12+8 adapter, the BMW-20 Adapter in the package any more. We are sincerely sorry for the inconvenience. NOTE: Please confirm compatibility before purchase.(Topdon Website>Support>Vehicle Coverage)
- Professional Customer Support: At TOPDON, your satisfaction is our unwavering commitment. Experience hassle-free support and a lifetime of expert assistance. Should you encounter any challenges, reach out to us at 833-629-4832. For returns, please damage the packaging to prevent Amazon from reselling it. Please be advised that after two years, a subscription fee of 249 Bucks will apply.
- [Diagnose Like a Pro] BlueDriver Pro Next-Gen is a professional OBD2 scanner and diagnostic tool that helps you scan, understand, and clear vehicle trouble codes with confidence. Turn your phone into a powerful car diagnostic scanner—no guesswork, no unnecessary repairs.
- [Read and Clear More Codes Than Ever] Read and clear more codes than basic car code readers. Access enhanced diagnostics for Check Engine, ABS, SRS, Airbag, TPMS, Transmission, and more on supported vehicles, including expanded coverage on newer model years.
- [Verified Fixes and Real-Time Data] Get unlimited, technician-verified repair reports matched to your VIN, with definitions, causes, and confirmed fixes. Monitor live vehicle data as you drive, view freeze frames, check smog readiness, and analyze Mode 6 test results.
- [Expanded Make & Model Coverage] Optimized for today’s vehicles with strong support for GM, Ford, Stellantis (RAM, Jeep, Chrysler), Toyota, Honda, Nissan, Mazda, Subaru, Hyundai, Mercedes-Benz, BMW, and VW. Enhanced communication on select 2024+ Nissan and Mazda models (see compatibility chart).
- [Gas Vehicles 1996+ & Select Light-Duty Trucks] Works with all gas-powered vehicles made in 1996 or newer, plus select light-duty trucks and diesels, including F-250, RAM 2500, Silverado, and Sierra. Built for daily drivers, family vehicles, and real-world truck use.
This product presentation was made with AAWP plugin.