| “This site contains affiliate links for which OEMDTC may be compensated” |
NHTSA ID Number: 10134600
Manufacturer Communication Number: PI1408E
Summary
This preliminary informational bulletin provides a procedure to install a ionizer, clean evaporator and inspect the drain tube on vehicles that exhibit a condition of a musty odor from the HVAC vents on start up.
This preliminary informational bulletin provides a revision of PI1408C to update information under the Ionizer Kit Installation and remove the Note in the Parts Infomation.
This PI provides a procedure to install an ionizer kit to reduce a musty odor condition.
7 Affected Products
Vehicles
Parts
| FILTER, PASS COMPT CARBON AIR | 13356914 |
| APPLICATOR TOOL | 23372329 |
| BODY PLUG | 15632415 |
| IONIZER KIT | 23328151 |
| OXYVAP EVAPORATOR SANITIZER (Quantity of 4) | 534-60646 |
Bulletin No.: PI1408E
Date: Oct-2017
 Loading...
Bulletin No.: PI1408D
Date: Feb-2017
 Loading...
Bulletin No.: PI1408C
Date: Jan-2016
 Loading...
Bulletin No.: PI1408B
Date: Nov-2015
 Loading...
Bulletin No.: PI1408A
Date: Jul-2015
 Loading...
Bulletin No.: PI1408
Date: Jun-2015
 Loading...
| “This site contains affiliate links for which OEMDTC may be compensated” |
- FRESHEN UP YOUR CAR: One 2 oz spray bottle of Meguiar's Whole Car Air Refresher removes tough odors and replaces them with a pleasant new car scent
- SPRAY AND RECIRCULATE: This car air freshener spray uses a car’s recirculated air system to remove odors in hard-to-reach areas in your car, truck or SUV
- ODOR ELIMINATOR: Permanently removes odors to get rid of bad smells, including cigarette smoke, wet dog and sweaty workout gear
- EASY TO USE: Using these car air fresheners is easy. Just set the AC to high, hit the recirculate button, activate the Re-Fresher, and close the doors for 10-15 minutes. After that, open the doors and let it air out for another 10-15 minutes.
- NEW CAR SCENT: Leave behind a pleasant new car aroma that's sure to bring back memories of that "new car" feeling. This long-lasting scent is perfect for anyone who wants to enjoy a fresh and clean-smelling car every day.
- THE ANYWHERE ODOR ELIMINATOR : OZIUM gel eliminates stubborn smoke odors and tackles other offensive everyday smells found in bathrooms, kitchens, trash cans, and more.
- IDEAL FOR BOTH SMALL AND LARGE SPACES: OZIUM odor eliminating gel eliminates unpleasant odors wherever you have them. Great for small spaces, use the 4. 5oz gel in cars, bathrooms, musty closets, gym bags and trash cans.
- DISCREET & EASY TO USE: The compact design and adjustable lid allows you to control the fragrance level, personalizing it to your liking.
- VARIETY OF SCENTS/FRAGRANCES: The 4. 5oz gel is available in an assortment of scents, including Original, That New Car Smell, Carbon Black, and Outdoor Essence.
- CLEANS THE AIR YOU BREATHE : OZIUM sanitizes and deodorizes the air, temporarily reducing bacteria and germs that cause unpleasant odors, leaving the air smelling fresh.
- MULTI-USE ODOR ELIMINATING AIR SANITIZER: OZIUM eliminates stubborn odors and offensive everyday smells found in bathrooms, musty closets, cars, kitchens, trash cans, offices, sweaty shoes and more.
- TRUSTED & VALIDATED: Trusted for over 50 years, OZIUM was originally developed to combat airborne bacteria and germs in hospitals and is clinically-proven to eliminate unpleasant odors, not just mask them.
- MORE THAN JUST AN AIR FRESHENER: OZIUM air sanitizing spray isn’t your typical home or car air freshener, it makes smells disappear by reducing odor-causing bacteria and germs.
- The information below is per-pack only
- PERMANENT ODOR REMOVAL: Permanently eliminates odors on a molecular level. Removes bad smells like cigarette smoke, wet dog, workout gear and more
- ONE-TIME USE: Simple one-time-use aerosol refreshes every corner of your car’s interior
- AIR REFRESHER: Aerosol mist moves through the ventilation system, across the headliner and in between all other hard-to-reach areas, eliminating odors and leaving a pleasant scent in its place
- 100% NATURAL BAMBOO CHARCOAL: The bamboo charcoal bags are made of 100% natural bamboo charcoal, without any fragrance and chemicals. They are safe for children and pets. Standard size bamboo charcoal particles have a larger contact area with air, the performance of adsorption is better, effectively remove odors and bring fresh air.
- REUSABLE FOR 2 YEARS: Rejuvenate the charcoal bags by placing them under direct sunlight once a month for about two hours. It releases the void of bamboo charcoal, restores the effectiveness and maintains the service life of the bag for up to 2 years.
- EFFECTIVELY REMOVES ODORS: Bamboo charcoal absorbs 10x the odor of regular charcoal bags; eliminating musty odors with ease, quickly transforming your home air quality! We recommend placing multiple air purifier bags to specific areas around the house to maximize the air purification effect.
- MULTIPURPOSE FRESHENER: Crafted from a durable burlap bag with robust string design, these fresheners are easy to use and won't scratch surrounding items. They can be placed in various locations such as car corners, shoes, kitchens, bathrooms, refrigerators, gym bags, and more!
- EXCELLENT CUSTOMER SERVICE: Customers are at the core of everything we do. If you have any problem about this bamboo charcoal bag, please feel free to contact us, we will arrange the refund or replacement for you!
- Eliminates odors for 60 Days!
- Natural & effective odor elimination, Clean burst maintains freshness for long hours
- Deodorizing balls filled with odor eliminating baking soda and Arm & Hammer's Clean Burst fresh scent
- Perfect for every room in the house, closets, hampers, travel bags, shoes, athletic gear & much more!
- Keeps odors out & freshness in
- Fights trapped car odors with an irresistible scent
- Make every day smell like laundry day with the crisp, airy scent of Fresh
- Easy to install: Click to activate, clip into vent, adjust scent level, and sniff on
- Adjust the scent intensity from low to high and explore your bold side
- Delivers even scent for up to 40 days (on low) with a fresh that works with your car’s airflow
- PERMANENT CAR ODOR REMOVER: This car air freshener is the ultimate solution for permanent odor removal in your car. The advanced formula works at the molecular level to eliminate stubborn odors like cigarette smoke, pet smells, and sweat.
- ONE-TIME USE: Refreshing your car's interior is as easy as a simple one-time-use aerosol. Our molecular odor eliminating chemistry works great at permanently removing smells like cigarette smoke, wet dog, work-out gear, and more.
- COMPLETE REFRESH: This complete odor eliminator for car interiors moves through the ventilation system, across the headliner, and in between hard-to-reach areas. This ensures that smells are taken care of in every inch of your car's interior.
- EASY TO USE: Using these car air fresheners is easy. Just set the AC to high, hit the recirculate button, activate the Re-Fresher, and close the doors for 10-15 minutes. After that, open the doors and let it air out for another 10-15 minutes.
- BLACK CHROME SCENT: Our signature Black Chrome scent aroma is sure to make your ride smell as good as it looks. This refreshing scent is perfect for anyone who simply wants a fresh and clean-smelling car every day.
- CAR AIR FRESHENER: Three 1.5 oz bottles of Armor All Freshfx Rapid Odor Eliminator in Tranquil Skies scent
- RAPID RESULTS: Odor Elimination Technology quickly removes odors instead of covering them up
- DESTROYS ODORS: Advanced odor neutralizer destroys stubborn odors from pets, food, smoke and more
- FAR-REACHING FRESHNESS: Powerful Odor Elimination technology freshens your entire car interior, including the vents
- REFRESHING FRAGRANCE: This crisp Tranquil Skies scent is like a fresh breeze rushing through your car, blending notes of apple, freesia and lush greens
- Includes one, 17 ounce Amazon Basics Gel Odor Eliminator
- Fragrance free with unscented activated charcoal
- Great for closets, bathrooms, laundry rooms, garages, basements, and lockers
- Alexa voice shopping enabled: to place your next order, just say, “Alexa, reorder Amazon Basics Gel Odor Eliminator.”
Last update on 2025-05-08 / Affiliate links / Images from Amazon Product Advertising API
This product presentation was made with AAWP plugin.
SEOCONTENT-START
Bulletin No.: PI1408E
Date: Oct-2017
Subject: Musty Odor from HVAC Vents on Startup
Models: 2013-2016 Cadillac ATS
ATS
2014-2016 Cadillac CTS Sedan (VIN A)
Attention: This PI also applies to any of the above models that may be Export from North America vehicles.
This PI has been revised to add the 2016 Model Year. Please discard PI1408D.
Condition/Concern
Some customers may comment on a musty or mildew odor coming from the HVAC instrument panel air outlet vents on startup. The odor most likely will dissipate after 30-60 seconds of operation. The odor generally occurs after the vehicle has been parked for 2–6 hours with sun load with temperatures of 21°C (70°F) or higher.
This may be caused by condensation building up on the evaporator core, which does not evaporate by itself in humid conditions. The odor may be the result of microbial growth on the evaporator core being released into the air stream by the HVAC blower motor.
Recommendation/Instructions
Follow all the steps below to reduce the HVAC musty odor:
Install the latest HVAC Control Module calibration and enable After-blow
Refer to Tis2Web and SI Procedures for enabling after-blow.
For 2013 ATS’s built prior to VIN 1G6AH5RX0D0142531, refer to the latest version of PIC5730: Enabling After-blow.
Drain Tube Inspection
1. Verify that the plenum area is free of any debris.
2. Inspect the drain assembly for the presence of a white or light blue plastic drain tube using the latest version of PI1160. If the secondary tube is present, replace the drain hose assembly.
Apply Oxyvap Cleaning Agent
1. Place the passenger seat in the full rearward position.
2. Disable the SIR. Refer to SIR Disabling and Enabling in SI.
3. Remove the instrument panel compartment. Refer to Instrument Panel Compartment Replacement in SI.
4. Remove the front floor console extension panel – right side. Refer to Front Floor Console Extension Panel Replacement – Right Side in SI.
5. Remove the right front side door sill trim plate. Refer to Front Side Door Sill Trim Plate Replacement in SI.
6. Remove the floor front air outlet duct – right side. Refer to Floor Front Air Outlet Duct Replacement – Right Side in SI.
7. Remove the blower motor. Refer to Blower Motor Replacement in SI.
8. Pull back the carpet and roll it back towards the passenger seat.
9. On the lower HVAC case, scribe an “X” in the area shown.
10. Drill a 3 mm (1/8”) pilot hole in the middle of the “X.”
11. Drill a 19 mm (3/4″) hole in the center of the air duct between the blower motor and the air distribution box. The use of a Uni-bit style bit works well. The use of a spade bit will produce excessive plastic chips and may cause the drain to get plugged.
Note: Use a vacuum to collect as many of the plastic chips inside and outside the HVAC case as possible. The blower motor removed helps gain access to the inside of the HVAC case.
12. Using the supplied ionizer bracket as a template, drill a 1/8” pilot hole as shown. Remove the bracket. It will be used at step 18 of the Ionizer Installation.
Note: Some HVAC cases may or may not have the shown case mounting bolt. If the case does not have one, use the supplied bolt in the ionizer kit to mount the bracket.
13. Using a 12.7 mm (1/2”) drill bit, drill the ionizer mounting hole.
Important: The use of a Uni-bit style bit works well. The use of a spade bit will produce excessive plastic chips and may cause the drain to get plugged.
Important: Remove all of the plastic flash around the ½” hole. Reach in through the blower motor area and use a mirror and/or feel to ensure that there is no plastic flash around the hole on the inside wall of the case.
Note: Use a vacuum to collect as many of the plastic chips as possible. The blower motor removed helps gain access to the inside of the HVAC case.
14. Reinstall the blower motor. Refer to Refer to Blower Motor Replacement in SI.
15. Connect the battery.
16. Close the face vents on the dash as well as the vents on the rear of the center console. Place a protective cover over the carpet under the blower to air distribution box duct and over the HVAC face (upper) vents. Set the HVAC temperature control to LO, air distribution to vent mode and blower speed to high (A/C off).
17. Insert the application tool into the drilled hole. Apply OxyVap™ at 65 psi (448 kPa).
• Apply the OxyVap to the evaporator core using applicator tool P/N 23372329. Move the wand up and down to obtain good coverage to the fin area. Turn the HVAC system to off.
• Allow the core to soak for 5 minutes.
• Rinse the empty bottle of OxyVap and fill with clean water. Rinse the evaporator core moving the applicator tool up and down with clean water until the bottle is empty with the blower turned on “High.”
• Using the applicator tool, blow compressed air on the evaporator core for one minute moving the applicator tool up and down to help remove excess water.
• Install the body plug, P/N 15632415, into the 19 mm (3/4”) hole with a thin coating of RTV.
Ionizer Kit Installation
1. Wire Harness
2. 3M Dual Lock Mounting Strip
3. 3M Adhesion Promoter
4. Splice Sleeves
5. Ionizer Controller
6. Ionizer Bracket
7. Ionizer Emitter
8. Double Sided Adhesive Gasket
1. Disconnect the battery and any connected battery charger.
2. On the supplied wire harness, cut wire (3) from the connector. Wire (1) is power and wire (2) is for ground.
3. Remove the friction tape from the instrument panel harness to gain access to the wires.
4. Locate the violet/gray wire (circuit 539, K33 HVAC Control Module X2) in the instrument panel harness for power as shown and cut the wire.
Note: Within the same harness, there is a violet/white wire. Use caution to select the correct wire.
5. Using the supplied splice sleeves, crimp wire 1 from the supplied wire harness to the violet I/P harness and connect the other end of the violet wire to the connector.
Note: Stagger the crimps from the supplied wire harness to the instrument panel harness.
6. Locate the black wire (circuit 1450, K33 HVAC Control Module X2) in the instrument panel harness for ground and cut the wire.
7. Using the supplied splice sleeves, crimp wire 2 from the supplied wire harness to the black I/P harness and connect the other end of the black wire to the connector.
8. Apply heat to the splice sleeves to seal them.
9. Rewrap the I/P harness with the friction tape and seal with electrical tape.
10. Route the supplied wire harness (connector end) up towards the radio.
11. Connect the battery.
12. With ignition on, check for 12 volts at the Ionizer connector of the wire harness before connecting to the ionizer controller. (The Ionizer has no telltale signs that it is operational.) Also see item #31 for operational checks after installation.
13. Connect the supplied wire harness to the ionizer controller.
14. Clean the ionizer controller and the surface of the radio with the supplied adhesion promoter and let dry.
15. Apply the supplied 3M dual lock mounting strip to the ionizer controller as shown.
16. Peel the backing from the other mounting strip and apply the ionizer controller firmly to the radio.
17. Remove and discard the protective sleeve from the ionizer emitter.
Caution: When handing and installing the ionizer emitter, use care to not touch or otherwise damage the two tiny metal prongs located between the protruding plastic protectors. The Ions are produced by the metal prongs.
18. Before installing, remove the green foam seal and snip off the “ears” from the ionizer as shown.
19. Install the supplied gasket to the ionizer emitter.
20. Using tin snips or equivalent, trim the mounting bracket as shown.
21. Install the ionizer emitter to the HVAC case. The adhesive from the gasket will hold it in place until the bracket can be installed.
22. Install the ionizer emitter bracket to the HVAC case with the supplied or existing screw.
Tighten: Tighten the screw to 9 Nm (79 lb in).
23. With the supplied tie straps, secure the wiring harness in place.
24. Place the carpet back in place.
25. Install the floor front air outlet duct – right side. Refer to Floor Front Air Outlet Duct Replacement – Right Side in SI.
26. Remove and install a new passenger cabin compartment carbon air filter.
27. Install the instrument panel compartment. Refer to Instrument Panel Compartment Replacement in SI.
28. Install the front floor console extension panel – right side. Refer to Front Floor Console Extension Panel Replacement – Right Side in SI.
29. Install the front side door sill trim plate. Refer to Front Side Door Sill Trim Plate Replacement in SI.
30. Enable the SIR. Refer to SIR Disabling and Enabling in SI.
Note: Check the ionizer for operation. There should be B+ available at the ionizer power supply (white wire terminal 1) with the HVAC system operating and the blower motor turned on. Also check the amp draw of the ionizer at the B+ available at the ionizer power supply (white wire terminal 1). Amp draw should be .03 +/- .005 amps.
31. If the condition is still present, and the musty odor condition has been verified, the evaporator core should be replaced. Part number 23375992 should be installed.
Note: Do not apply any coatings to the replacement evaporator.
Parts Information
Part Number Description Material Allowance
13356914 FILTER, PASS COMPT CARBON AIR –
23372329* APPLICATOR TOOL –
15632415 BODY PLUG –
23328151 IONIZER KIT –
534–60646** OXYVAP EVAPORATOR SANITIZER (Quantity of 4) Dealers should submit
$15.00 plus applicable
shipping as a net item.
*The Applicator Tool is reusable and does not need to be ordered for additional repairs.
**Available through GM Dealer Equipment (1-844-742-8471) or by visiting www.GMDEsolutions.com.
Warranty Information
For vehicles repaired under the Bumper-to-Bumper coverage (Canada Base Warranty coverage), use the following labor operation. Reference the Applicable Warranties section of Investigate Vehicle History (IVH) for coverage information.
Labor Operation Description Labor Time
4480308* Inspect Drain Tube, Clean Evaporator and Install Ionizer 2.8 hrs
Add Replace Evaporator Core 9.0 hrs
(ATS)
8.7 hrs
(CTS)
*This is a unique Labor Operation for Bulletin use only.
| Subject: | Musty Odor from HVAC Vents on Startup |
| Models: | 2013-2015 Cadillac ATS |
| 2014-2015 Cadillac CTS Sedan (VIN A) |
Condition/Concern
Some customers may comment on a musty or mildew odor coming from the HVAC instrument panel air outlet vents on startup. The odor most likely will dissipate after 30-60 seconds of operation. The odor generally occurs after the vehicle has been parked for 2–6 hours with sun load with temperatures of 21°C (70°F) or higher.
This may be caused by condensation building up on the evaporator core, which does not evaporate by itself in humid conditions. The odor may be the result of microbial growth on the evaporator core being released into the air stream by the HVAC blower motor.
Recommendation/Instructions
Follow all the steps below to reduce the HVAC musty odor:
Install the latest HVAC Control Module calibration and enable After-blow
Refer to Tis2Web and Service Information Procedures for enabling after-blow.
For 2013 ATS’s built prior to VIN 1G6AH5RX0D0142531, refer to the latest version of PIC5730: Enabling Afterblow.
Drain Tube Inspection
- Verify that the plenum area is free of any debris.
- Inspect the drain assembly for the presence of a white or light blue plastic drain tube using the latest version of “Water On Front Compartment Floor And/Or Musty Odor“. If the secondary tube is present, replace the drain hose assembly.
Apply Oxyvap Cleaning Agent
- Place the passenger seat in the full rearward position.
- Disable the SIR.
- Remove the instrument panel compartment.
- Remove the front floor console extension panel – right side.
- Remove the right front side door sill trim plate.
- Remove the floor front air outlet duct – right side.
- Remove the blower motor.
- Pull back the carpet and roll it back towards the passenger seat.
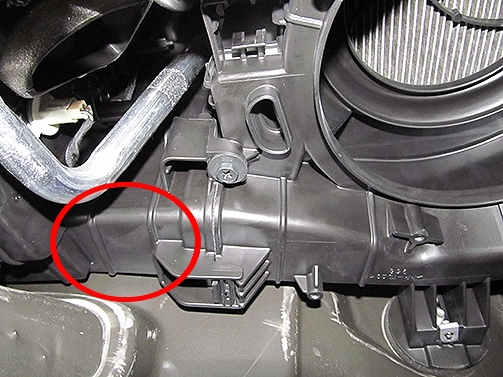
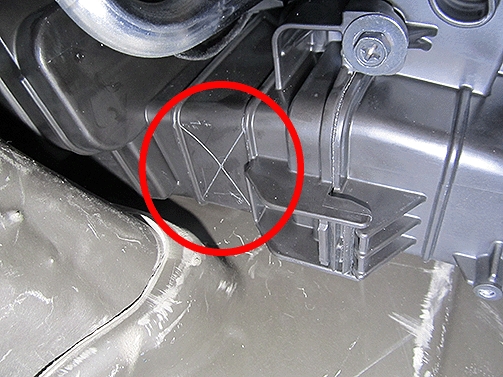
- On the lower HVAC case, scribe an “X” in the area shown.
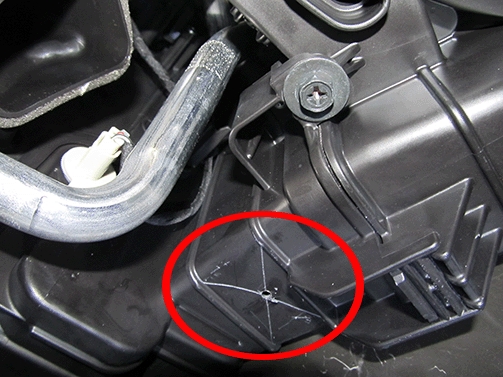
- Drill a 3 mm (1/8”) pilot hole in the middle of the “X.”
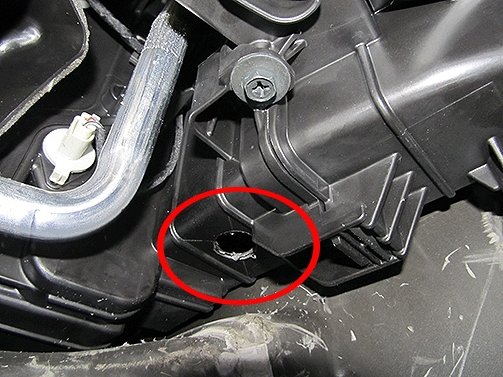
- Drill a 19 mm (3/4″) hole in the center of the air duct between the blower motor and the air distribution box. The use of a Uni-bit style bit works well. The use of a spade bit will produce excessive plastic chips and may cause the drain to get plugged.
Note: Use a vacuum to collect as many of the plastic chips inside and outside the HVAC case as possible. The blower motor removed helps gain access to the inside of the HVAC case.
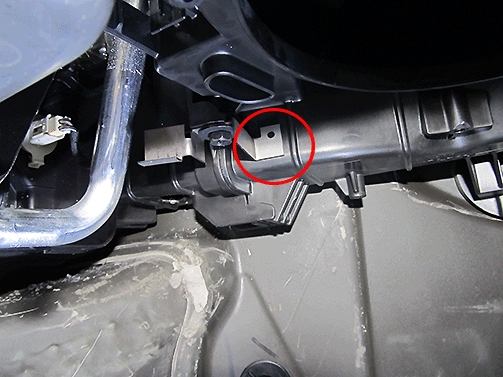
- Using the supplied ionizer bracket as a template, drill a 1/8” pilot hole as shown. Remove the bracket. It will be used at step 18 of the Ionizer Installation.
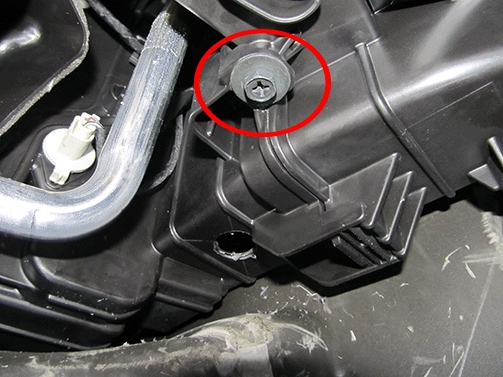
Note: Some HVAC cases may or may not have the shown case mounting bolt. If the case does not have one, use the supplied bolt in the ionizer kit to mount the bracket.
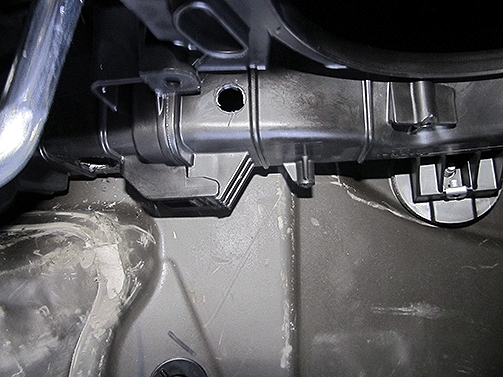
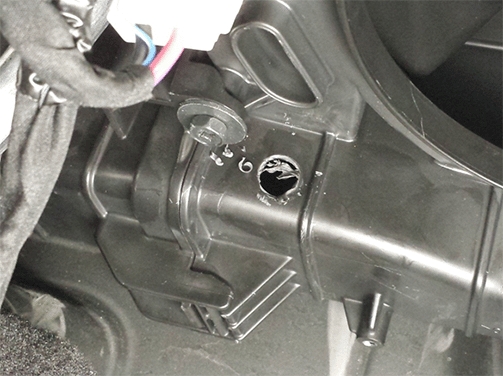
- Using a 12.7 mm (1/2”) drill bit, drill the ionizer mounting hole.
Important: The use of a Uni-bit style bit works well. The use of a spade bit will produce excessive plastic chips and may cause the drain to get plugged.
Important: Remove all of the plastic flash around the ½” hole. Reach in through the blower motor area and use a mirror and/or feel to ensure that there is no plastic flash around the hole on the inside wall of the case.
Note: Use a vacuum to collect as many of the plastic chips as possible. The blower motor removed helps gain access to the inside of the HVAC case.
- Reinstall the blower motor.
- Connect the battery.
- Close the face vents on the dash as well as the vents on the rear of the center console. Place a protective cover over the carpet under the blower to air distribution box duct and over the HVAC face (upper) vents. Set the HVAC temperature control to LO, air distribution to vent mode and blower speed to high (A/C off).
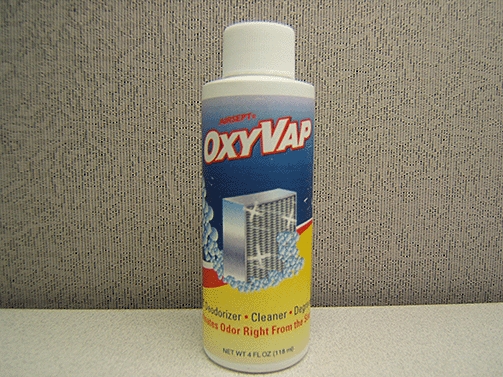
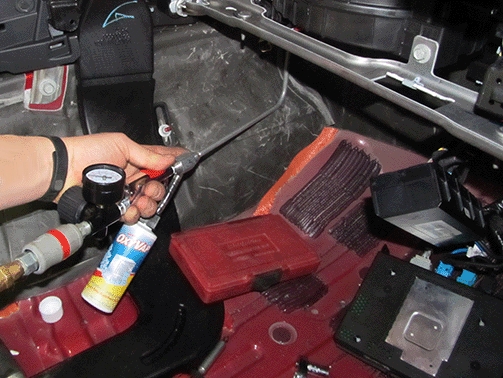
- Insert the application tool into the drilled hole. Apply OxyVap at 65 psi (448 kPa).
- Apply the OxyVap to the evaporator core using applicator tool P/N 23372329. Move the wand up and down to obtain good coverage to the fin area. Turn the HVAC system to off.
- Allow the core to soak for 5 minutes.
- Rinse the empty bottle of OxyVap and fill with clean water. Rinse the evaporator core moving the applicator tool up and down with clean water until the bottle is empty with the blower turned on “High.”
- Using the applicator tool, blow compressed air on the evaporator core for one minute moving the applicator tool up and down to help remove excess water.
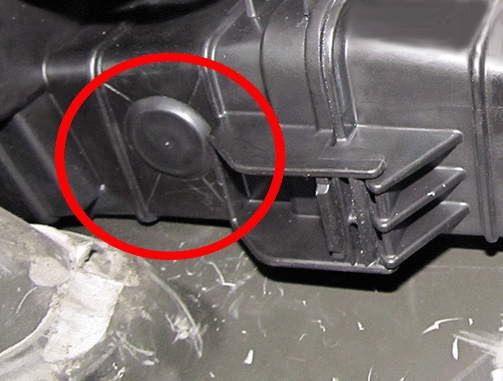
- Install the body plug, P/N 15632415, into the 19 mm (3/4”) hole with a thin coating of RTV.
Ionizer Kit Installation
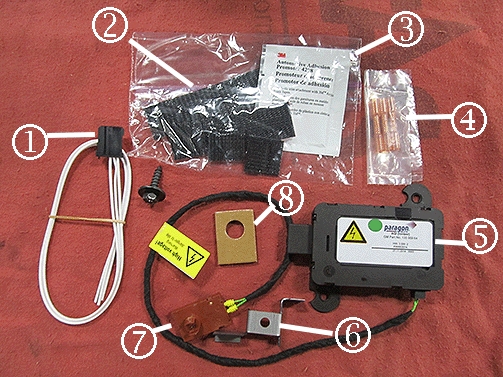
| (1) | Wire Harness |
| (2) | 3M Dual Lock Mounting Strip |
| (3) | 3M Adhesion Promoter |
| (4) | Splice Sleeves |
| (5) | Ionizer Controller |
| (6) | Ionizer Bracket |
| (7) | Ionizer Emitter |
| (8) | Double Sided Adhesive Gasket |
- Disconnect the battery and any connected battery charger.
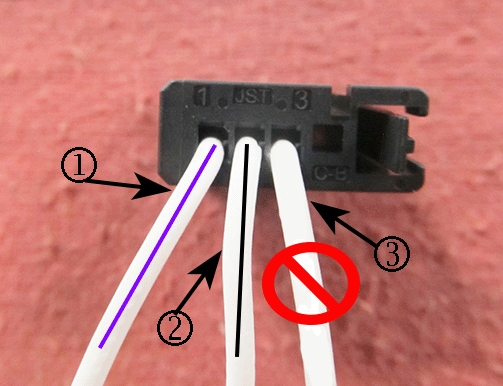
- On the supplied wire harness, cut wire (3) from the connector. Wire (1) is power and wire (2) is for ground.
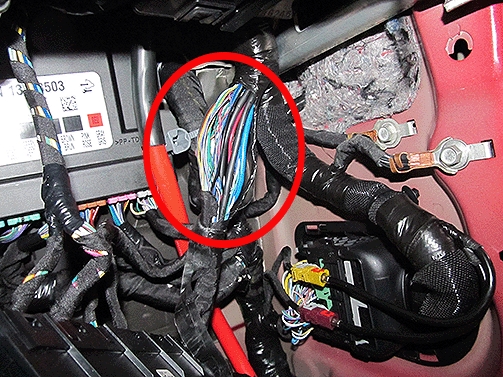
- Remove the friction tape from the instrument panel harness to gain access to the wires.
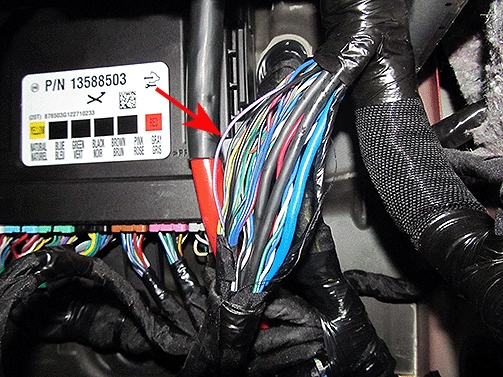
- Locate the violet/gray wire (circuit 539, K33 HVAC Control Module X2) in the instrument panel harness for power as shown and cut the wire.
Note: Within the same harness, there is a violet/white wire. Use caution to select the correct wire.
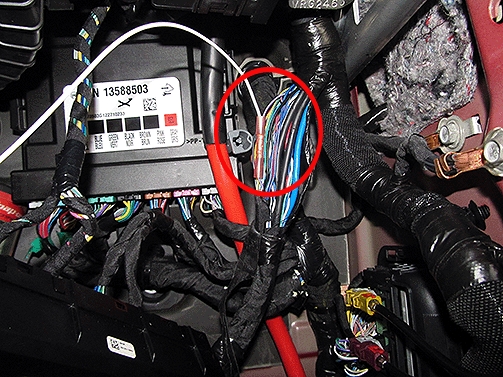
- Using the supplied splice sleeves, crimp wire 1 from the supplied wire harness to the violet I/P harness and connect the other end of the violet wire to the connector.
Note: Stagger the crimps from the supplied wire harness to the instrument panel harness.
- Locate the black wire (circuit 1450, K33 HVAC Control Module X2) in the instrument panel harness for ground and cut the wire.
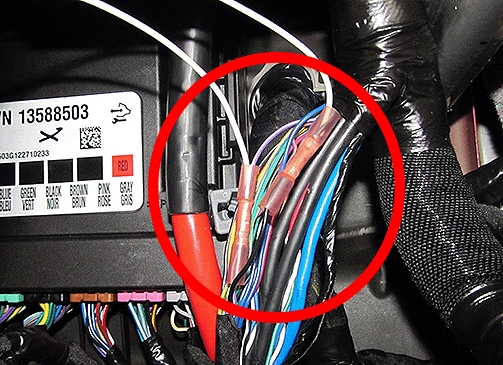
- Using the supplied splice sleeves, crimp wire 2 from the supplied wire harness to the black I/P harness and connect the other end of the black wire to the connector.
- Apply heat to the splice sleeves to seal them.
- Rewrap the I/P harness with the friction tape and seal with electrical tape.
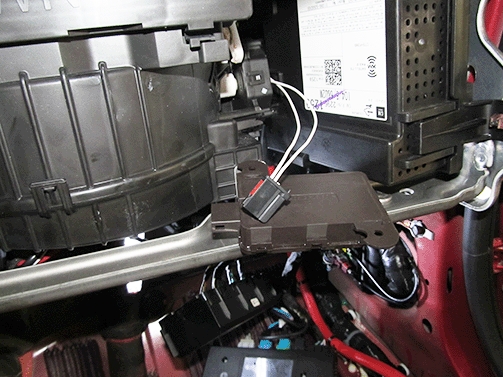
- Route the supplied wire harness (connector end) up towards the radio.
- Connect the battery.
- With ignition on, check for 12 volts at the Ionizer connector of the wire harness before connecting to the ionizer controller. (The Ionizer has no telltale signs that it is operational.)
- Connect the supplied wire harness to the ionizer controller.
- Clean the ionizer controller and the surface of the radio with the supplied adhesion promoter and let dry.
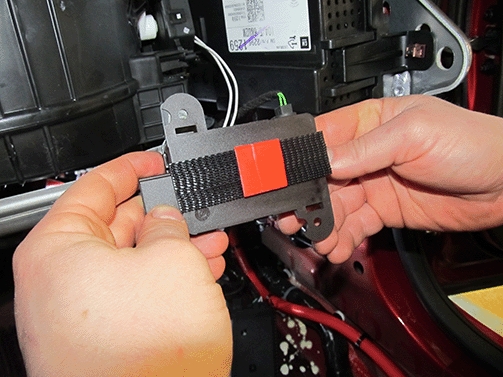
- Apply the suppled 3M dual lock mounting strip to the ionizer controller as shown.
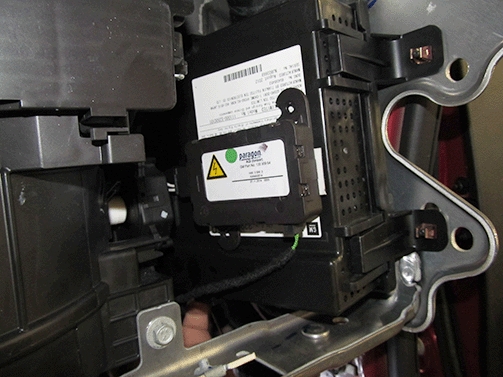
- Peel the backing from the other mounting strip and apply the ionizer controller firmly to the radio.
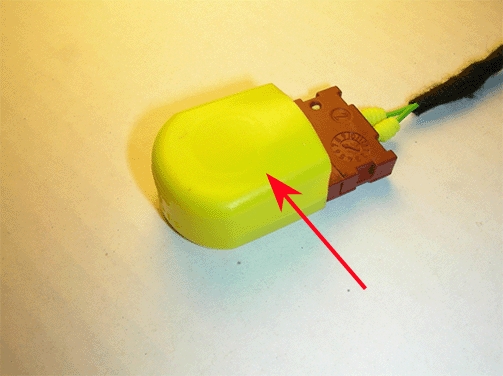
- Remove and discard the protective sleeve from the ionizer emitter.
Caution: When handing and installing the ionizer emitter, use care to not touch or otherwise damage the two tiny metal prongs located between the protruding plastic protectors. The Ions are produced by the metal prongs.
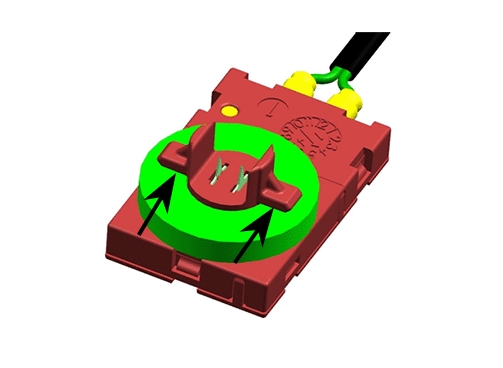
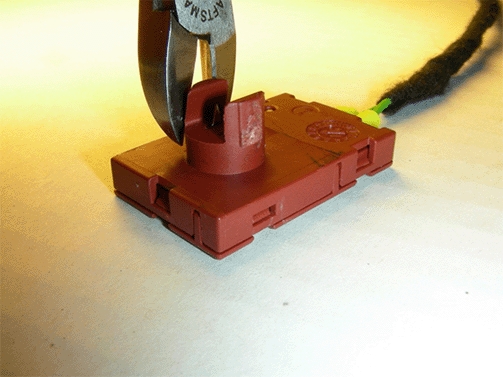
- Before installing, remove the green foam seal and snip off the “ears” from the ionizer as shown.
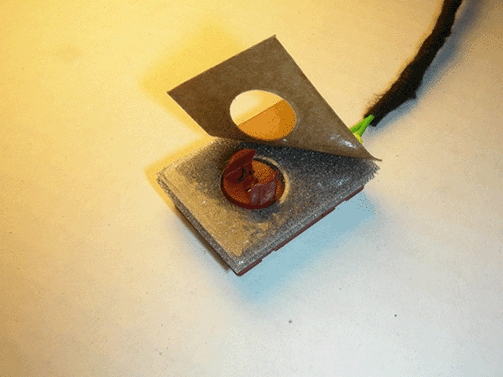
- Install the supplied gasket to the ionizer emitter.
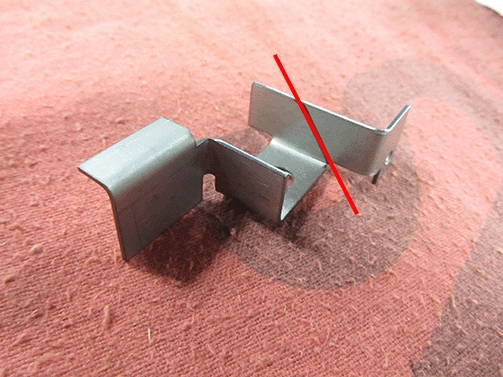
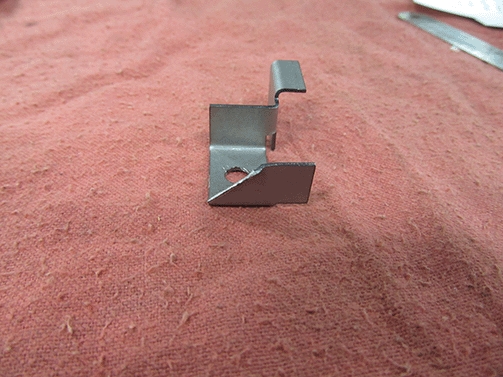
- Using tin snips or equivalent, trim the mounting bracket as shown.
- Install the ionizer emitter to the HVAC case. The adhesive from the gasket will hold it in place until the bracket can be installed.
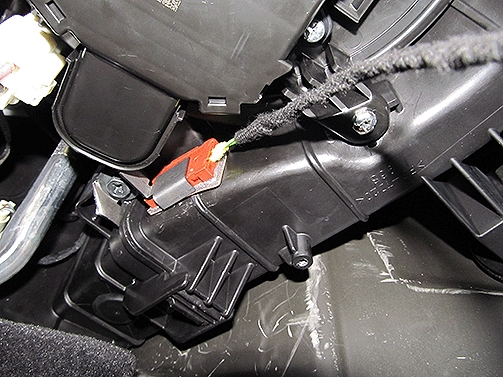
- Install the ionizer emitter bracket to the HVAC case with the supplied or existing screw.
Tighten
Tighten the screw to 9 Nm (79 lb in).
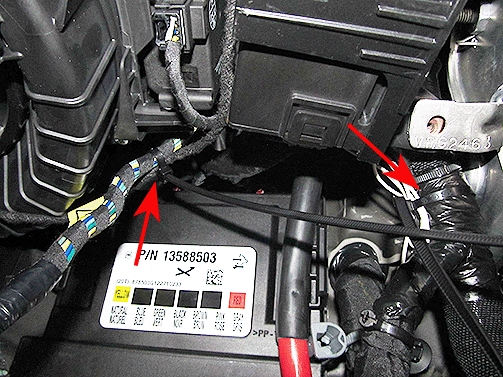
- With the supplied tie straps, secure the wiring harness in place.
- Place the carpet back in place.
- Install the floor front air outlet duct – right side. Refer to Floor Front Air Outlet Duct
Replacement – Right Side in SI. - Remove and install a new passenger cabin compartment carbon air filter.
- Install the instrument panel compartment. Refer to Instrument Panel Compartment
Replacement in SI. - Install the front floor console extension panel – right side. Refer to Front Floor Console
Extension Panel Replacement – Right Side in SI. - Install the front side door sill trim plate. Refer to Front Side Door Sill Trim Plate Replacement
in SI. - Enable the SIR. Refer to SIR Disabling and Enabling in SI.
- If the condition is still present, and the musty odor condition has been verified, the evaporator core should be replaced. Part number 23375992 should be installed.
Note: Do not apply any coatings to the replacement evaporator.
Parts Information
| Part Number | Description |
| 13356914 |
FILTER, PASS COMPT CARBON AIR |
| 23372329 | APPLICATOR TOOL* |
| 15632415 |
BODY PLUG |
| 23328151 | IONIZER KIT
Note: Ionizer Kits are currently in limited supply. This kit will be on order review and all DROs (Daily Replenishment Orders) will cancel. If determined that this part is needed for this field fix, order part on a CSO (Customer Special Order) and create a SPAC case. SPAC orders will be processed in the order received. All orders will be reviewed prior to being filled. Duplicate VIN orders will cancel. |
| 534-60646 | OXYVAP EVAPORATOR SANITIZER (Quantity of 4)** |
| *The Applicator Tool is reusable and does not need to be ordered for additional repairs. | |
| **Available through 1-800-GM-TOOLS (option 2) or by visiting www.GMDEsolutions.com (U.S.) or www.des-canada.ca (Canada). |
|
Warranty Information
For vehicles repaired under the Bumper-to-Bumper coverage (Canada Base Warranty coverage), use the following labor operation. Reference the Applicable Warranties section of Investigate Vehicle History (IVH) for coverage information.
| Labor Operation | Description | Labor Time |
| 4480308* | Inspect Drain Tube, Clean Evaporator and Install Ionizer | 2.8 hrs |
| Add | Replace Evaporator Core | 9.0 hrs
(ATS) |
| 8.7 hrs
(CTS) |
||
| *This is a unique Labor Operation for Bulletin use only. It will not be published in the Labor Time Guide. | ||
SEOCONTENT-END


